
In this article, we will walk you through the process of implementing fine grained access control for the data governance framework within the Cloudera platform. This will allow a data office to implement access policies over metadata management assets like tags or classifications, business glossaries, and data catalog entities, laying the foundation for comprehensive data access control.
In a good data governance strategy, it is important to define roles that allow the business to limit the level of access that users can have to their strategic data assets. Traditionally we see three main roles in a data governance office:
- Data steward: Defines the business rules for data use according to corporate guidance and data governance requirements.
- Data curator: Assigns and enforces data classification according to the rules defined by the data stewards so that data assets are searchable by the data consumer.
- Data consumer: Derives insights and value from data assets and is keen to understand the quality and consistency of tags and terms applied to the data.
Within the Cloudera platform, whether deployed on premises or using any of the leading public cloud providers, the Cloudera Shared Data Experience (SDX) ensures consistency of all things data security and governance. SDX is a fundamental part of any deployment and relies on two key open source projects to provide its data management functionality: Apache Atlas provides a scalable and extensible set of core governance services, while Apache Ranger enables, monitors, and manages comprehensive security for both data and metadata.
In this article we will explain how to implement a fine grained access control strategy using Apache Ranger by creating security policies over the metadata management assets stored in Apache Atlas.
Case Introduction
In this article we will take the example of a data governance office that wants to control access to metadata objects in the company’s central data repository. This allows the organization to comply with government regulations and internal security policies. For this task, the data governance team started by looking at the finance business unit, defining roles and responsibilities for different types of users in the organization.
In this example, there are three different users that will allow us to show the different levels of permissions that can be assigned to Apache Atlas objects through Apache Ranger policies to implement a data governance strategy with the Cloudera platform:
- admin is our data steward from the data governance office
- etl_user is our data curator from the finance team
- joe_analyst is our data consumer from the finance team
Note that it would be just as easy to create additional roles and levels of access, if required. As you will see as we work through the example, the framework provided by Apache Atlas and Apache Ranger is extremely flexible and customizable.
First, a set of initial metadata objects are created by the data steward. These will allow the finance team to search for relevant assets as part of their day-to-day activities:
- Classifications (or “tags”) like “PII”, “SENSITIVE”, “EXPIRES_ON”, “DATA QUALITY” etc.
- Glossaries and terms created for the three main business units: “Finance,” “Insurance,” and “Automotive.”
- A business metadata collection called “Project.”
NOTE: The creation of the business metadata attributes is not included in the blog but the steps can be followed here.
Then, in order to control the access to the data assets related to the finance business unit, a set of policies need to be implemented with the following conditions:
The finance data curator <etl_user> should only be allowed to:
- Create/read classifications that start with the word “finance.”
- Read/update entities that are classified with any tag that starts with the word “finance,” and also any entities related to the “worldwidebank” project. The user should also be able to add labels and business metadata to those entities.
- Add/update/remove classifications of the entities with the previous specifications.
- Create/read/update the glossaries and glossary terms related to “finance.”
The finance data consumer <joe_analyst> should only be allowed to:
- View and access cClassifications related to “finance” to search assets.
- View and access entities that are classified with tags related to “finance.”
- View and access the “finance” glossary.
In the following section, the process for implementing these policies will be explained in detail.
Implementation of fine-grained access controls (step by step)
In order to meet the business needs outlined above, we will demonstrate how access policies in Apache Ranger can be configured to secure and control metadata assets in Apache Atlas. For this purpose we used a public AMI image to set up a Cloudera Data Platform environment with all SDX components. The process of setting up the environment is explained in this article.
1. Authorization for Classification Types
Classifications are part of the core of Apache Atlas. They are one of the mechanisms provided to help organizations find, organize, and share their understanding of the data assets that drive business processes. Crucially, classifications can “propagate” between entities according to lineage relationships between data assets. See this page for more details on propagation.
1.1 Data Steward – admin user
To control access to classifications, our admin user, in the role of data steward, must perform the following steps:
- Access the Ranger console.
- Acces Atlas repository to create and manage policies.
- Create the appropriate policies for the data curator and the data consumer of the finance business unit.
First, access the Atlas Ranger policies repository from the Ranger admin UI
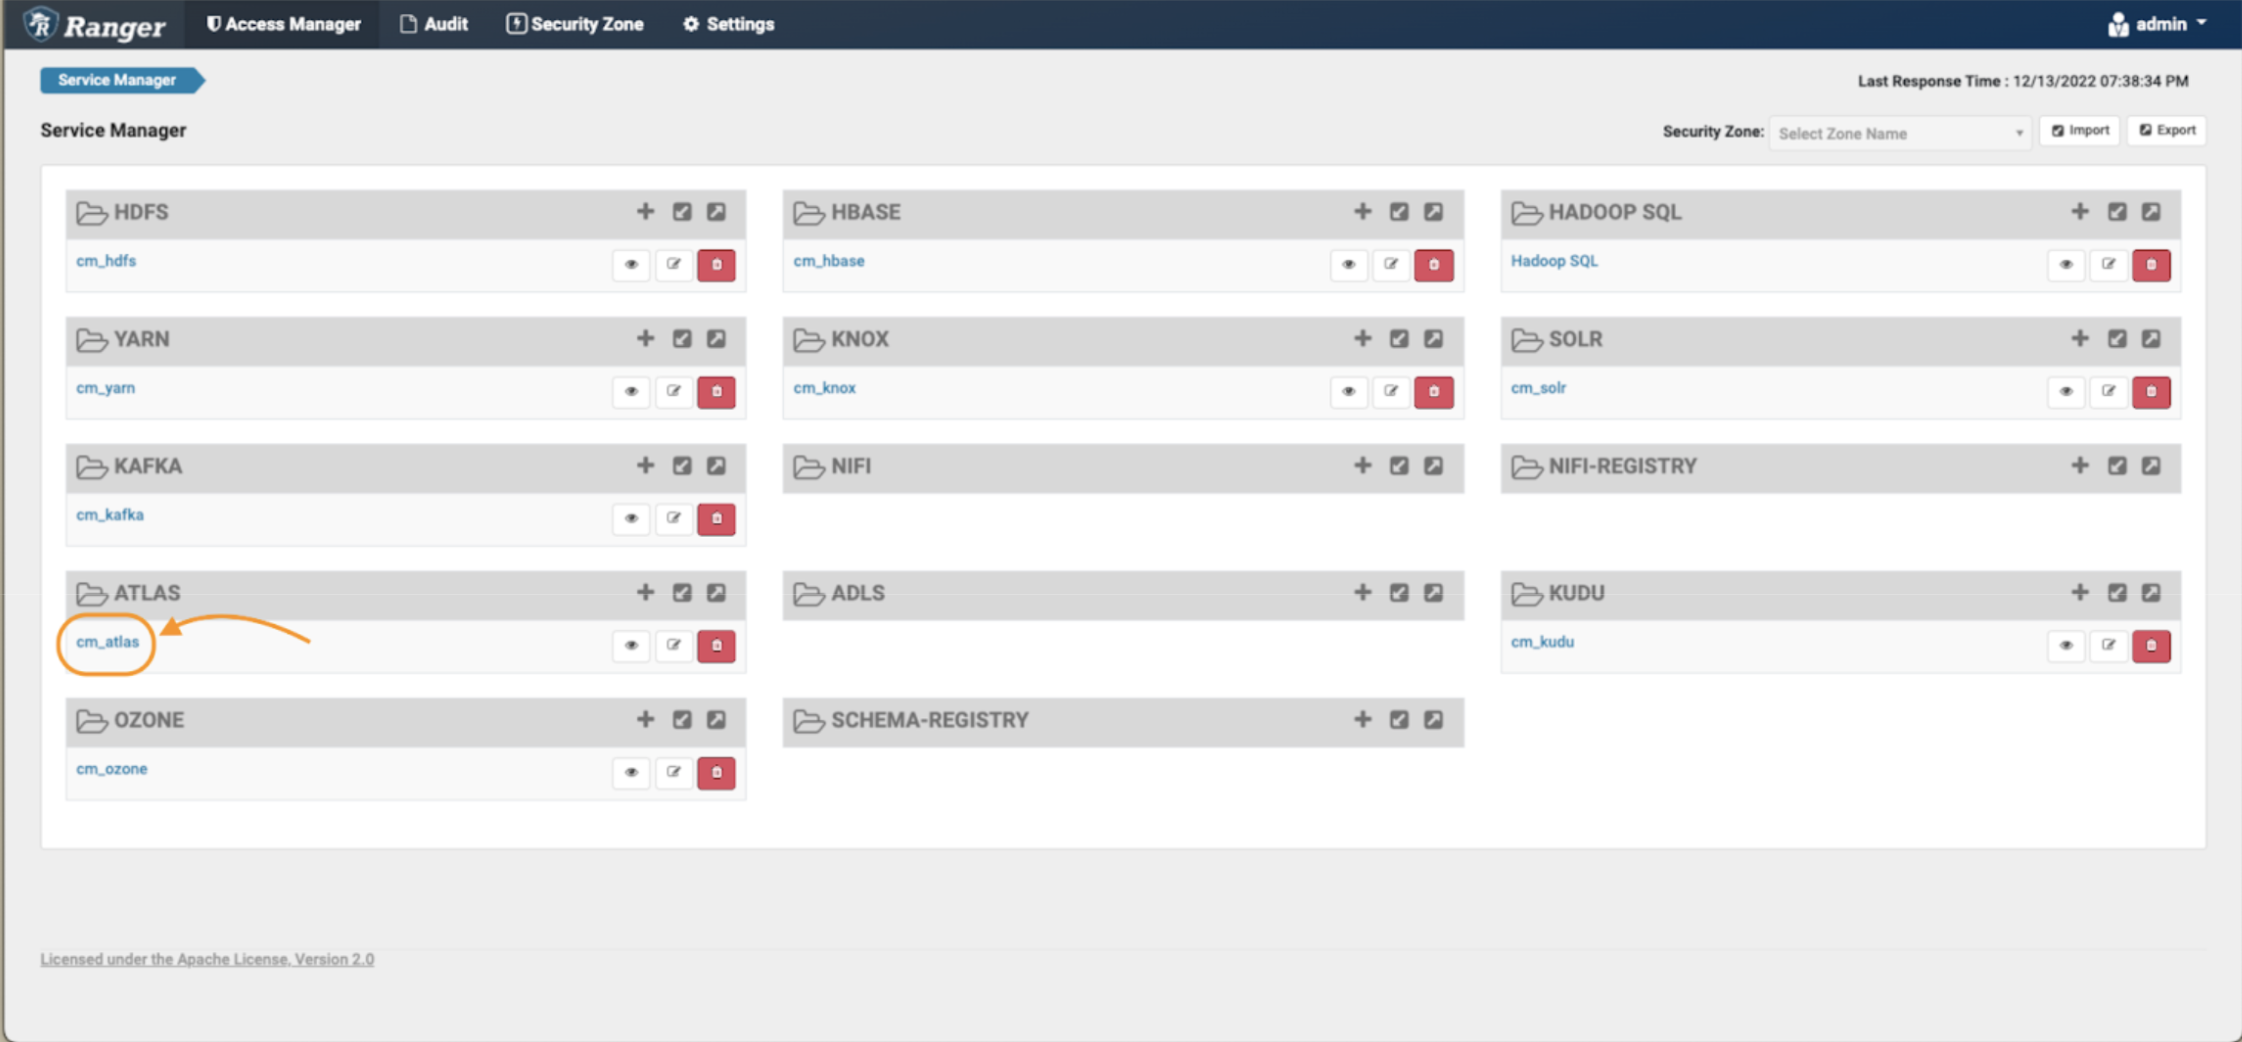
Image 1 – Ranger main page
In the Atlas policy repository:
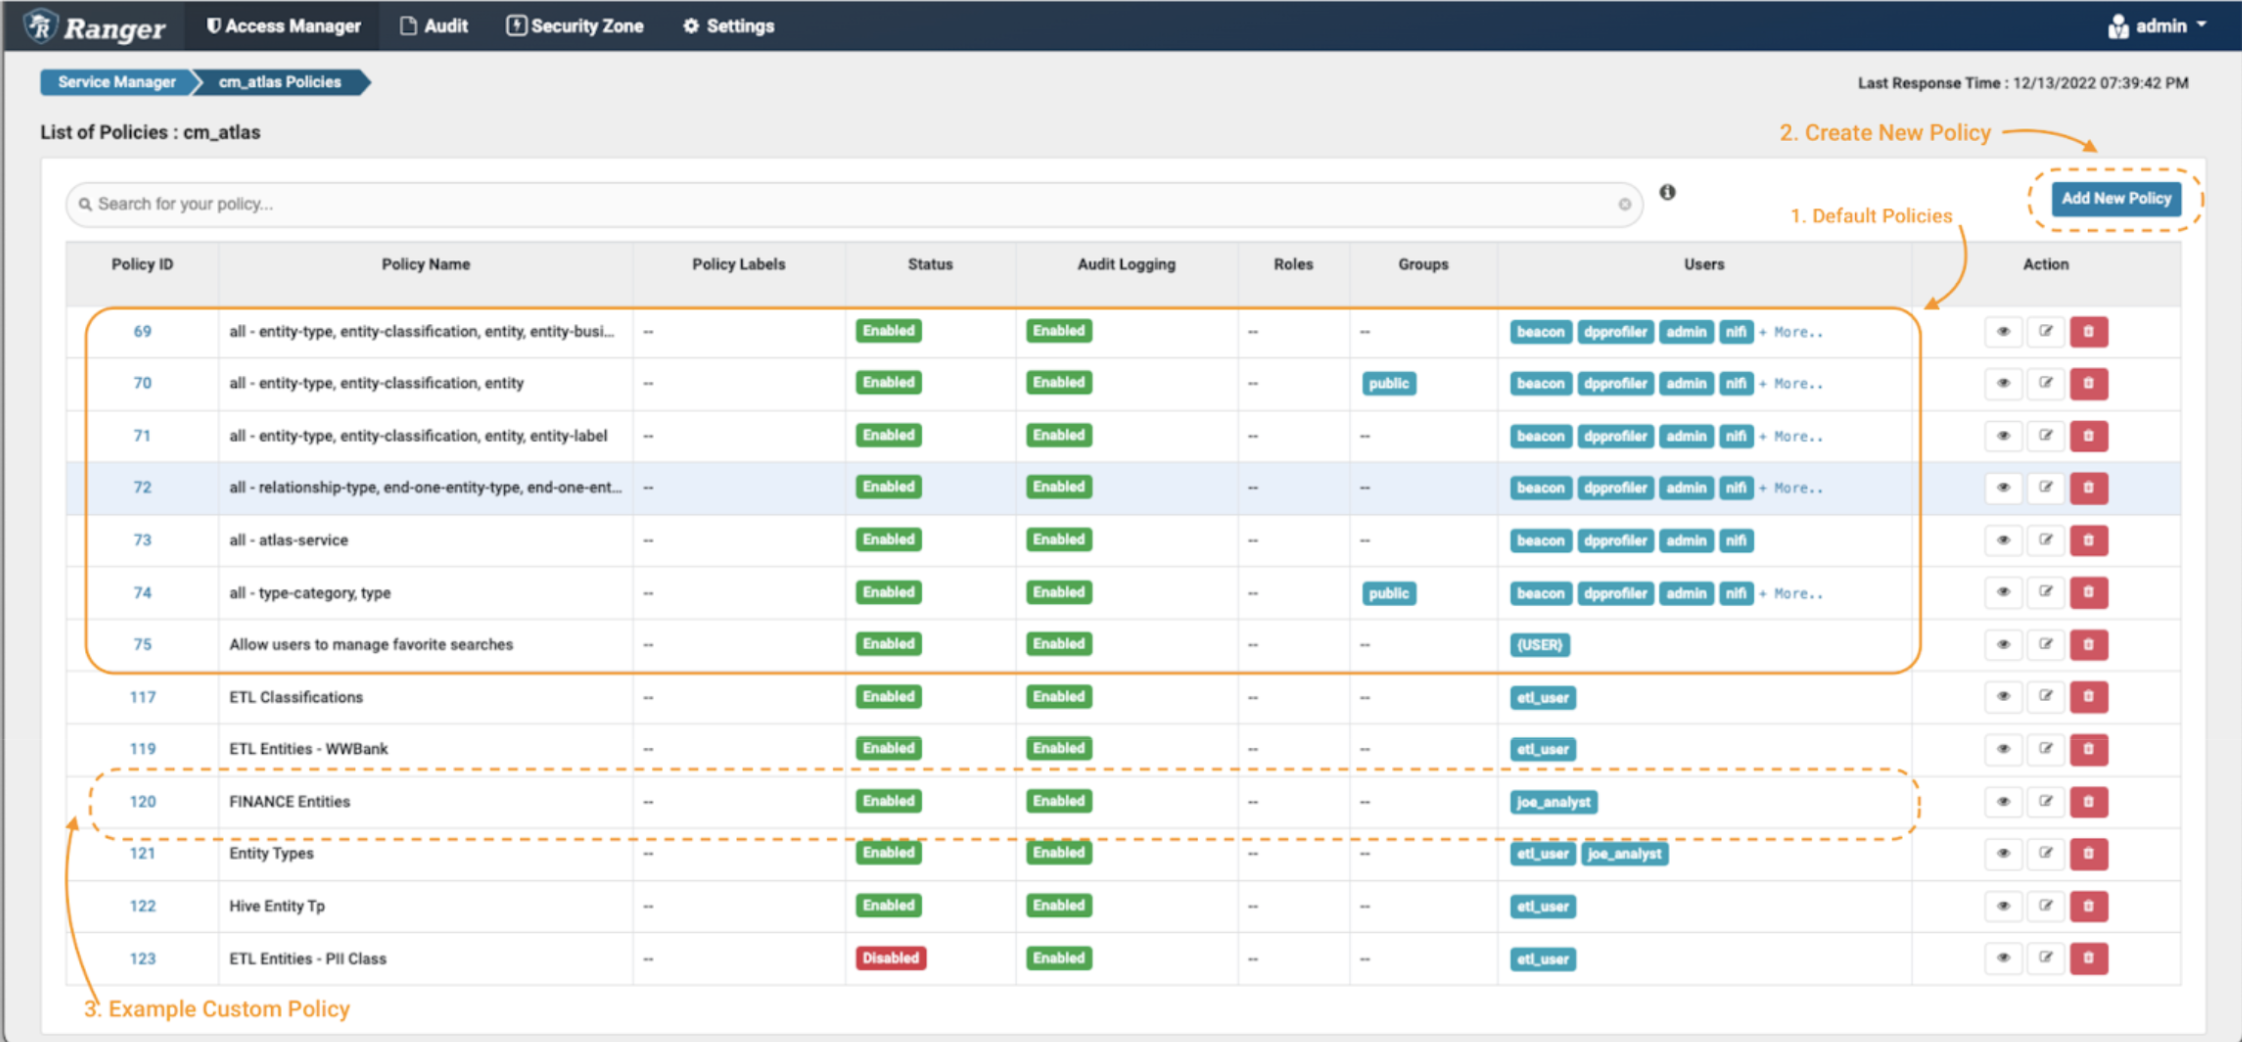
Image 2 – Atlas policies
The first thing you will see are the default Atlas policies (note 1). Apache Ranger allows specification of access policies as both “allow” rules and “deny” rules. However, it is a recommended good practice in all security contexts to apply the “principle of least privilege”: i.e., deny access by default, and only allow access on a selective basis. This is a much more secure approach than allowing access to everyone, and only denying or excluding access selectively. Therefore, as a first step, you should verify that the default policies don’t grant blanket access to the users we are seeking to restrict in this example scenario.Then, you can create the new policies (eg. remove the public access of the default policies by creating a deny policy; note 2) and finally you will see that the newly created policies will appear at the bottom of the section (note 3).
After clicking the “Add New Policy” button:
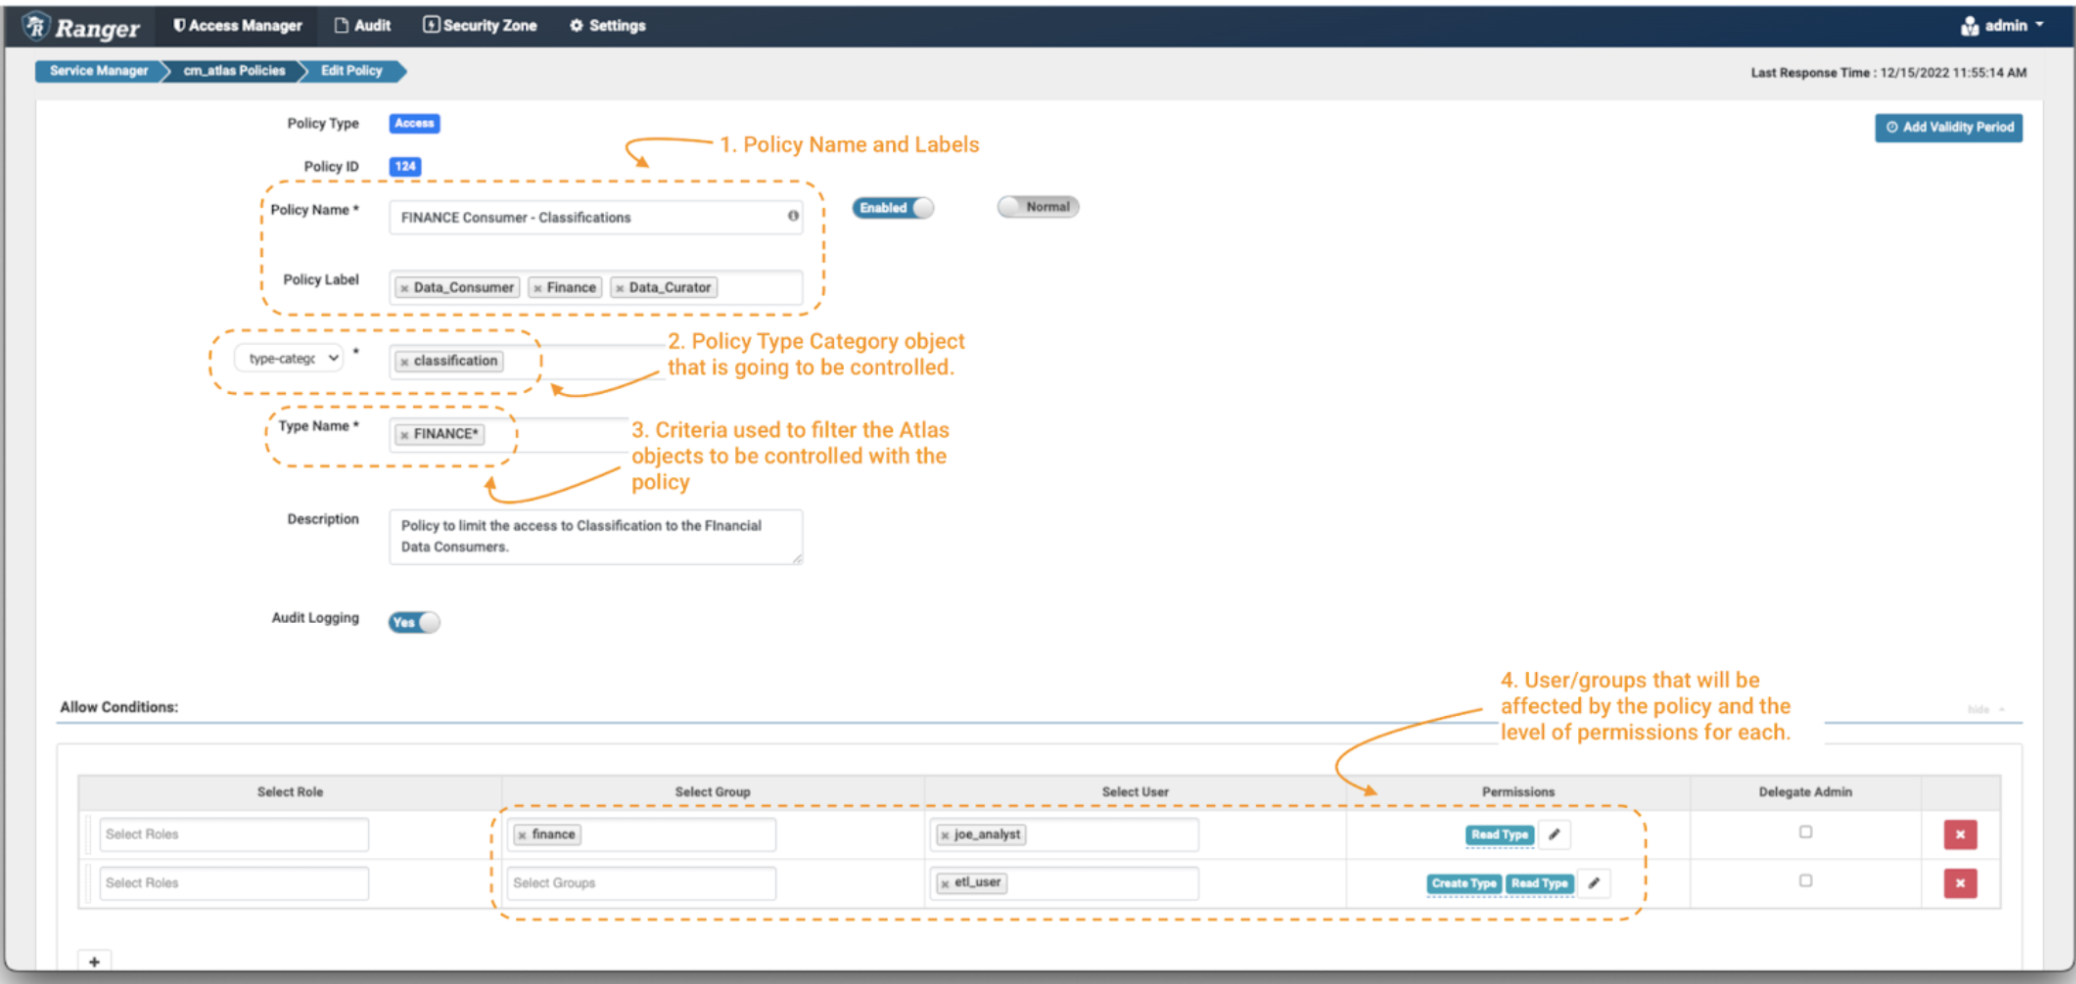
Image 3 – Create policy over finance classification
- First, define a policy name and, if desired, some policy labels (note 1). These do not have a “functional” effect on the policy, but are an important part of keeping your security policies manageable as your environment grows over time. It is normal to adopt a naming convention for your policies, which may include short-hand descriptions of the user groups and/or assets to which the policy applies, and an indication of its intent. In this case we have chosen the policy name “FINANCE Consumer – Classifications,” and used the labels “Finance.” “Data Governance,” and “Data Curator.”
- Next, define the type of object on which you want to apply the policy. In this case we will select “type-category” and fill with “Classifications” (note 2).
- Now, you need to define the criteria used to filter the Apache Atlas objects to be affected by the policy. You can use wildcard notations like “*”. To limit the data consumer to only search for classifications starting with the work finance, use FINANCE* (note 3).
Finally, you need to define the permissions that you want to grant on the policy and the groups and users that are going to be controlled by the policy. In this case, apply the Read Type permission to group: finance and user: joe_analyst and Create Type & Read Type permission to user: etl_user. (note 4)
Now, because they have the Create Type permission for classifications matching FINANCE*, the data curator etl_user can create a new classification tag called “FINANCE_WW” and apply this tag to other entities. This would be useful if a tag-based access policy has been defined elsewhere to provide access to certain data assets.
1.2 Data Curator – etl_user user
We can now demonstrate how the classification policy is being enforced over etl_user. This user is only allowed to see classifications that start with the word finance, but he can also create some additional ones for the different teams under that division.
etl_user can create a new classification tag called FINANCE_WW under a parent classification tag FINANCE_BU.
To create a classification in Atlas:
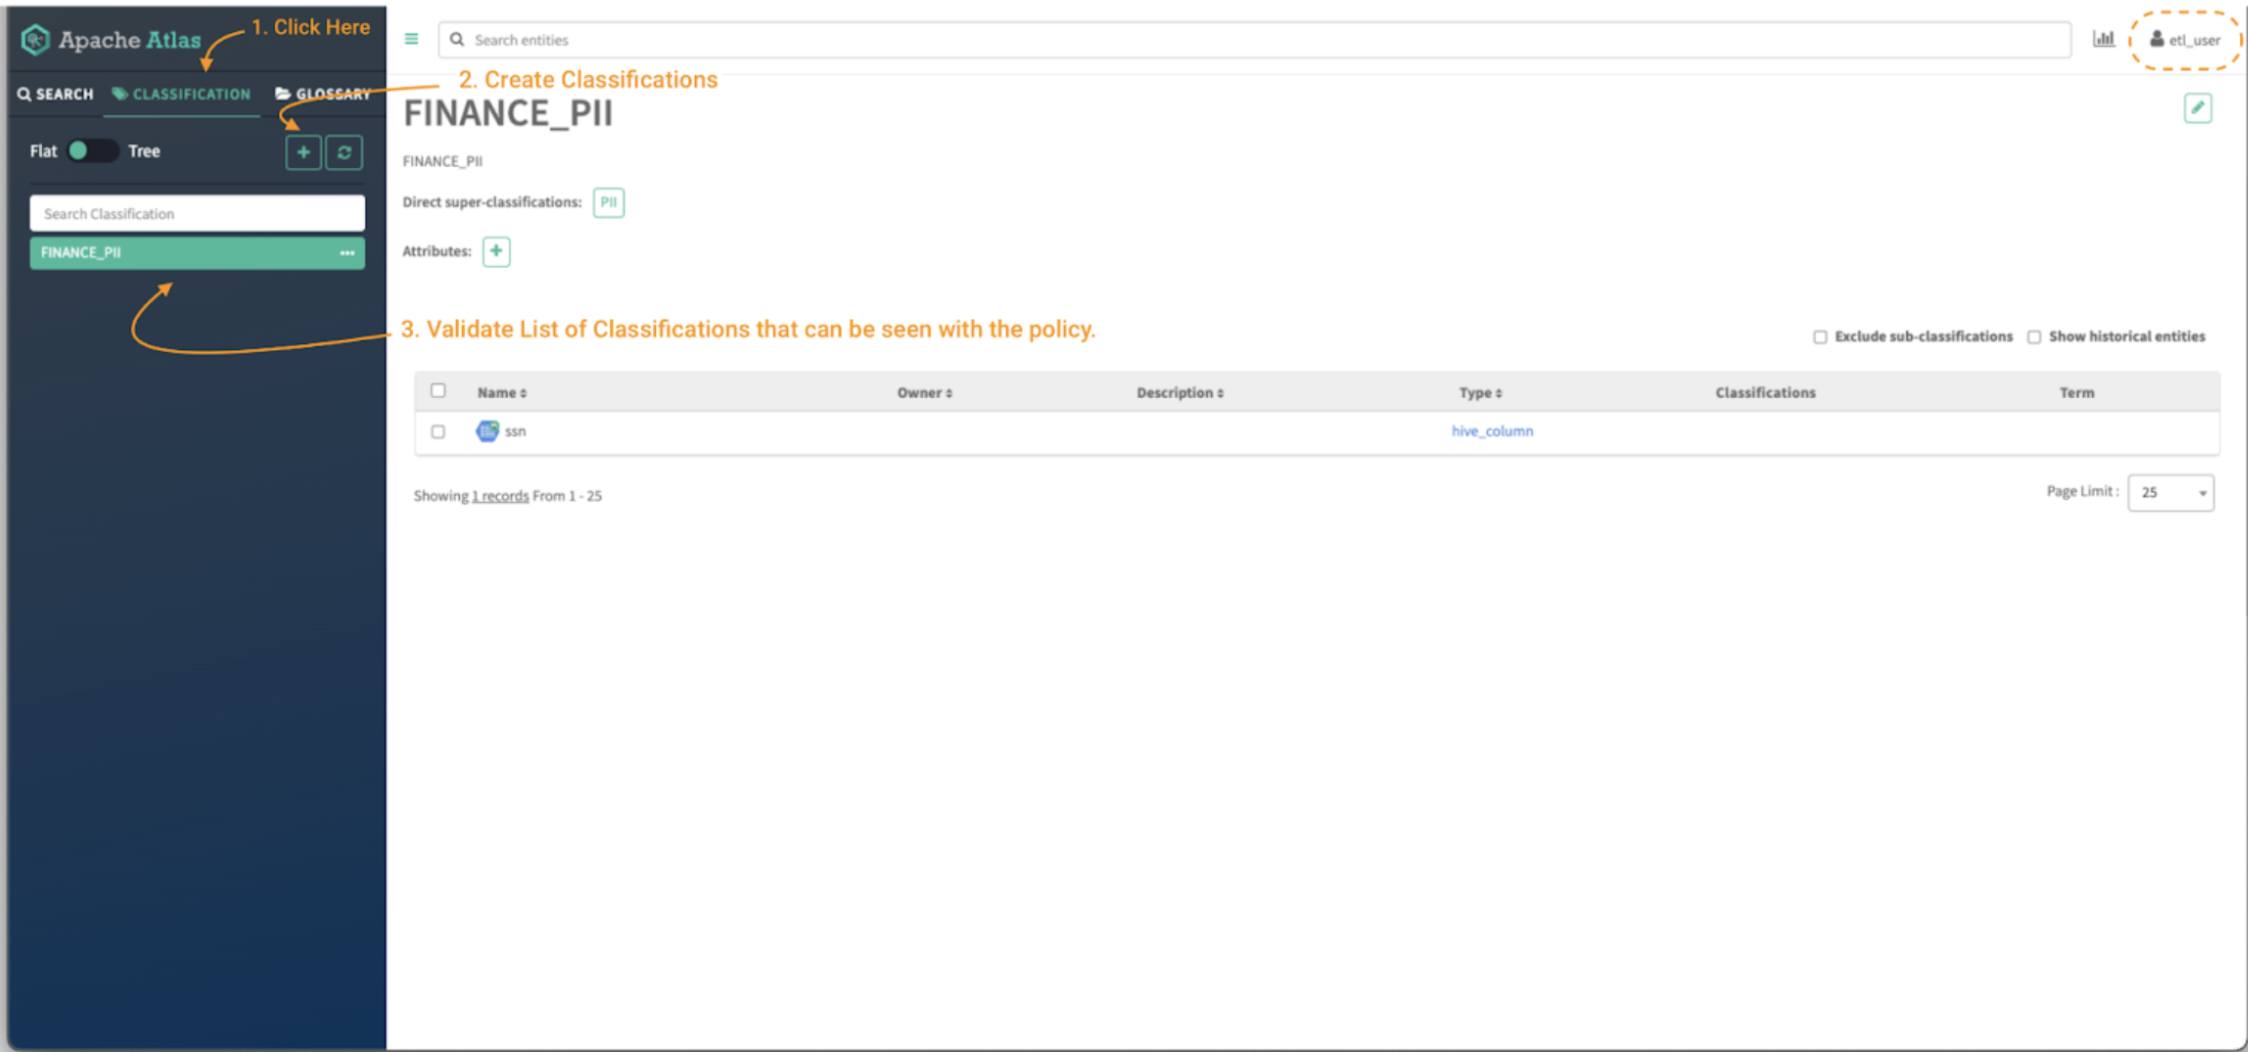
Image 4 – Atlas classifications tab
- First, click on the classification panel button (note 1) to be able to see the existing tags that the user has access to. You will be able to see the assets that are tagged with the selected classification. (note 3)
Then, click on the “+” button to create a new classification. (note 2)
A new window open, requiring various details to create the new classification
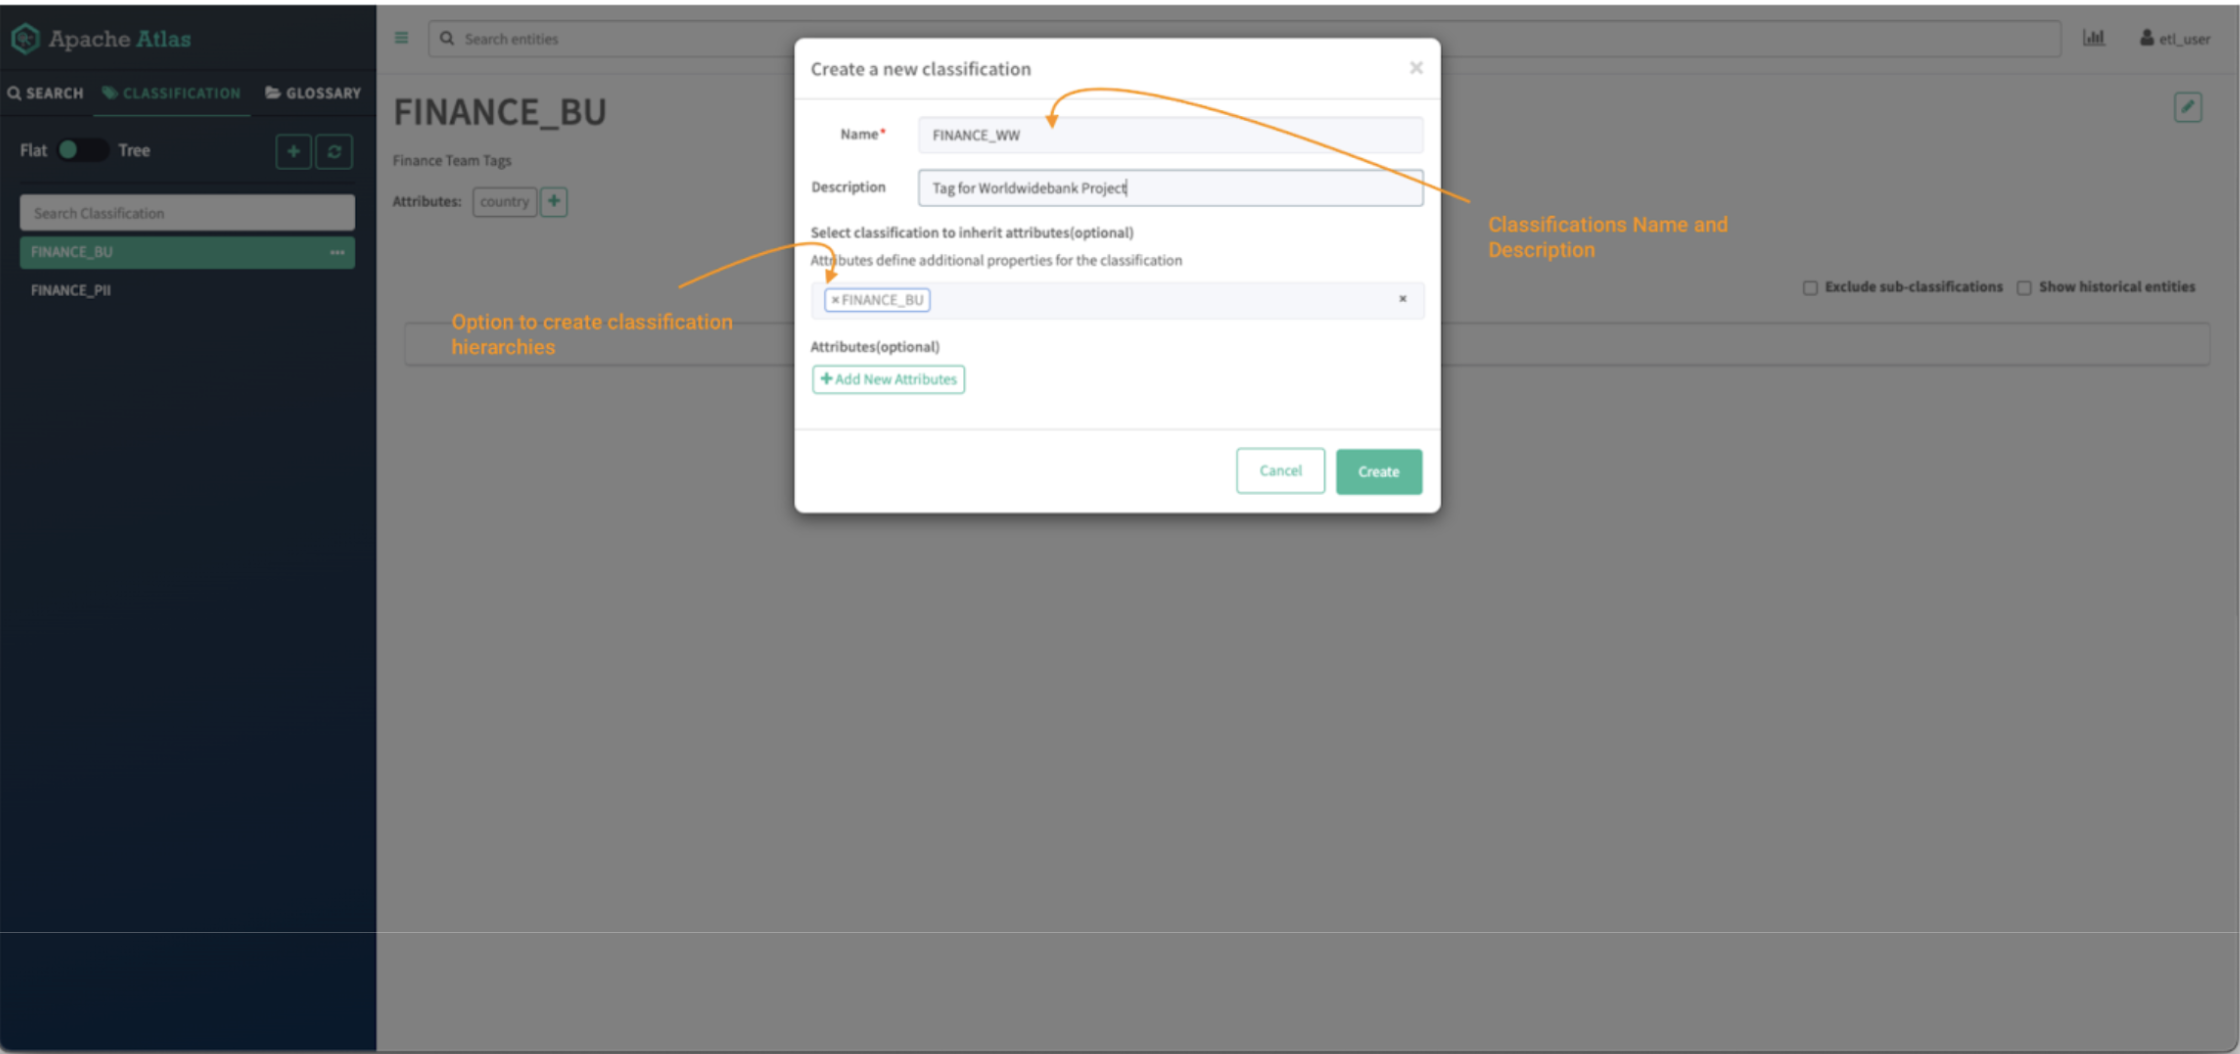
Image 5 – Atlas classifications creation tab
- First, provide the name of the classification, in this case FINANCE_WW, and provide a description, so that colleagues will understand how it should be used..
- Classifications can have hierarchies and those inherit attributes from the parent classification. To create a hierarchy, type the name of the parent tag, in this case FINANCE_BU.
- Additional custom attributes can also be added to later be used on attribute-based access control (ABAC) policies. This falls outside of the scope of this blog post but a tutorial on the subject can be found here.
(Optional) For this example, you can create an attribute called “country,” which will simply help to organize assets. For convenience you can make this attribute a “string” (a free text) type, although in a live system you would probably want to define an enumeration so that users’ inputs are restricted to a valid set of values.
After clicking the button “create” the newly created classification is shown in the panel:
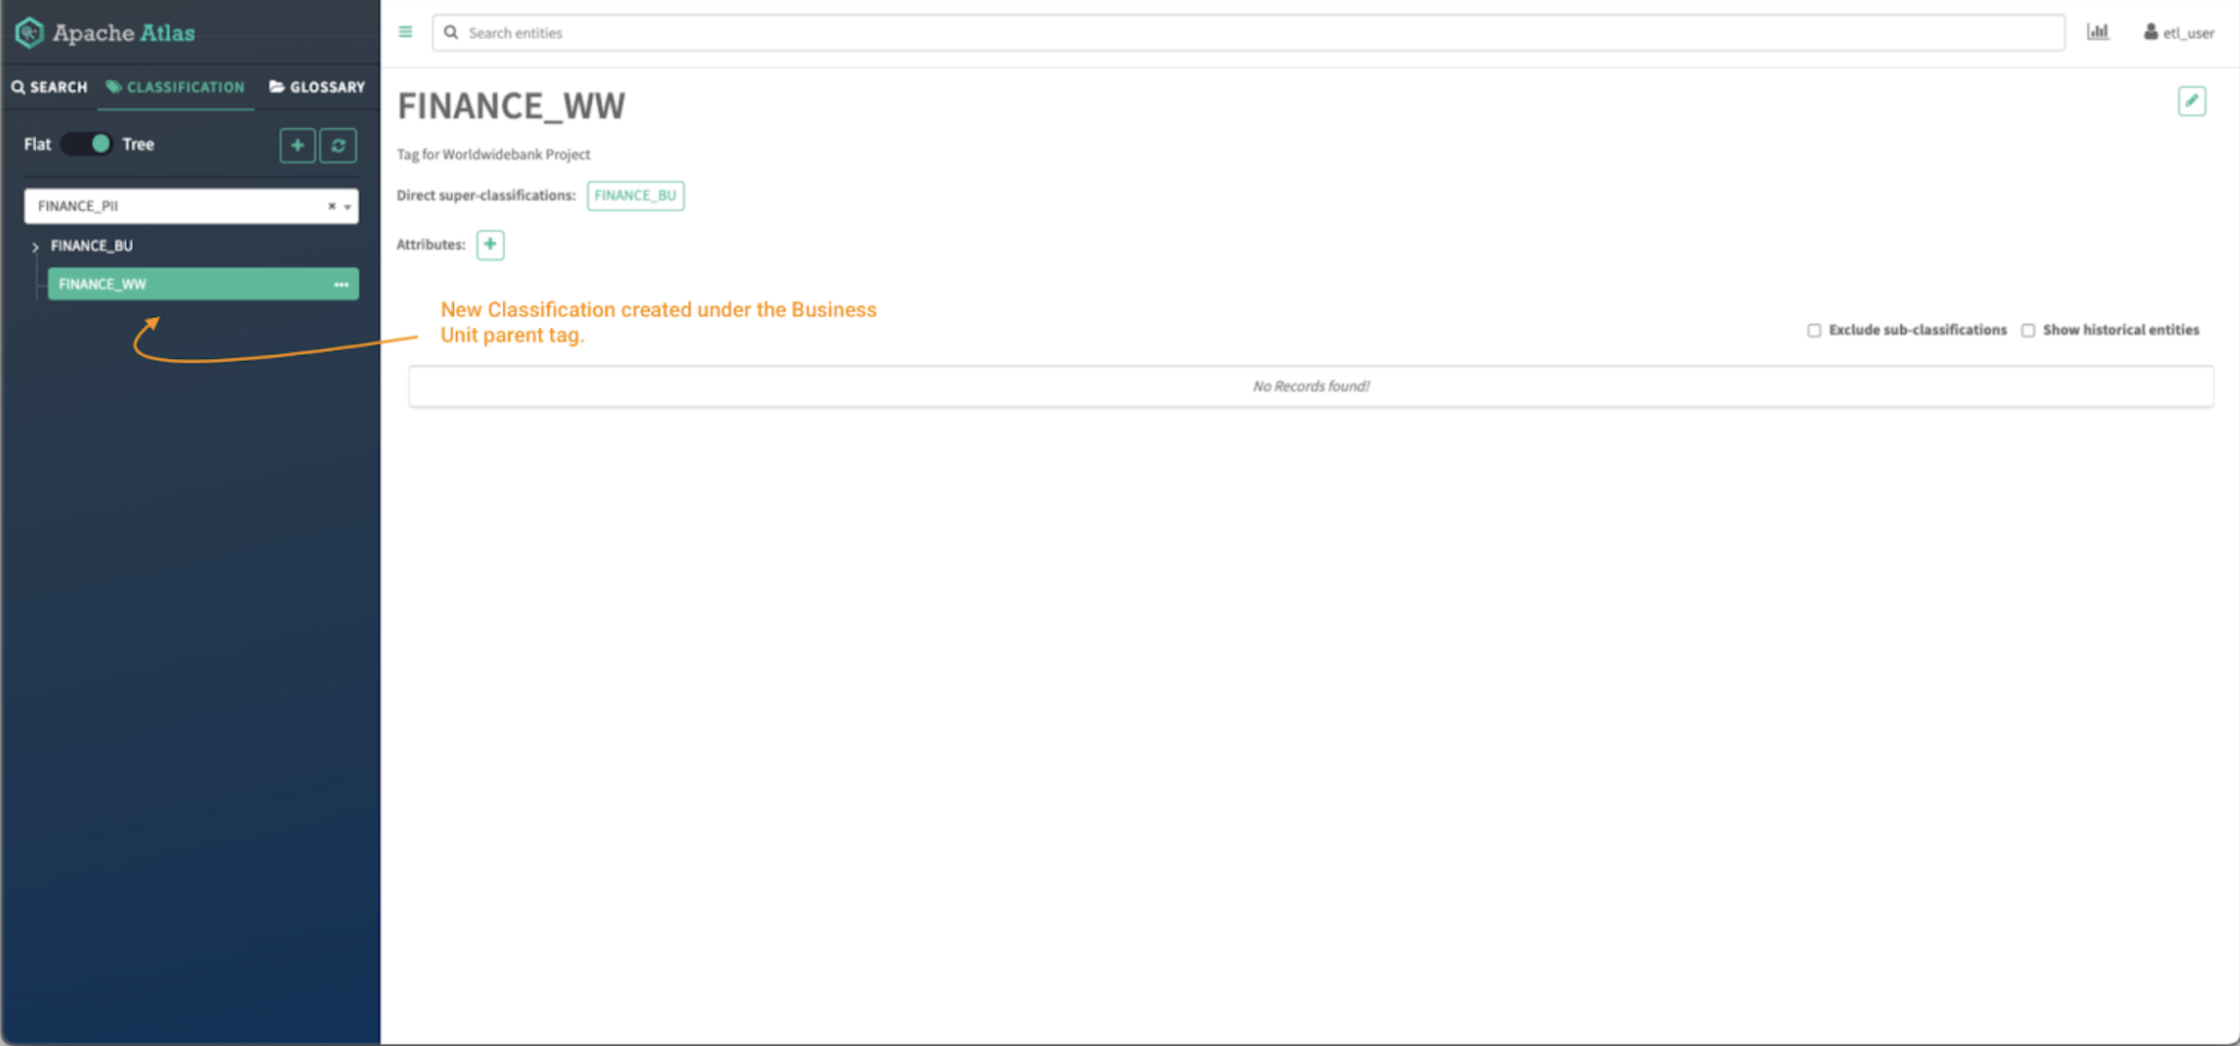
Image 6 – Atlas classifications tree
Now you can click on the toggle button to see the tags in tree mode and you will be able to see the parent/child relationship between both tags.
Click on the classification to view all its details: parent tags, attributes, and assets currently tagged with the classification.
1.3 Data Consumer – joe_analyst user
The last step on the Classification authorization process is to validate from the data consumer role that the controls are in place and the policies are applied correctly.
After successfully logging in with user joe_analyst:
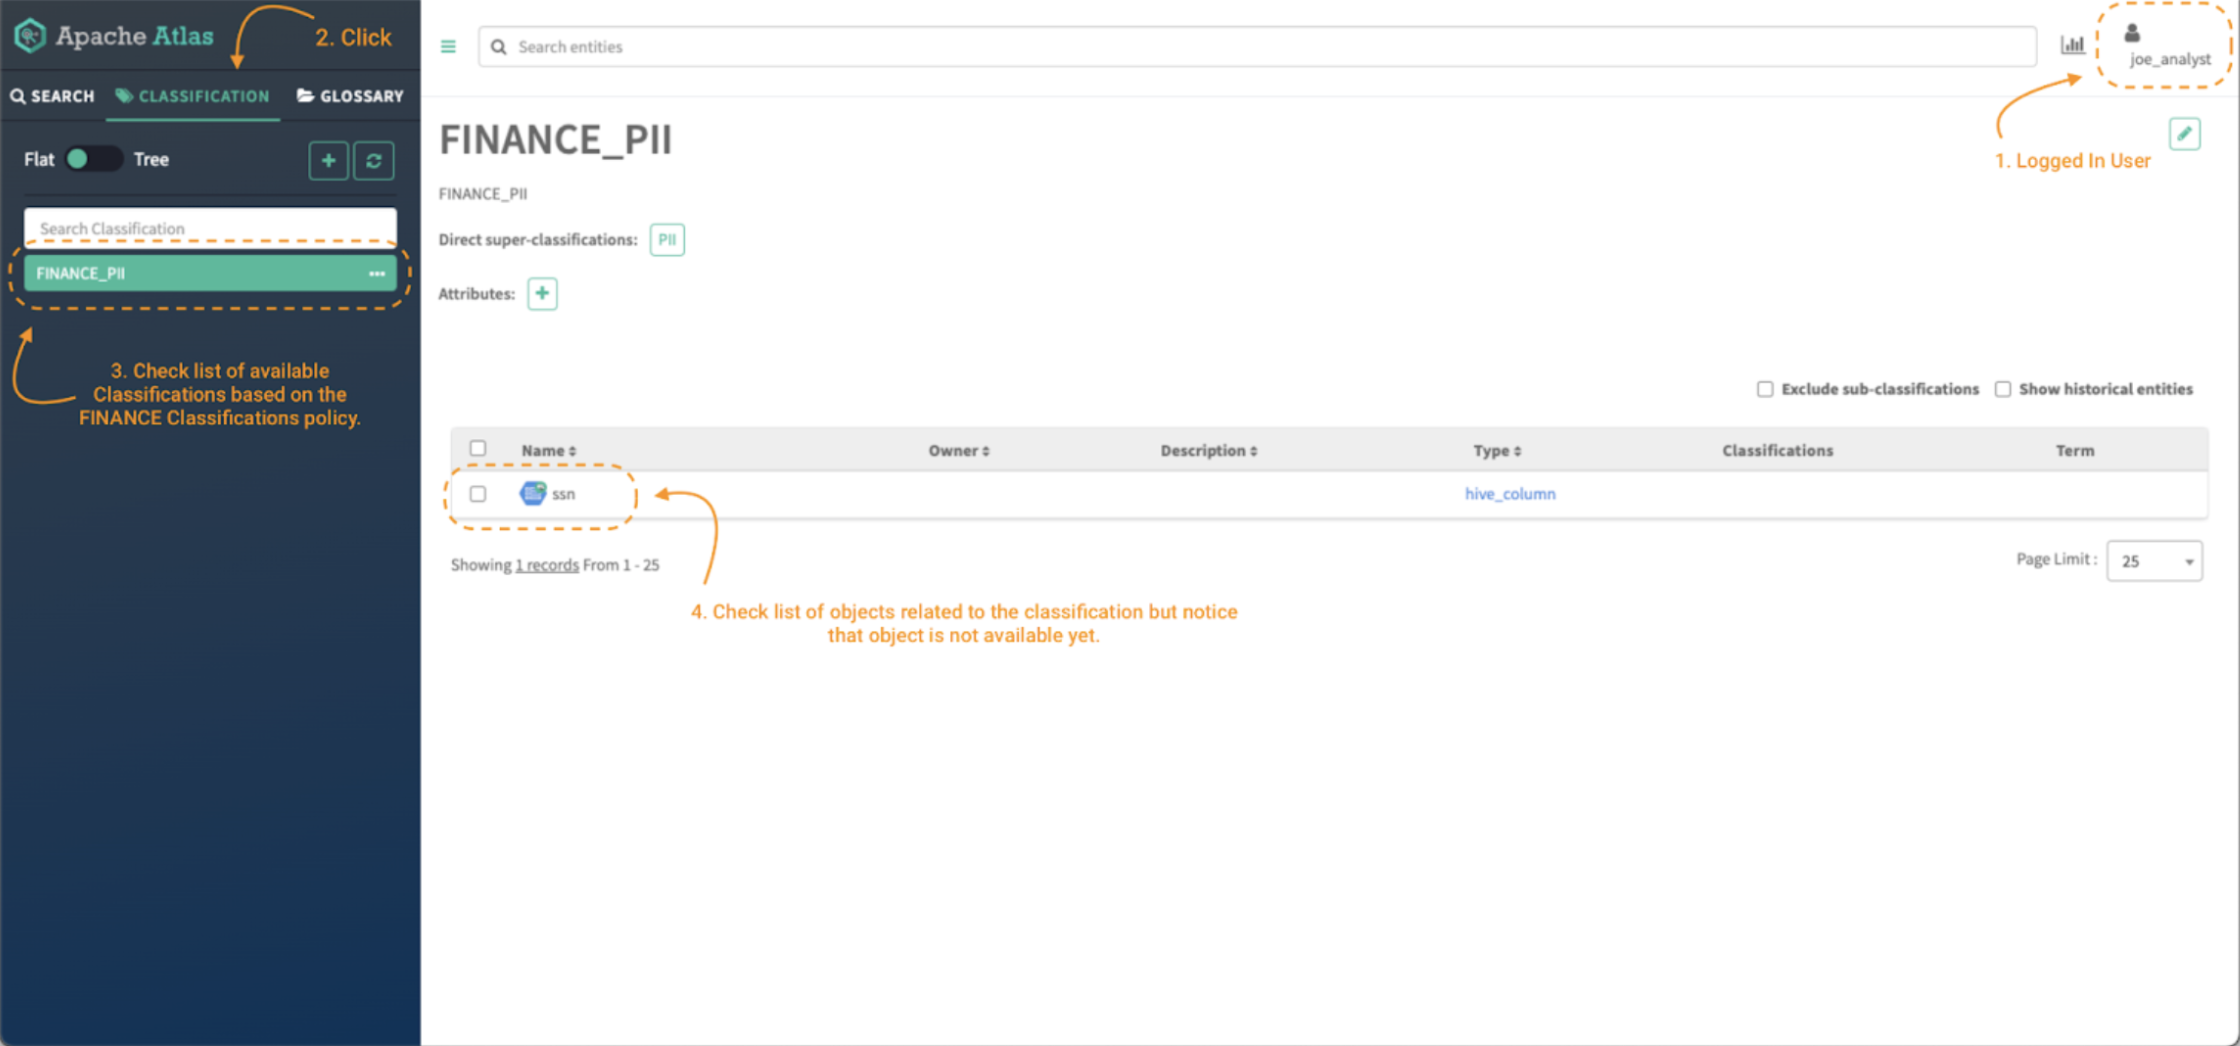
Image 7 – Atlas classifications for finance data consumer
To validate that the policy is applied and that only classifications starting with the word FINANCE can be accessed based on the level of permissions defined in the policy, click on the Classifications tab (note 2) and check the list available. (note 3)
Now, to be able to access the content of the entities (note 4), it is required to give access to the Atlas Entity Type category and to the specific entities with the corresponding level of permissions based on our business requirements. The next section will cover just that.
2. Authorization for Entity Types, Labels and Business Metadata
In this section, we will explain how to protect additional types of objects that exist in Atlas, which are important within a data governance strategy; namely, entities, labels, and business metadata.
Entities in Apache Atlas are a specific instance of a “type” of thing: they are the core metadata object that represent data assets in your platform. For example, imagine you have a data table in your lakehouse, stored in the Iceberg table format, called “sales_q3.” This would be reflected in Apache Atlas by an entity type called “ceberg table,” and an entity named “sales_q3,” a particular instance of that entity type. There are many entity types configured by default in the Cloudera platform, and you can define new ones as well. Access to entity types, and specific entities, can be controlled through Ranger policies.
Labels are words or phrases (strings of characters) that you can associate with an entity and reuse for other entities. They are a light-weight way to add information to an entity so you can find it easily and share your knowledge about the entity with others.
Business metadata are sets of related key-value pairs, defined in advance by admin users (for example, data stewards). They are so named because they are often used to capture business details that can help organize, search, and manage metadata entities. For example, a steward from the marketing department can define a set of attributes for a campaign, and add these attributes to relevant metadata objects. In contrast, technical details about data assets are usually captured more directly as attributes on entity instances. These are created and updated by processes that monitor data sets in the data lakehouse or warehouse, and are not typically customized in a given Cloudera environment.
With that context explained, we will move on to setting policies to control who can add, update, or remove various metadata on entities. We can set fine-grained policies separately for both labels and business metadata, as well as classifications. These policies are defined by the data steward, in order to control activities undertaken by data curators and consumers.
2.1 Data Steward – admin user
First, it’s important to make sure that the users have access to the entity types in the system. This will allow them to filter their search when looking for specific entities.
In order to do so, we need to create a policy:
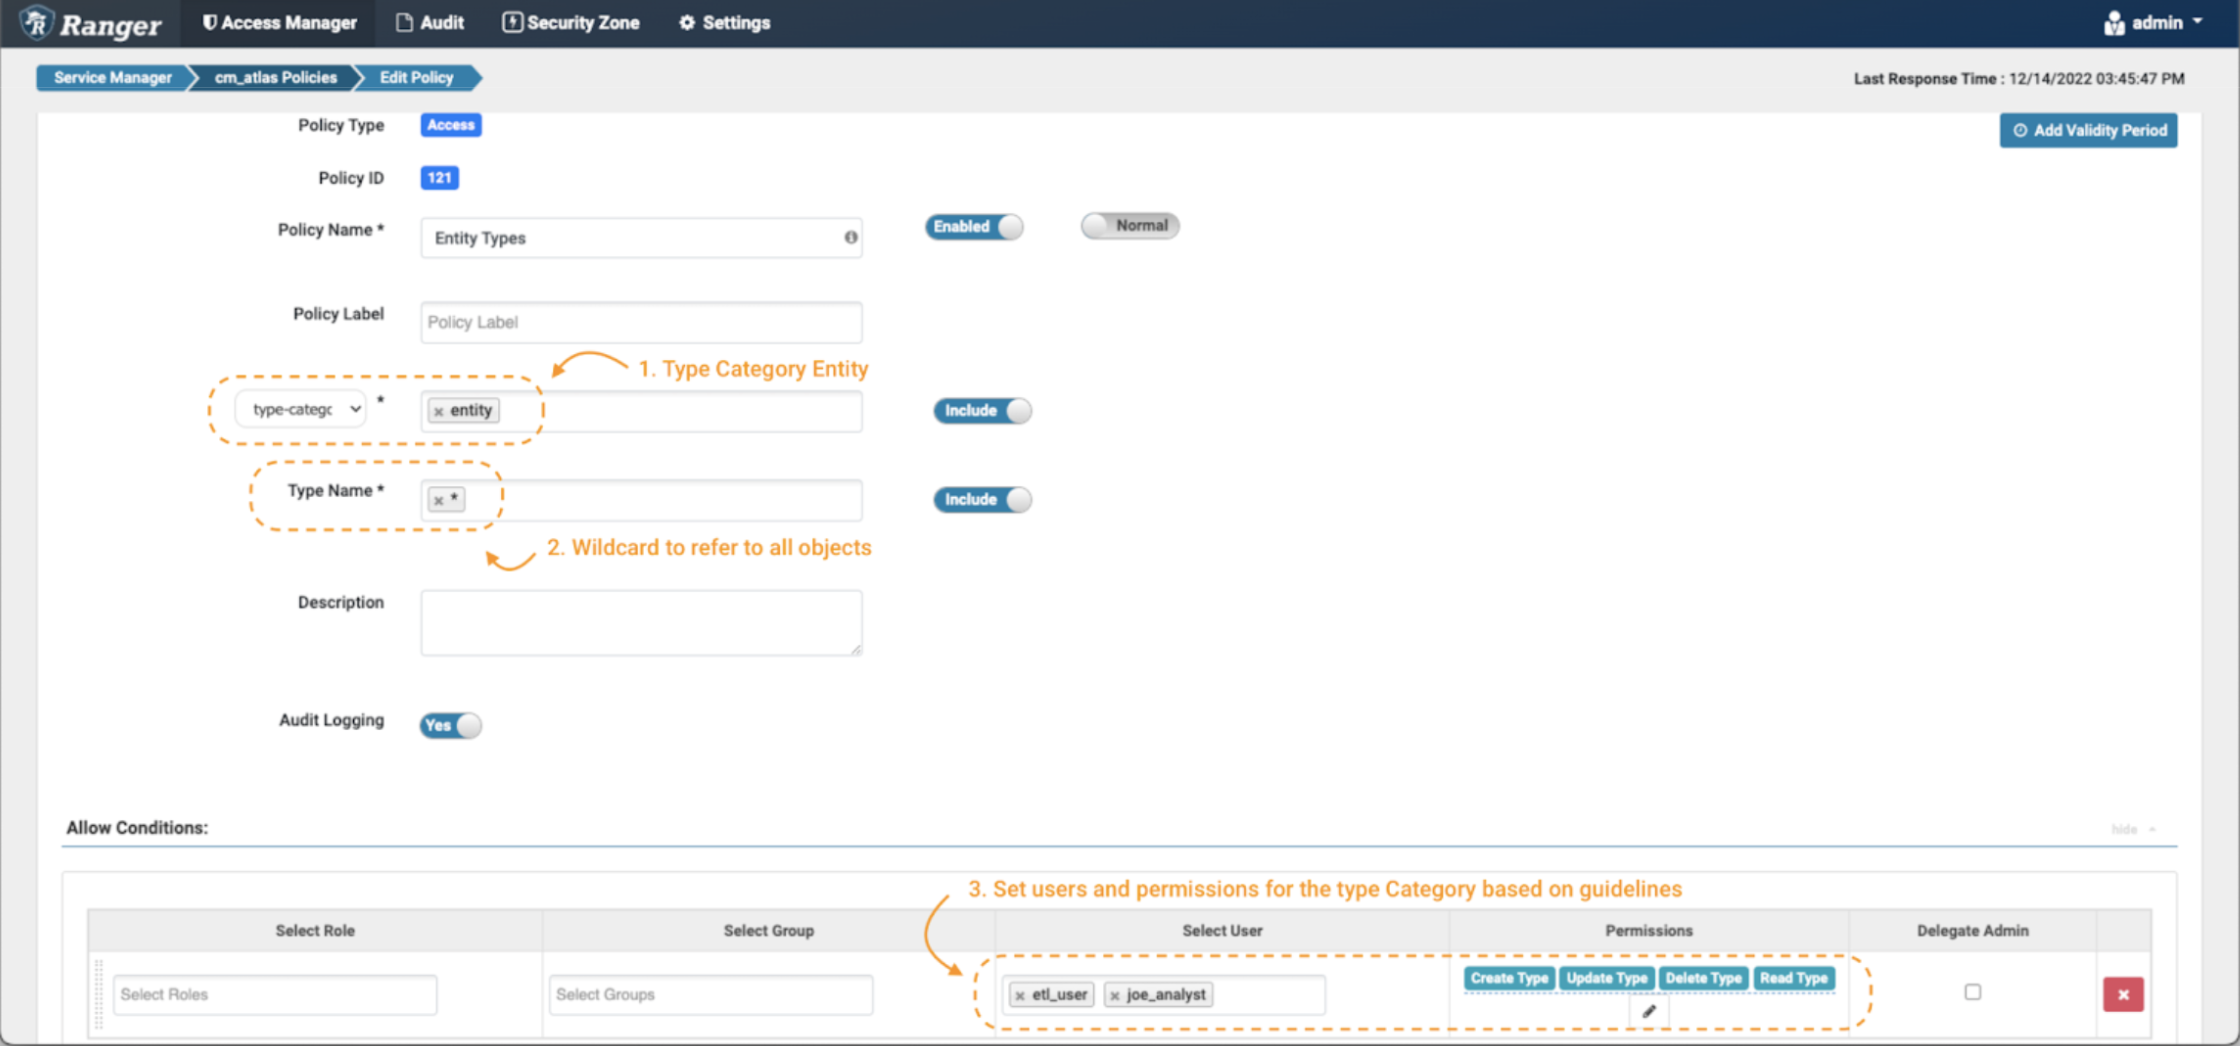
Image 8 – Atlas entity type policies
In the create policy page, define the name and labels as described before. Then, select the type-category “entity”(note 1). Use the wildcard notation (*) (note 2) to denote all entity types, and grant all available permissions to etl_user and joe_analyst.(note 3)
This will enable these users to see all the entity types in the system.
The next step is to allow data consumer joe_analyst to only have read access on the entities that have the finance classification tags. This will limit the objects that he will be able to see on the platform.
To do this, we need to follow the same process to create policies as shown in the previous section, but with some modifications on the policy details:
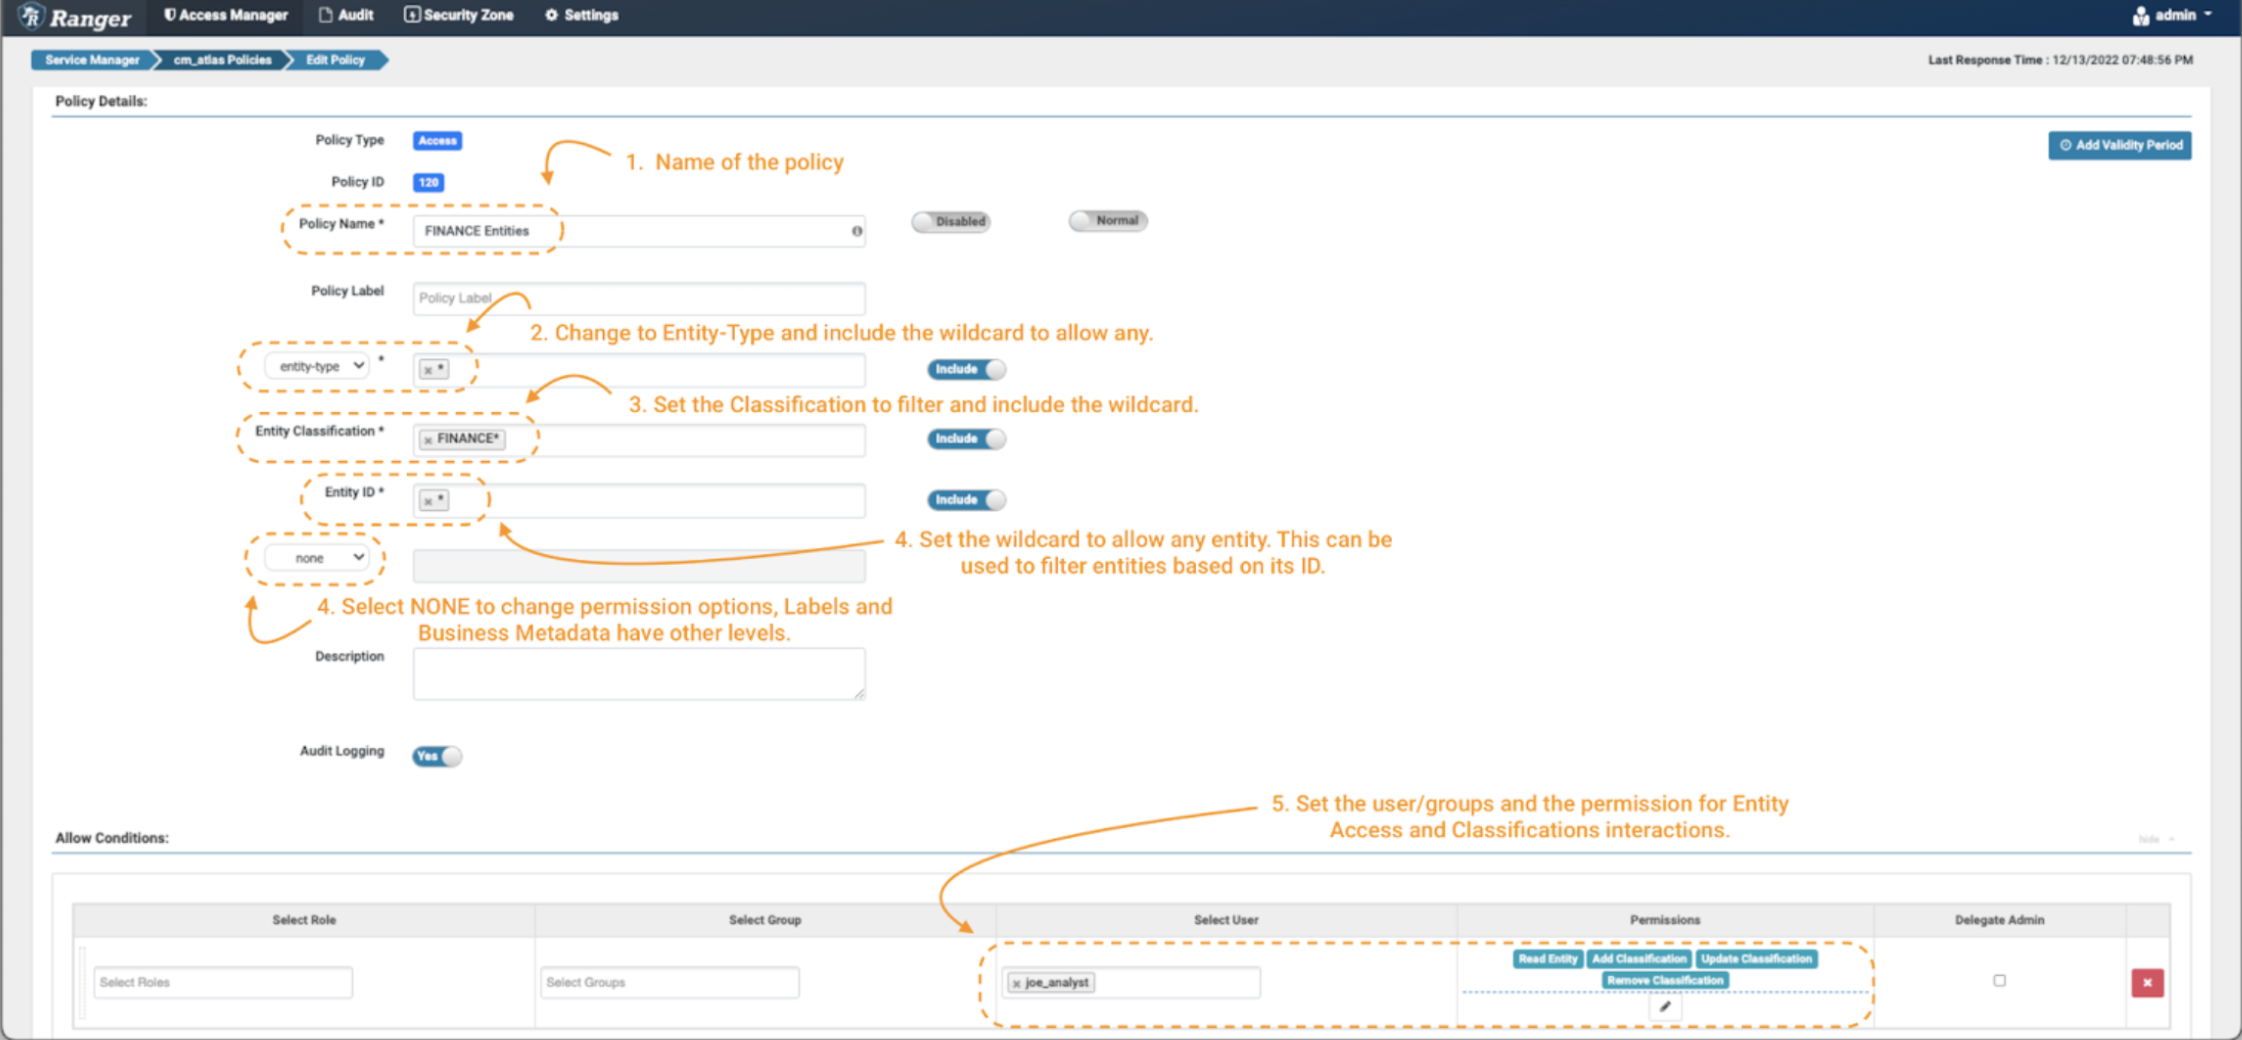
Image 9 – Example Atlas finance entity policies
- As always, name (and label) the policy to enable easy management later.
- The first important change is that the policy is applied on an “entity-type” and not in a “type-category.” Select “entity-type” in the drop-down menu (note 2) and type the wildcard to apply it to all the entity types.
- Some additional fields will appear in the form. In the entity classification field you can specify tags that exist on the entities you want to control. In our case, we want to only allow objects that are tagged with words that start with “finance.” Use the expression FINANCE*. (note 3)
- Next, filter the entities to be controlled through the entity ID field. In this exercise, we will use the wildcard (*) (note 4) and for the additional fields we will select “none.” This button will update the list of permissions that can be enforced in the conditions panel. (note 4)
- As a data consumer, we want the joe_analyst user to be able to see the entities. To implement this, select the Read Entity permission. (note 5)
- Add a new condition for the data curator etl_user but this time include permissions to modify the tags appropriately, by adding the Add Classification, Update Classification & Remove Classification permissions to the specific user.
In this way, access to specific entities can be controlled using additional metadata objects like classification tags. Atlas provides some other metadata objects that can be used not only to enrich the entities registered in the platform, but also to implement a governance strategy over those objects, controlling who can access and modify them. This is the case for the labels and the business metadata.
If you want to enforce some control over who can add or remove labels:
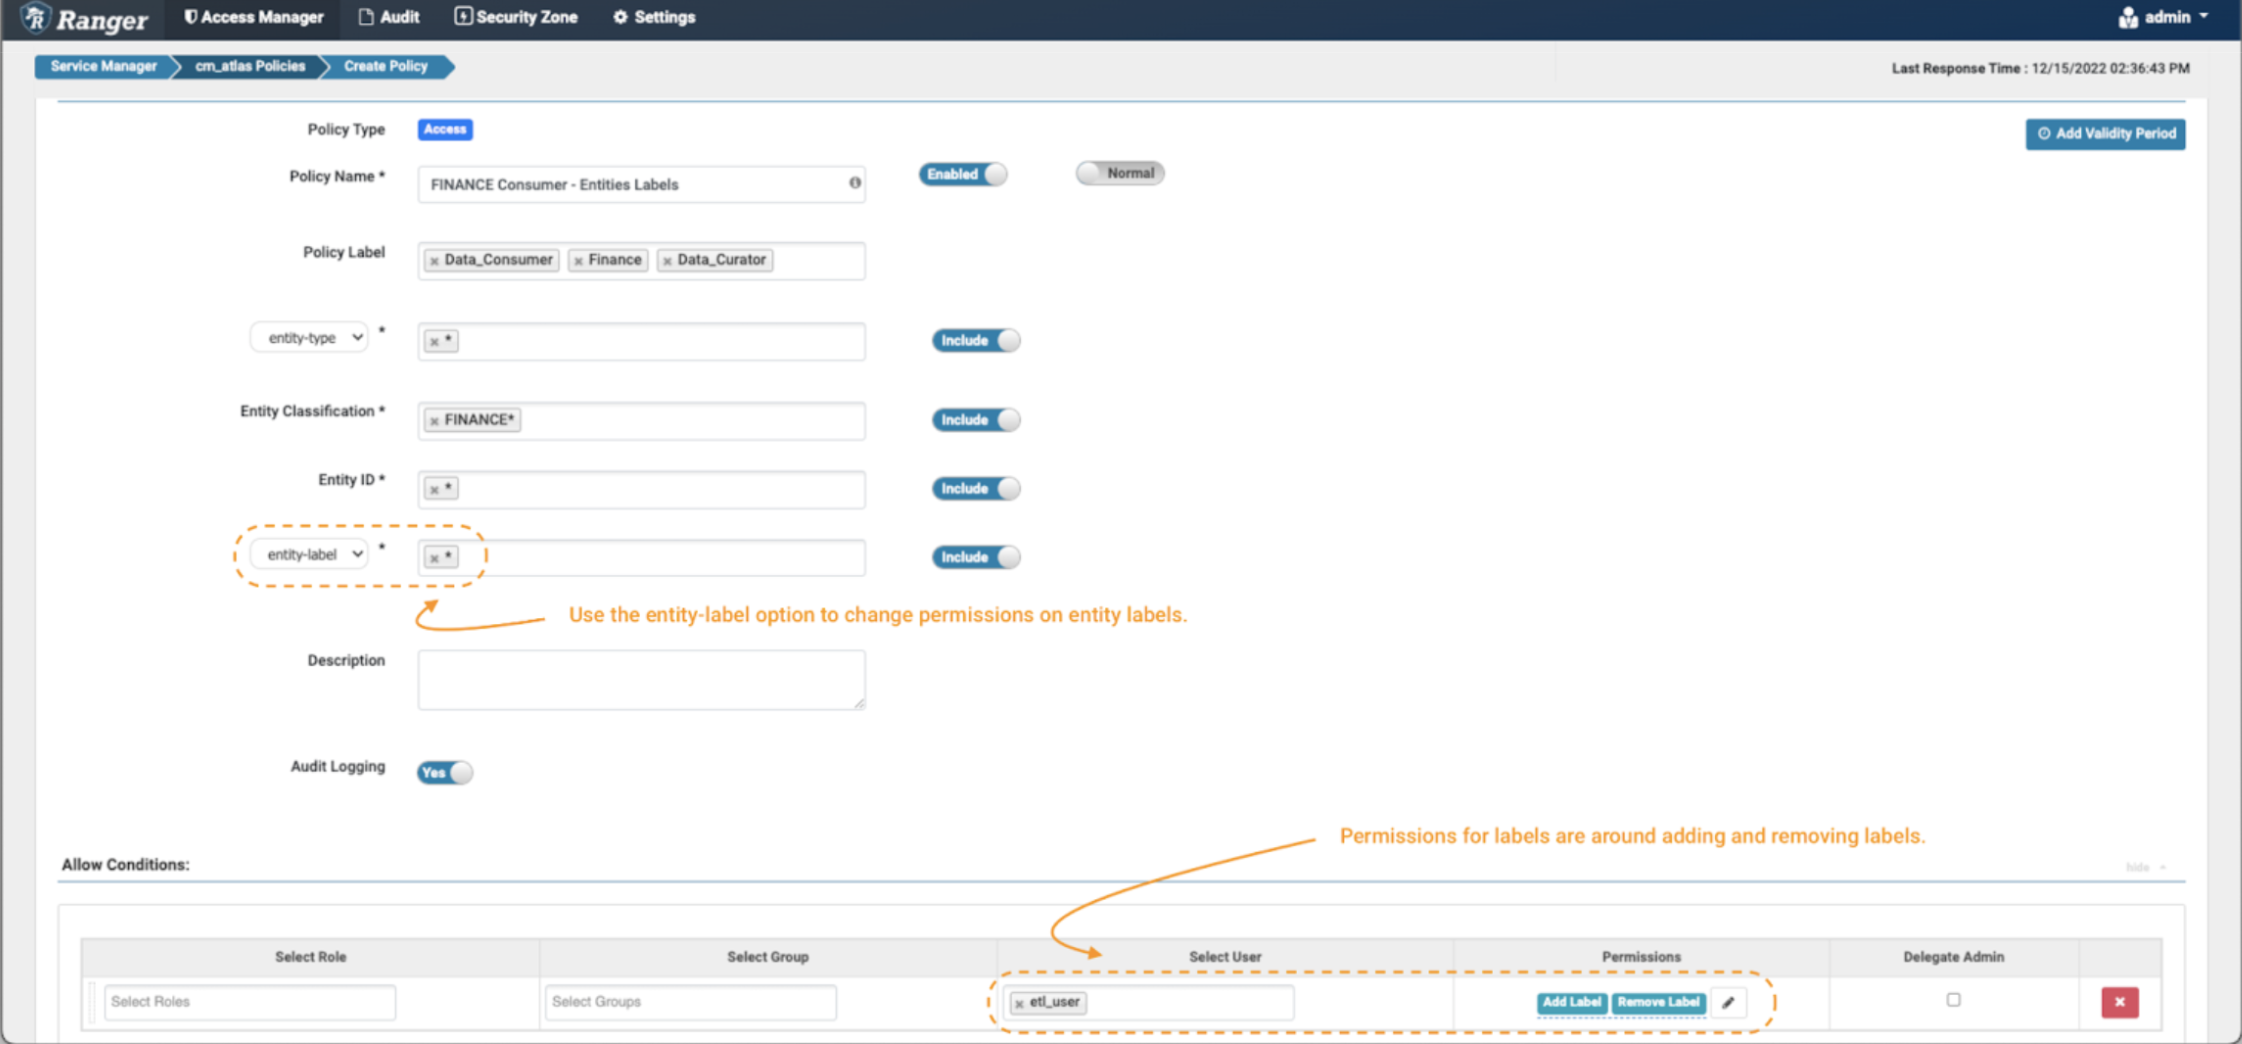
Image 10 – Example Atlas finance label policy
- The only difference between setting a policy for labels versus the previous examples is setting the additional fields filter to “entity-label” as shown in the image and fill with the values of labels that want to be controlled. In this case, we use the wildcard (*) to enable operations on any label on entities tagged with FINANCE* classifications.
- When the entity-label is selected from the drop-down, the permissions list will be updated. Select Add Label & Remove Label permission to grant the data curator the option to add and remove labels from entities.
The same principle can be applied to control the permissions over business metadata:
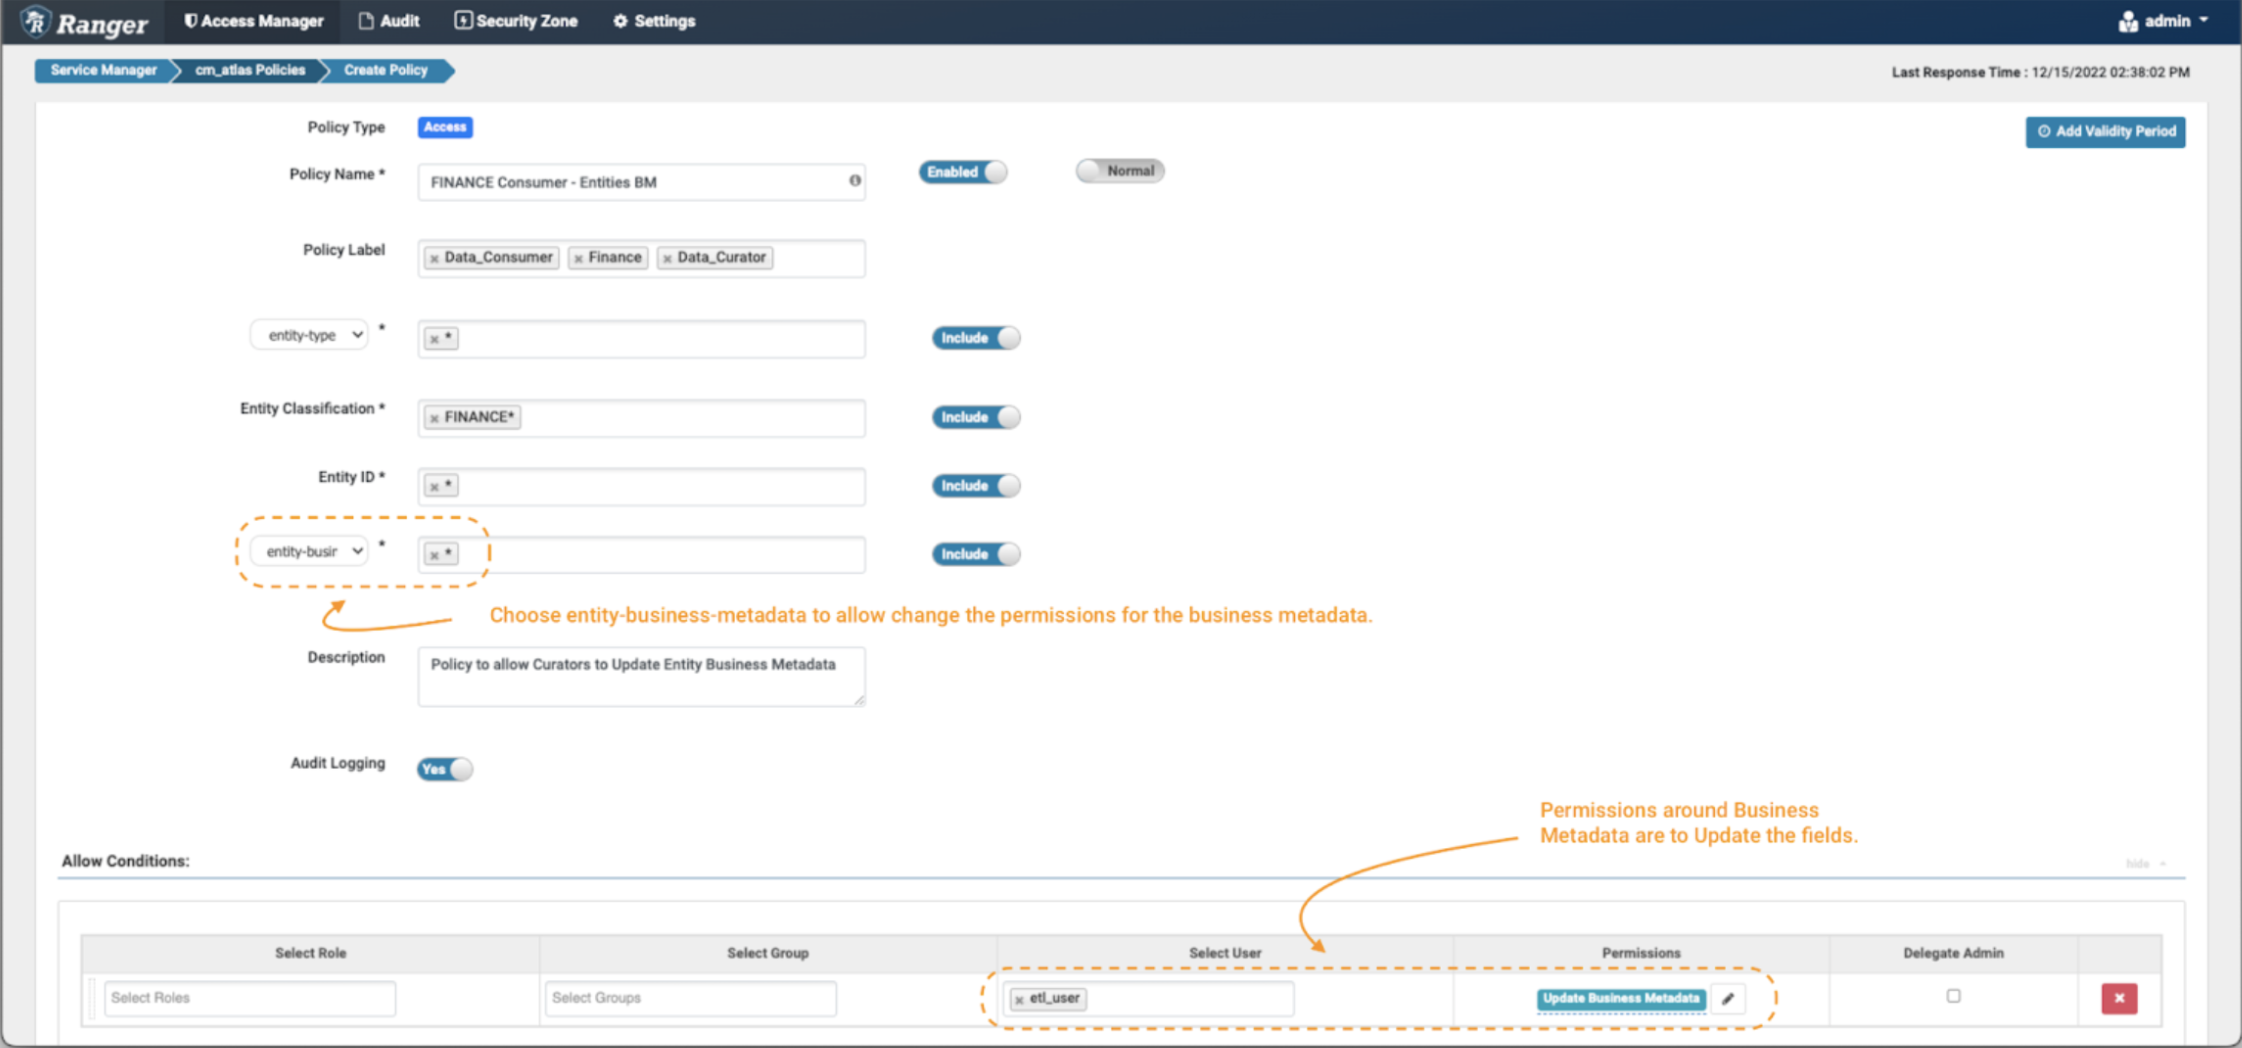
Image 11 – Example Atlas finance business metadata policy
- In this case, one must set the additional fields filter to “entity-business-metadata” as shown in the image and fill with the values of business metadata attributes that want to be protected. In this example, we use the wildcard (*) to enable operations on all business metadata attributes on entities tagged with FINANCE* classifications.
- When you enable the entity-business-metadata drop-down, the permissions list will be updated. Select Update Business Metadata permission to grant the data curator the option to modify the business metadata attributes of financial entities.
As part of the fine grained access control provided by Apache Ranger over Apache Atlas objects, one can create policies that use an entity ID to specify the exact objects to be controlled. In the examples above we have often used the wildcard (*) to refer to “all entities;” below, we will show a more targeted use-case.
In this scenario, we want to create a policy pertaining to data tables which are part of a specific project, named “World Wide Bank.” As a standard, the project owners required that all the tables are stored in a database called “worldwidebank.”
To meet this requirement, we can use one of the entity types pre-configured in Cloudera’s distributions of Apache Atlas, namely “hive_table”. For this entity type, identifiers always begin with the name of the database to which the table belongs. We can leverage that, using Ranger expressions to filter all the entities that belong to the “World Wide Bank” project.
To create a policy to protect the worldwidebank entities:
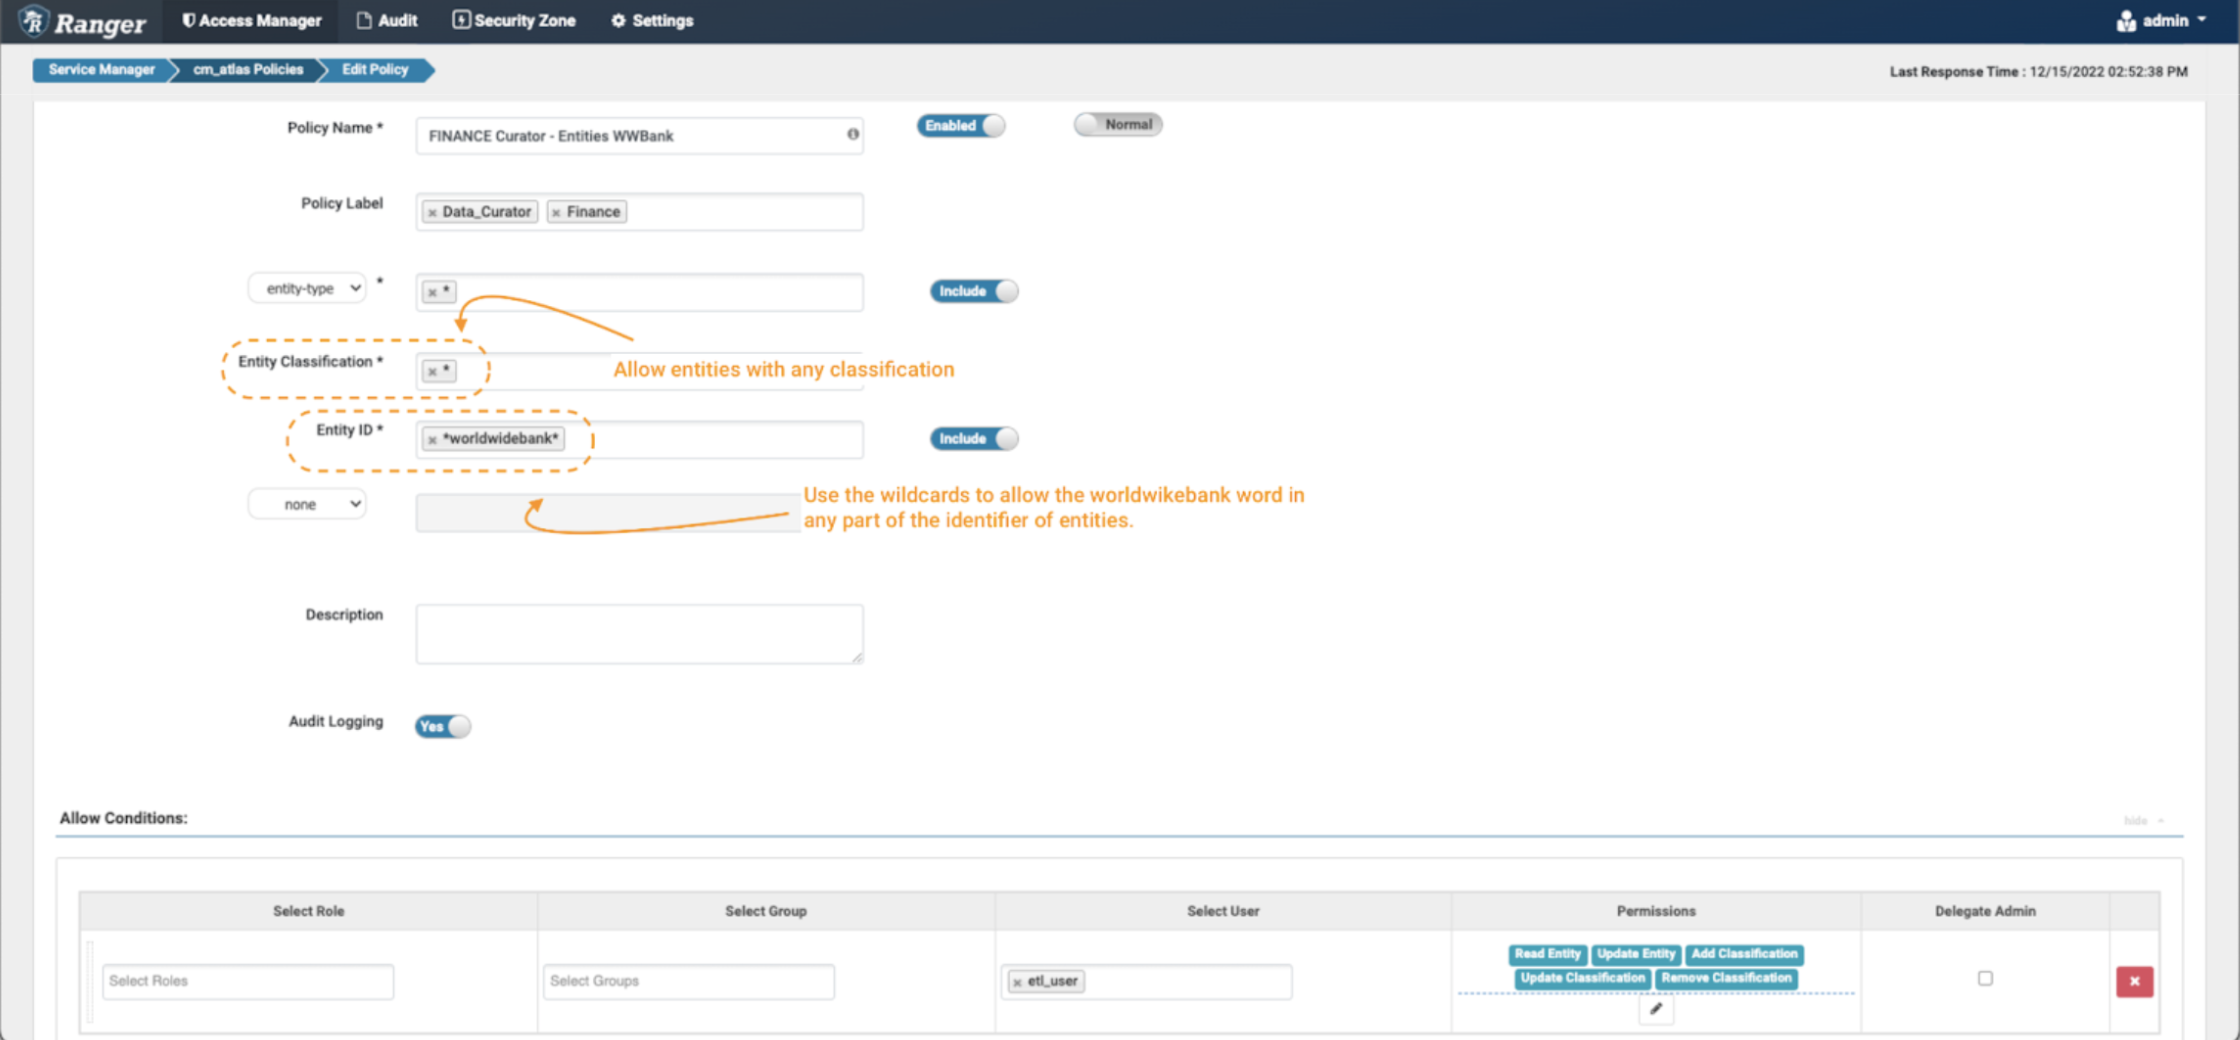
Image 12 – Example Atlas Worldwide Bank entity policy
- Create a new policy, but this time don’t specify any entity classification, use the wildcard “*” expression.
- In the entity ID field use the expression: *worldwidebank*
- In the Conditions, select the permissions Read Entity, Update Entity, Add Classification, Update Classification & Remove Classification to the data curator etl_user to be able to see the details of these entities and enrich/modify and tag them as needed.
2.2 Data Curator – etl_user user
In order to allow finance data consumer joe_analyst to use and access the worldwidebank project entities, the data curator etl_user must tag the entities with the approved classifications and add the required labels and business metadata attributes.
Login to Atlas and follow the process to tag the appropriate entities:
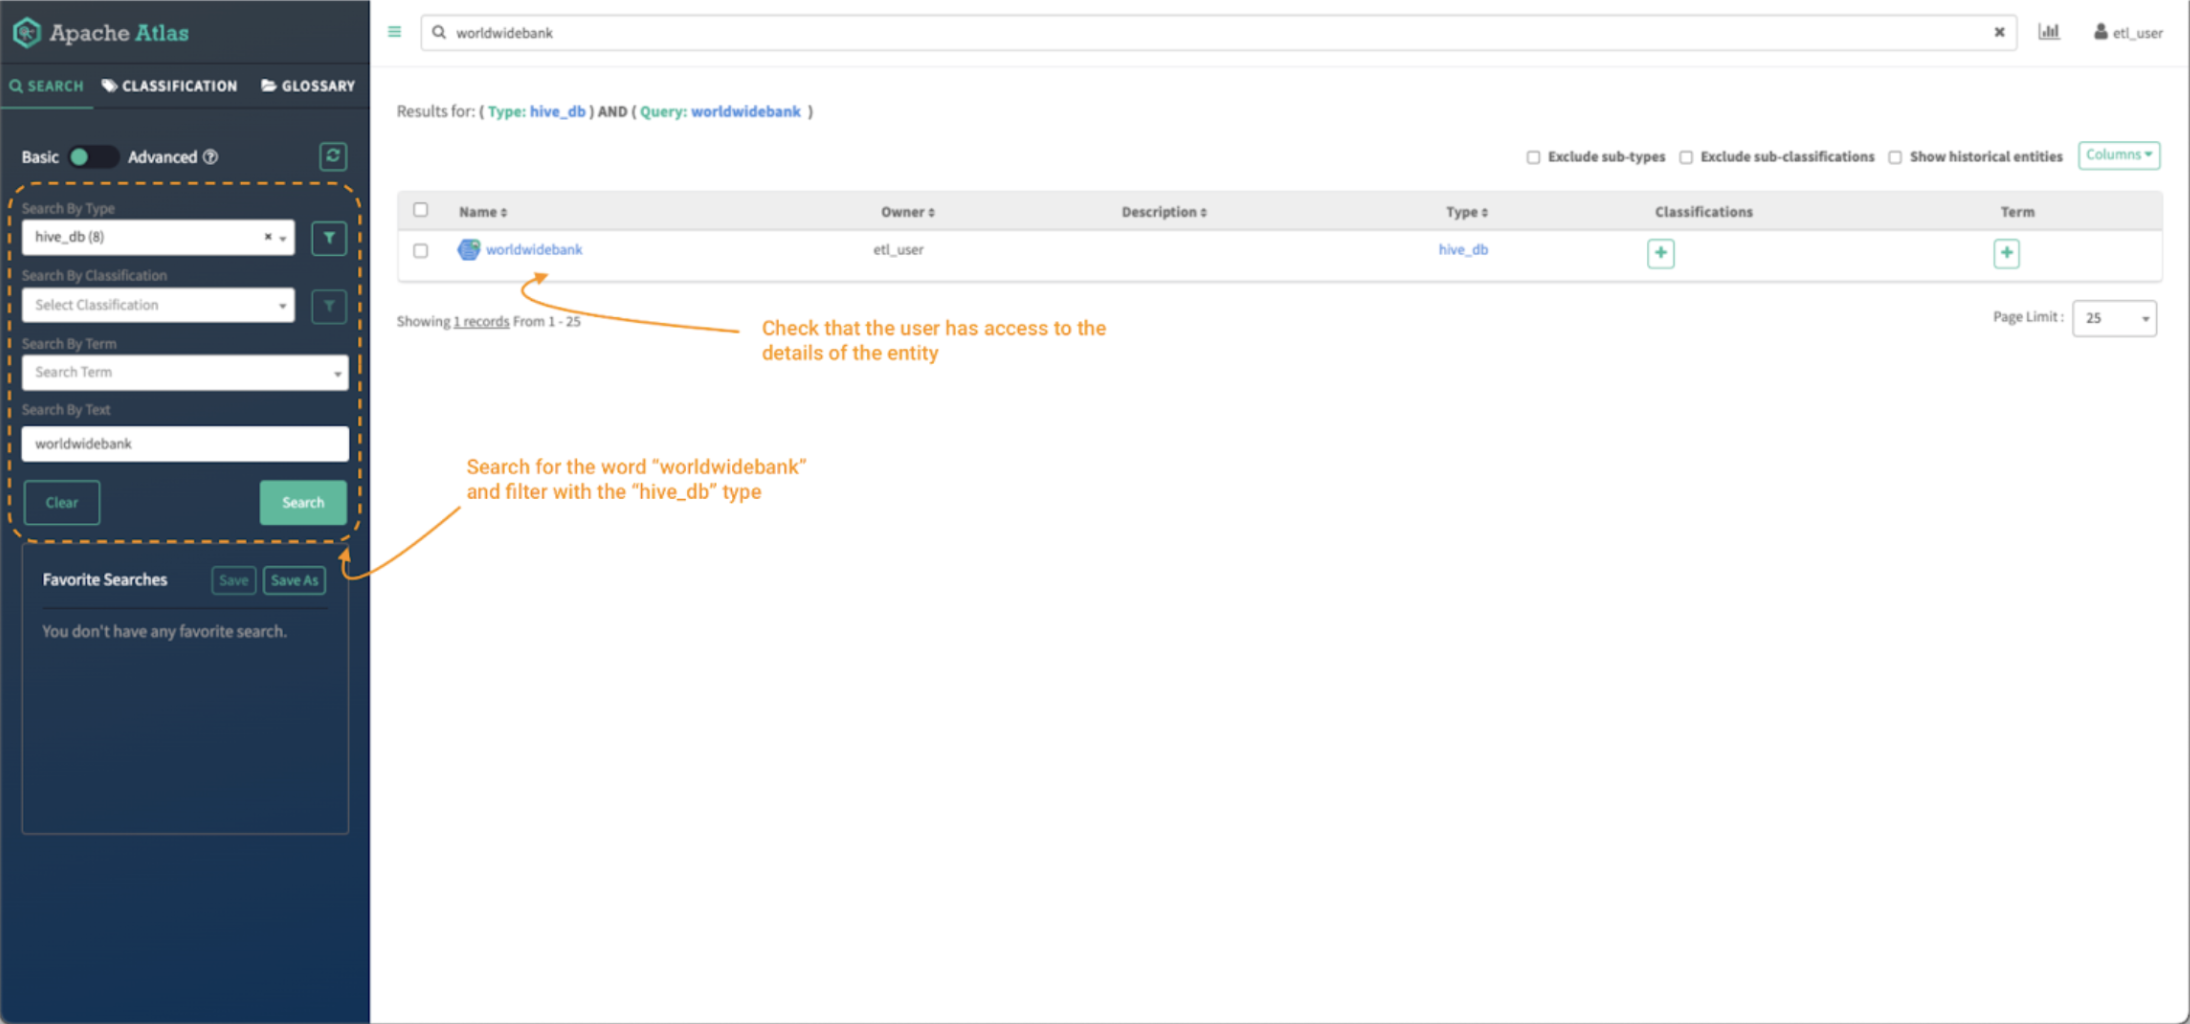
Image 13 – Data curator entity search
- First, search for the worldwidebank assets using the search bar. You can also use the “search by type” filter on the left panel to limit the search to the “hive_db” entity type.
- As data curator, you should be able to see the entity and be allowed to access the details of the worldwidebank database entity. It should have a clickable link to the entity object
- Click on the entity object to see its details.
After clicking the entity name, the entity details page is shown:
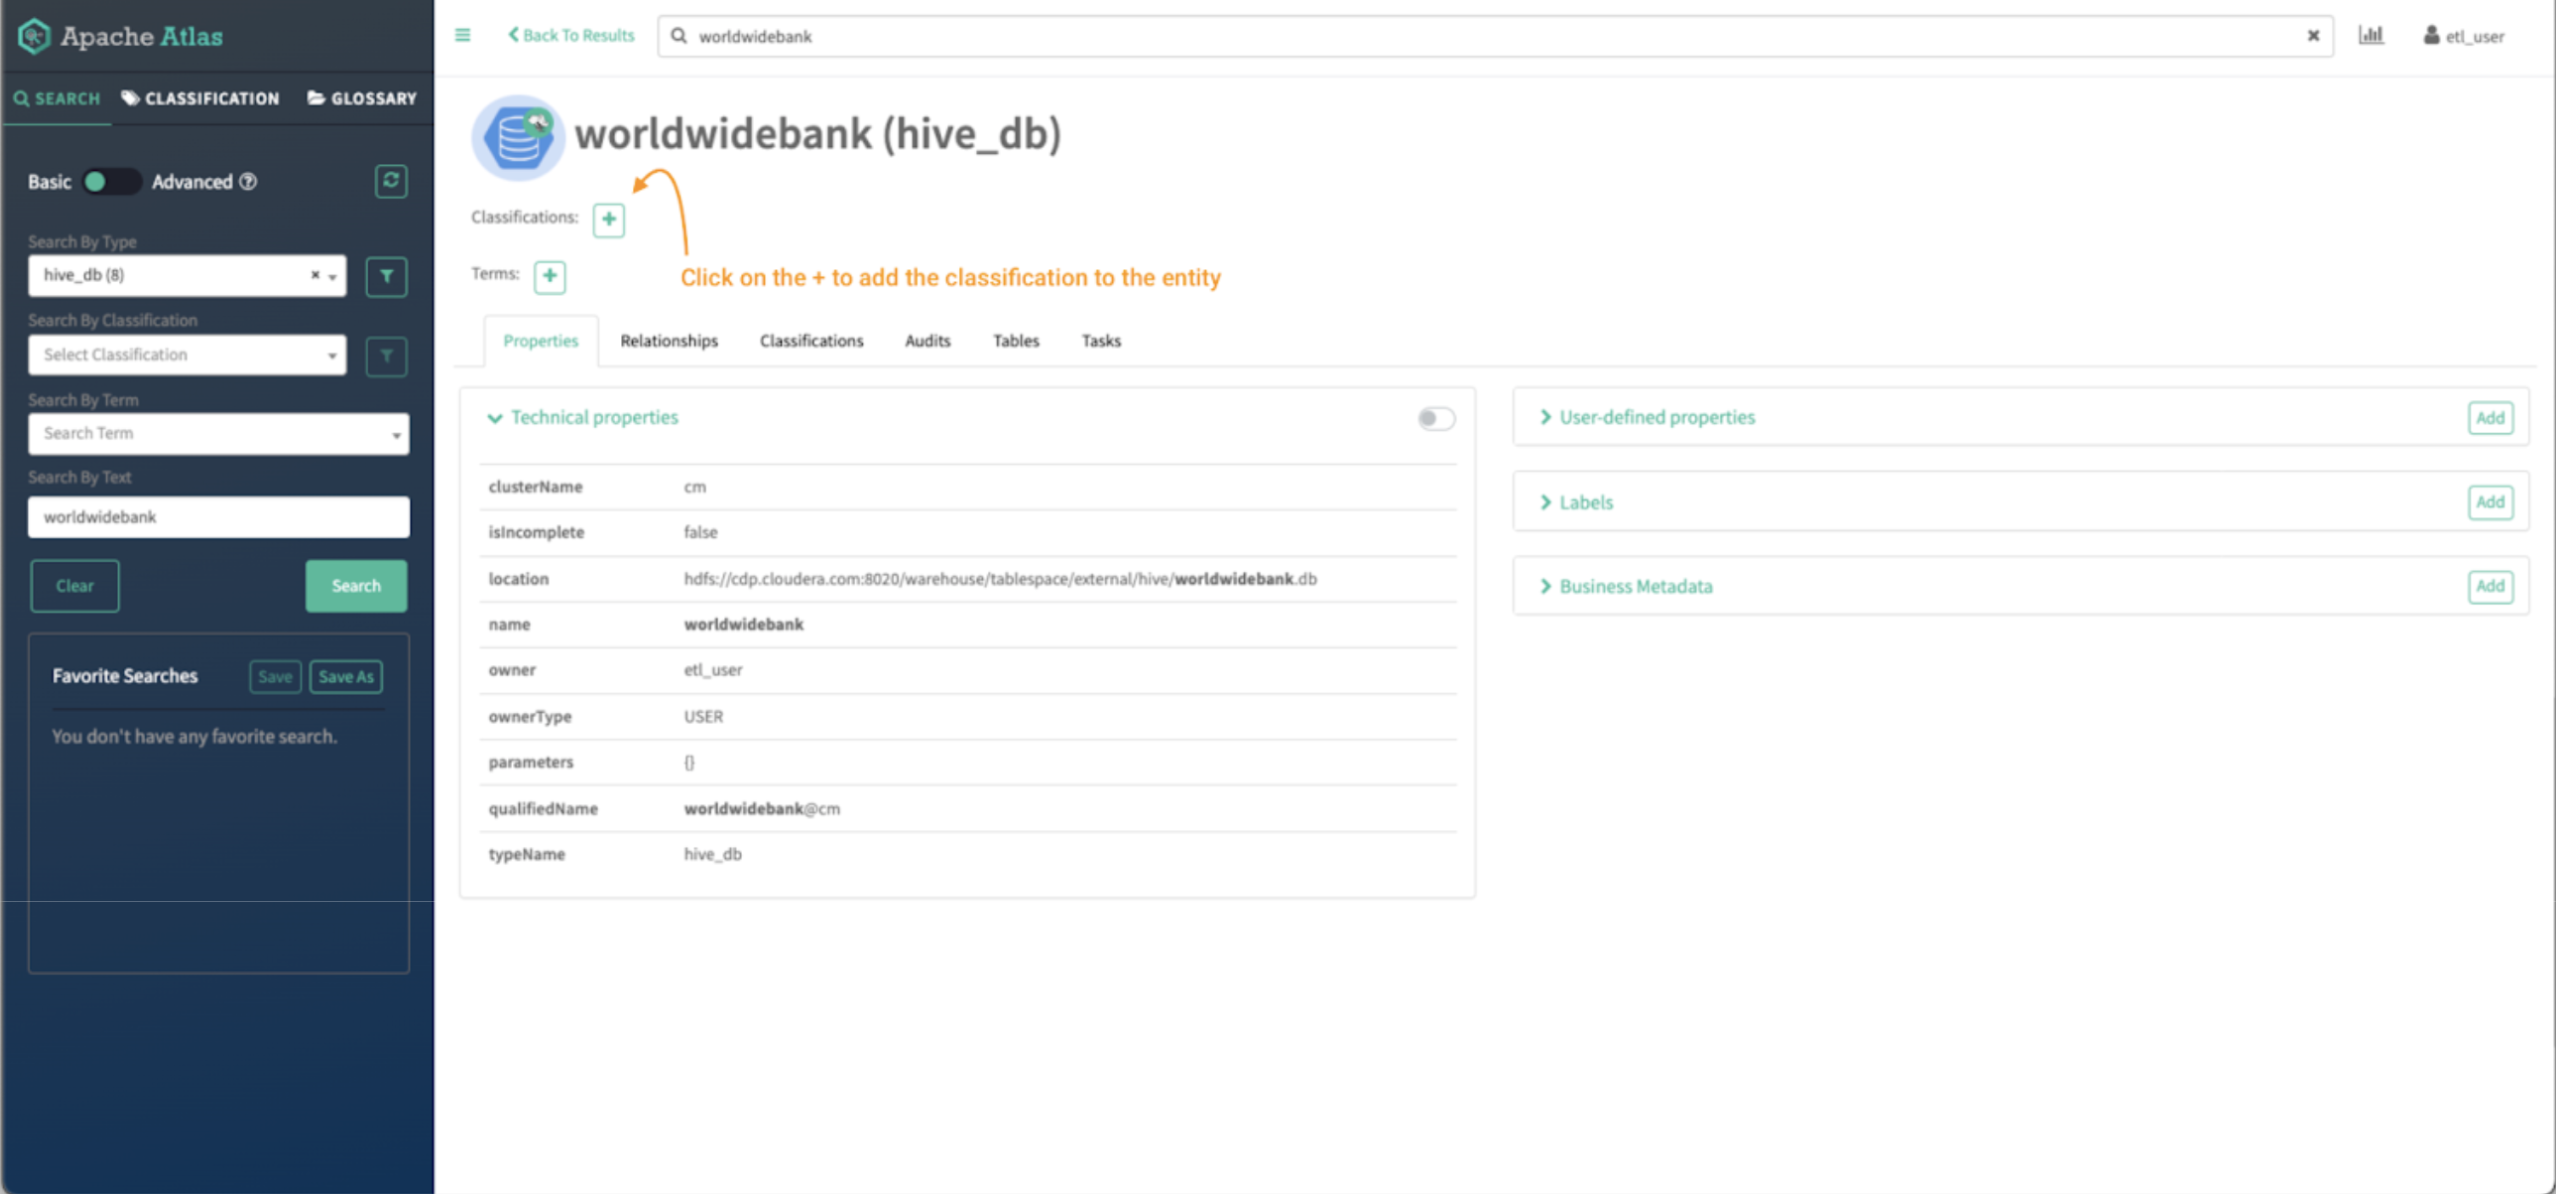
Image 14 – Worldwide Bank database entity detail
In the top of the screen, you can see the classifications assigned to the entity. In this case there are no tags assigned. We will assign one by clicking on the “+” sign.
In the “Add Classification” screen:
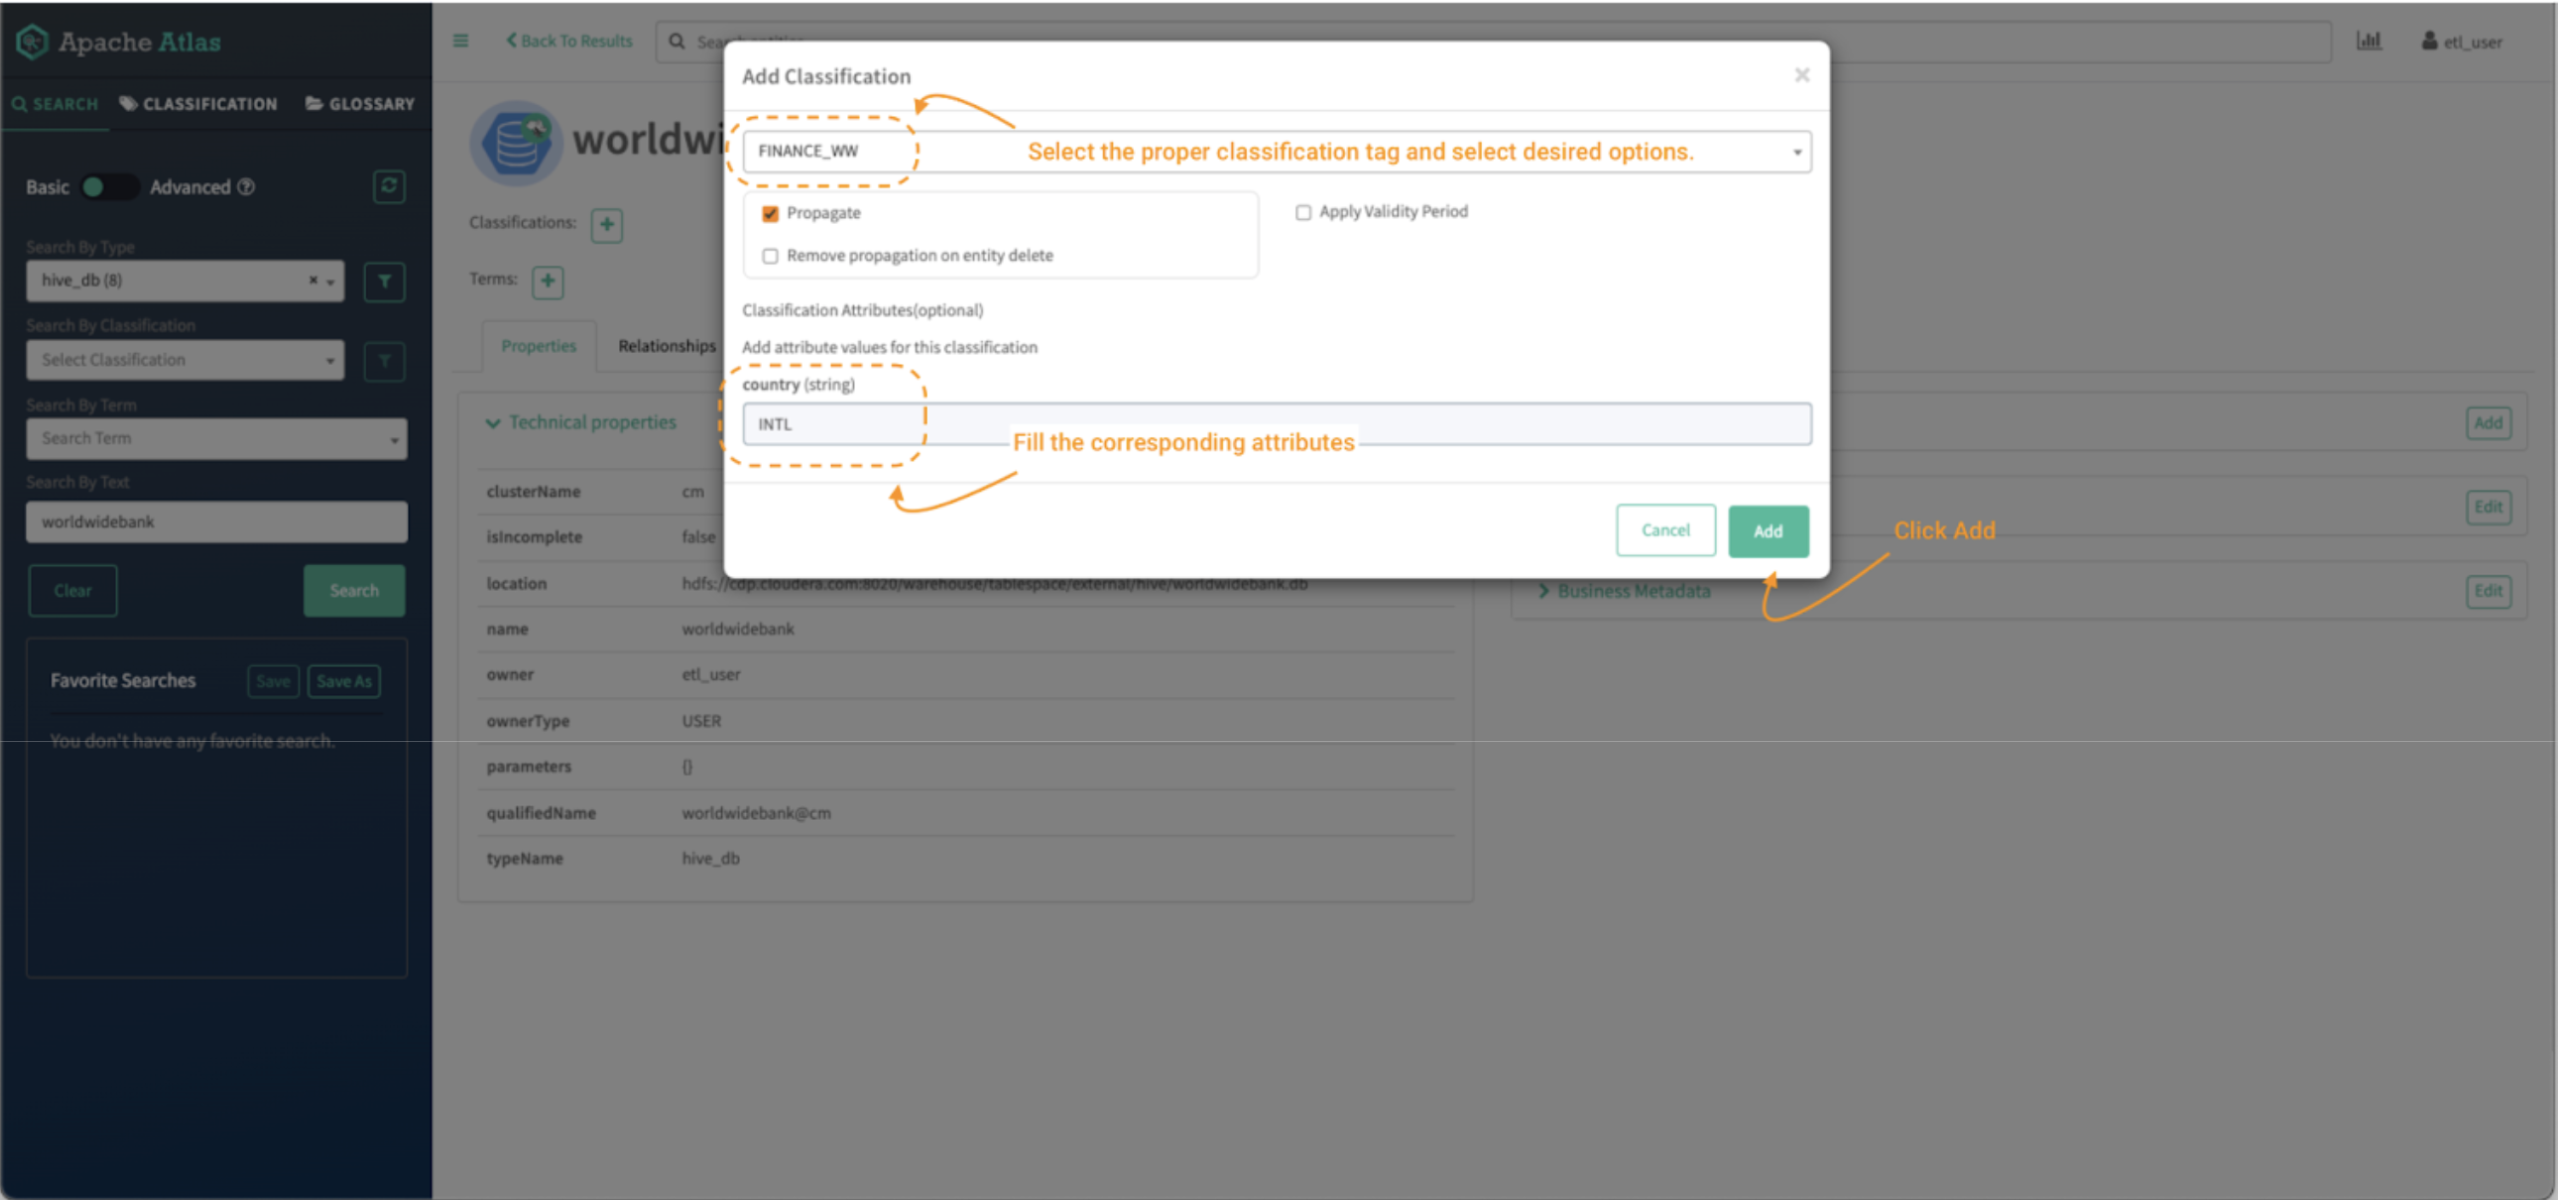
Image 15 – Worldwide Bank database tag process
- Search for the FINANCE_WW tag and select it.
- Then fill the appropriate attributes if the classification tag has any. (Optional in Image 5, in the 1.2 Data Curator – etl_user user section above.)
- Click on “add.”
That will tag an entity with the selected classification.
Now, enrich the worldwidebank hive_db entity with a new label and a new business metadata attribute called “Project.”
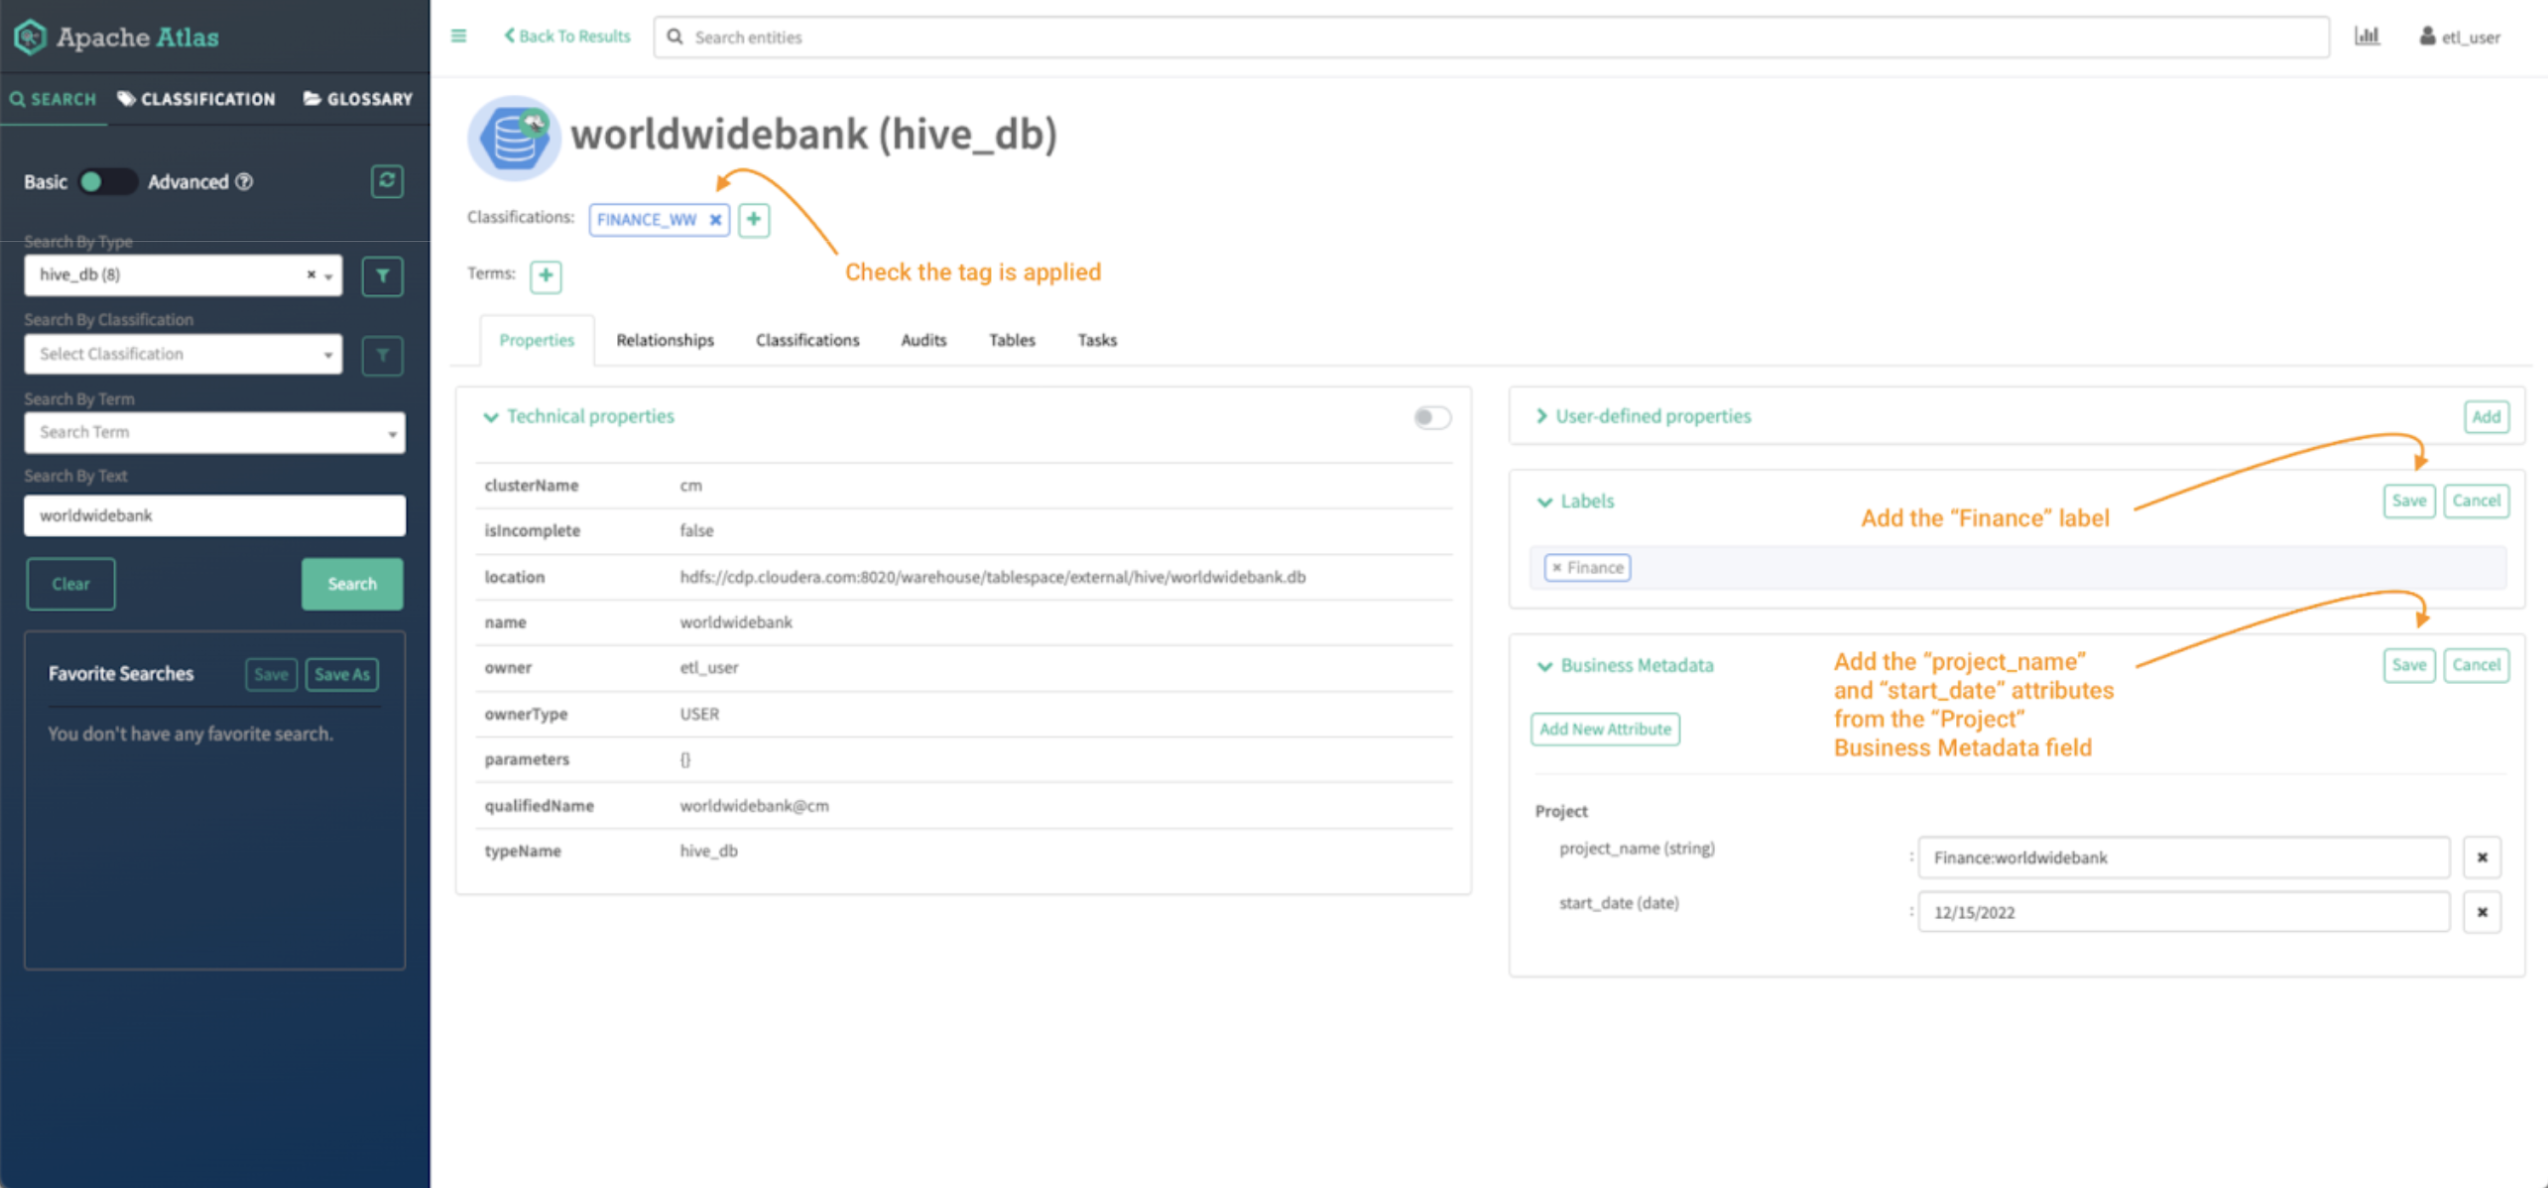
Image 16 – Worldwide Bank database tag process
To add a label, click “Add” on the labels menu.
- Type the label in the space and click “save.”
To add a business metadata attribute, click “Add” on the business metadata menu.
- Click on “Add New Attribute” if it’s not assigned or “edit” if it already exists.
- Select the attribute you want to add and fill the details and hit “save.”
NOTE: The creation of the business metadata attributes is not included in the blog but the steps can be followed here.
With the “worldwidebank” Hive object tagged with the “FINANCE_WW” classification, the data consumer should be able to have access to it and see the details. Also, it is important to validate that the data consumer also has access to all the other entities tagged with any classification that starts with “finance.”
2.3 Data Consumer – joe_analyst user
To validate that the policies are applied correctly, login into Atlas:
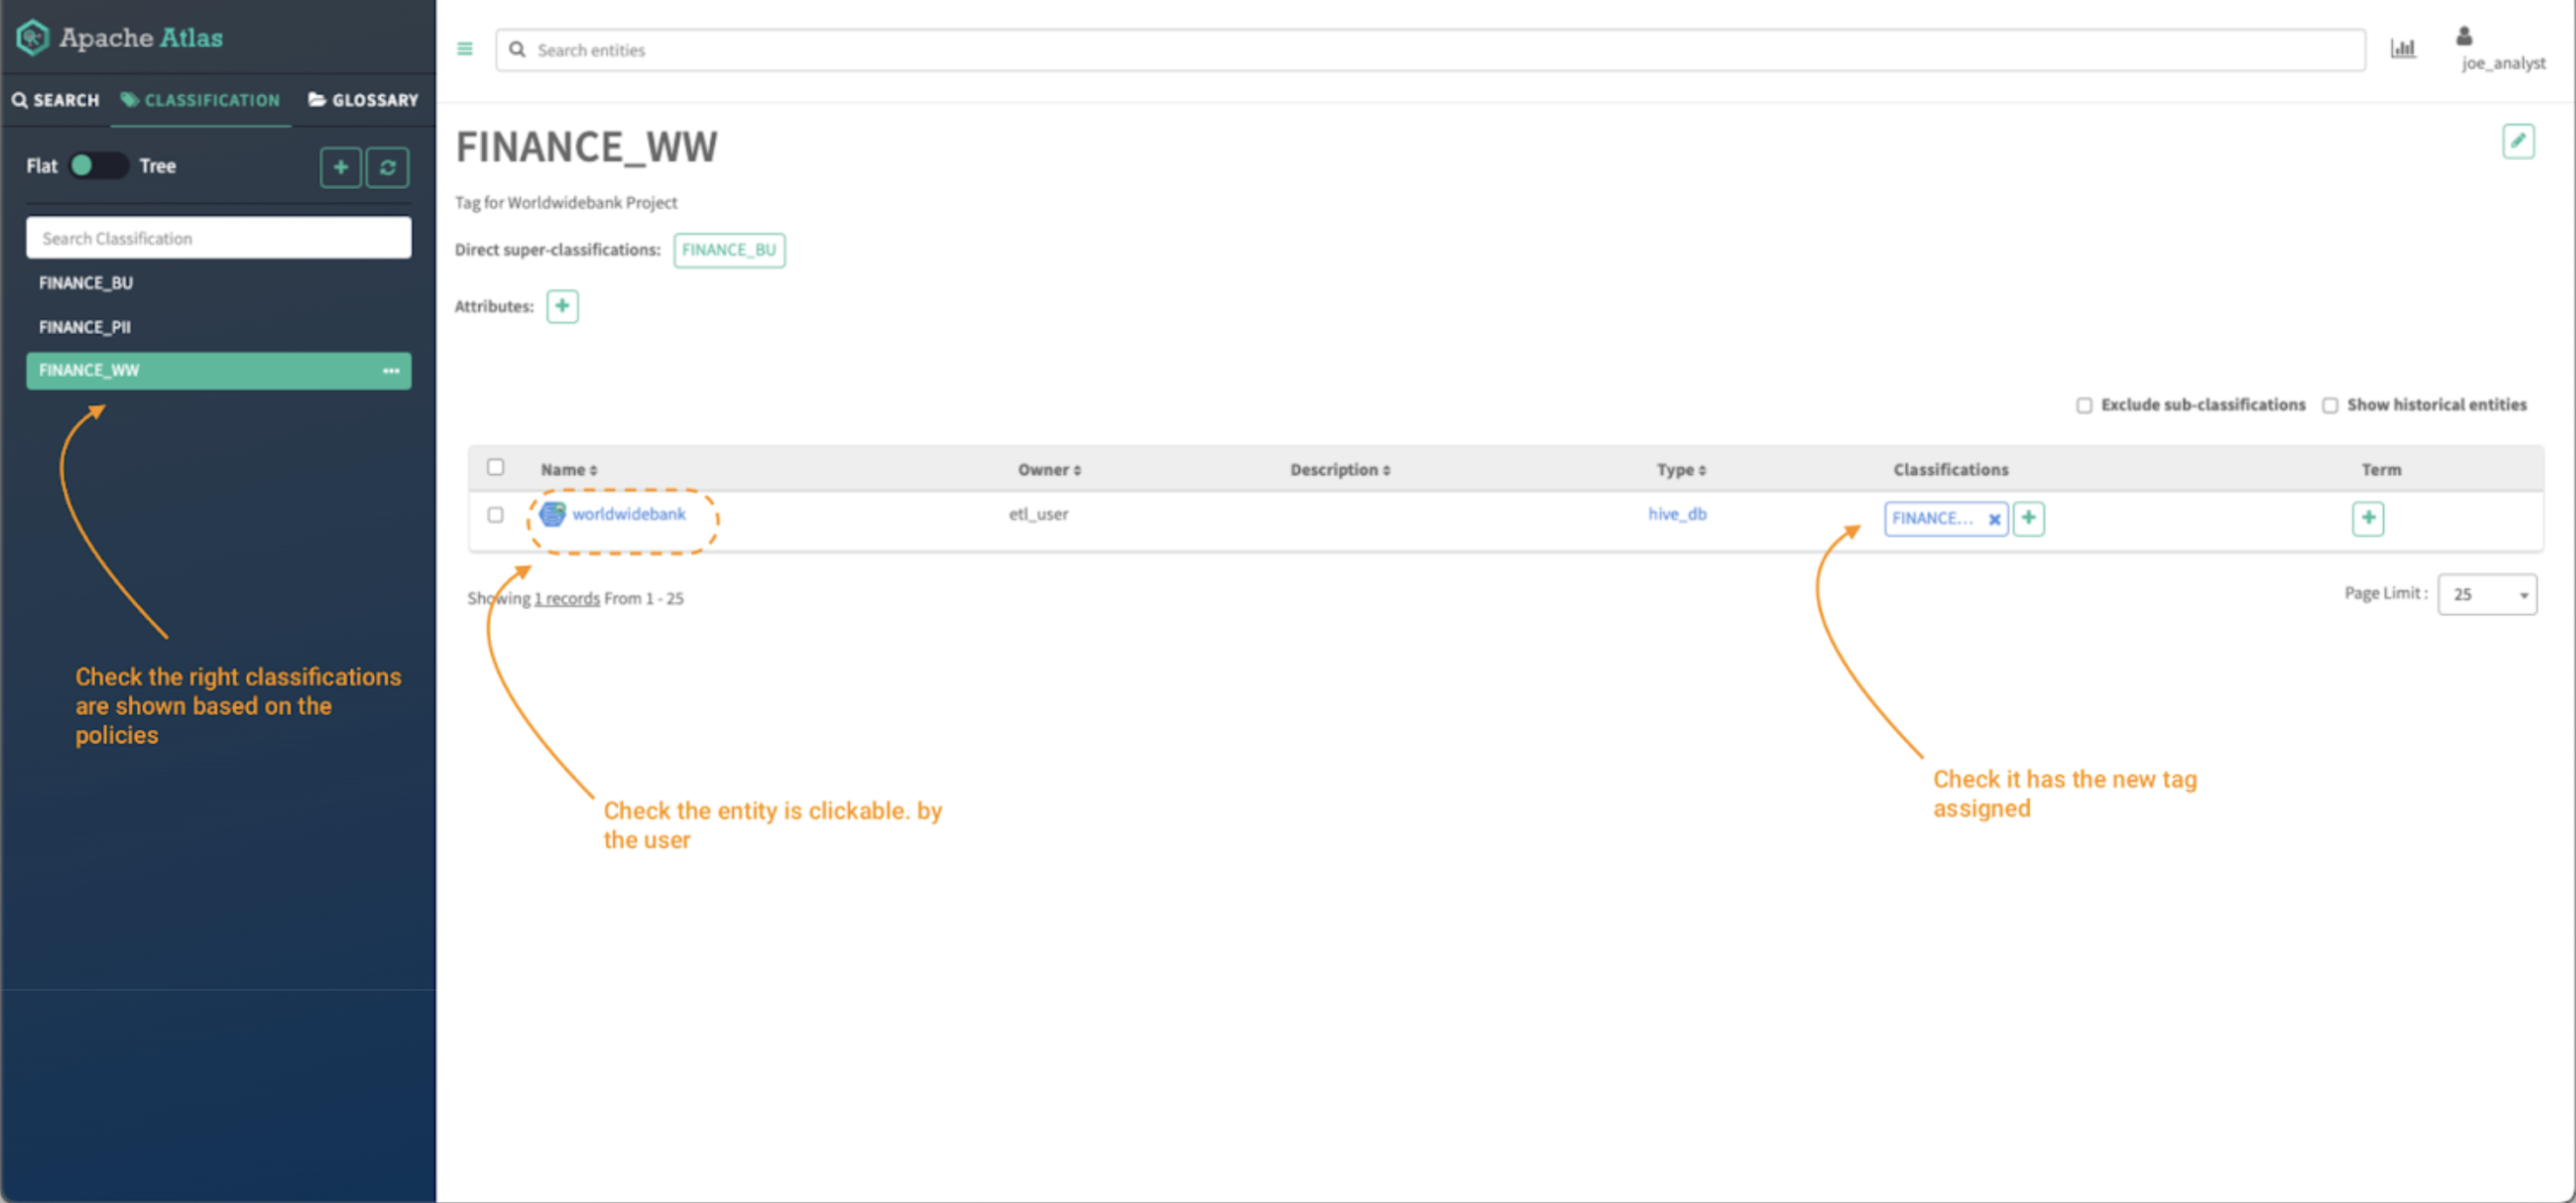
Image 17 – Finance data assets
Click on the classifications tab and validate:
- The list of tags that are visible based on the policies created in the previous steps. All the policies must start with the word “finance.”
Click on the FINANCE_WW tag and validate the access to the “worldwidebank” hive_db object.
After clicking on the “worldwidebank” object:
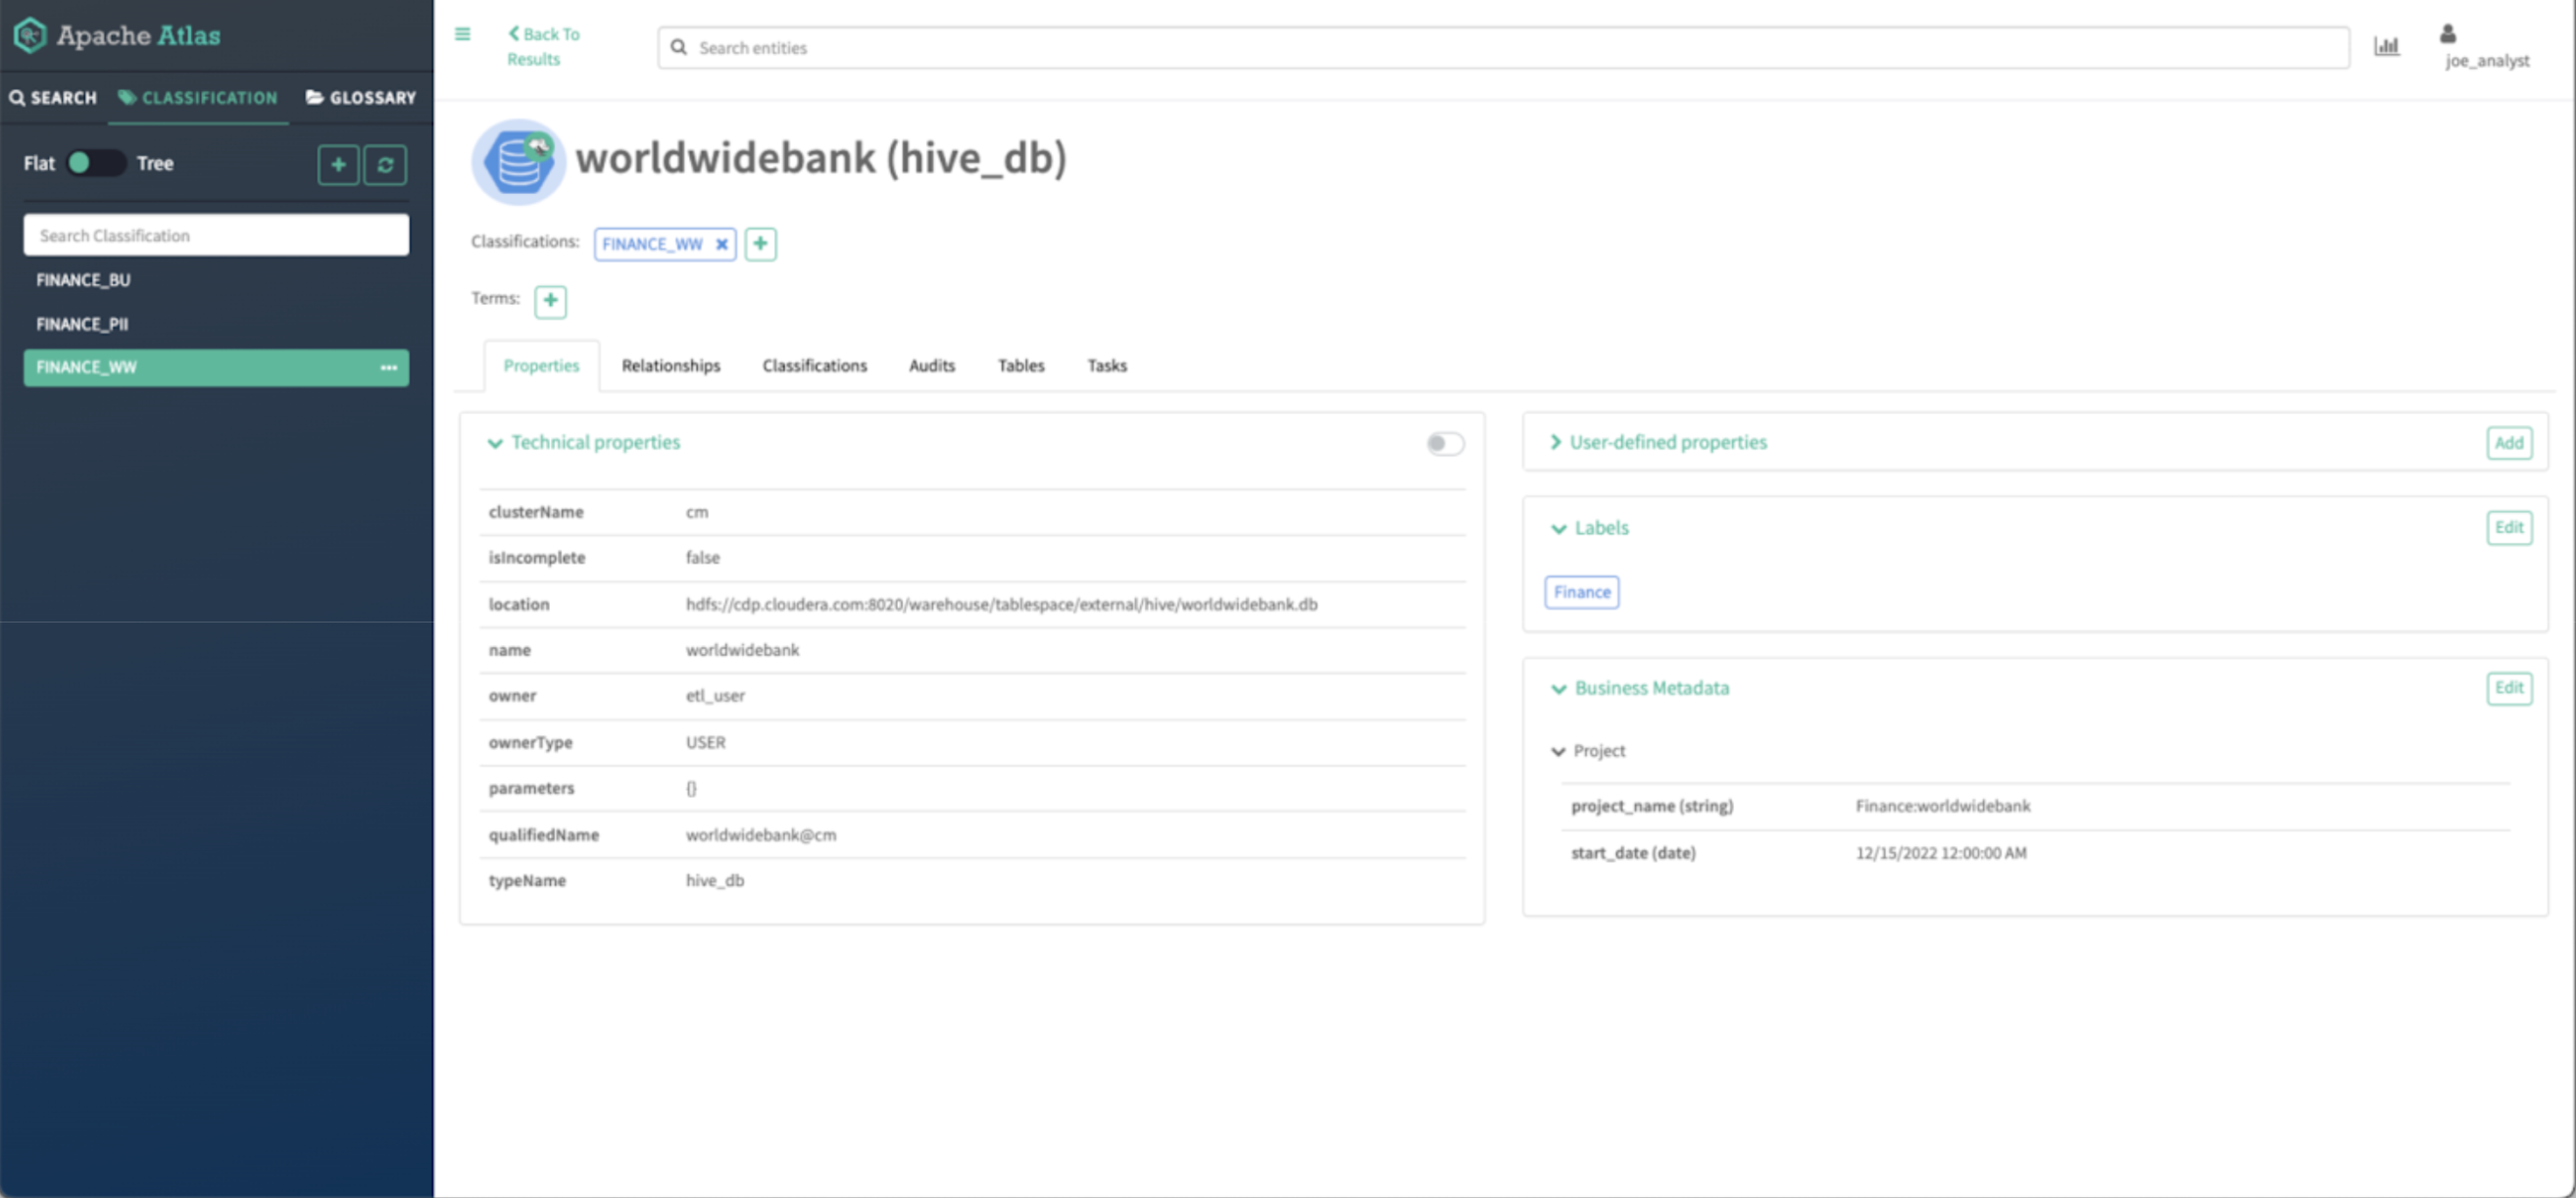
Image 18 – WorldWideBank database asset details
You can see all the details of the asset that where enriched by the finance data curator in previous steps:
- You should see all the technical properties of the asset.
- You should be able to see the tags applied to the asset
- You should see the labels applied to the asset.
- You should see the business metadata attributes assigned to the asset.
3. Authorization for Glossary and Glossary Terms
In this section, we will explain how a data steward can create policies to allow fine-grained access controls over glossaries and glossary terms. This allows data stewards to control who can access, enrich or modify glossary terms to protect the content from unauthorized access or mistakes.
A glossary provides appropriate vocabularies for business users and it allows the terms (words) to be related to each other and categorized so that they can be understood in different contexts. These terms can be then applied to entities like databases, tables, and columns. This helps abstract the technical jargon associated with the repositories and allows the user to discover and work with data in the vocabulary that is more familiar to them.
Glossaries and terms can also be tagged with classifications. The benefit of this is that, when glossary terms are applied to entities, any classifications on the terms are passed on to the entities as well. From a data governance process perspective, this means that business users can enrich entities using their own terminology, as captured in glossary terms, and that can automatically apply classifications as well, which are a more “technical” mechanism, used in defining access controls, as we have seen.
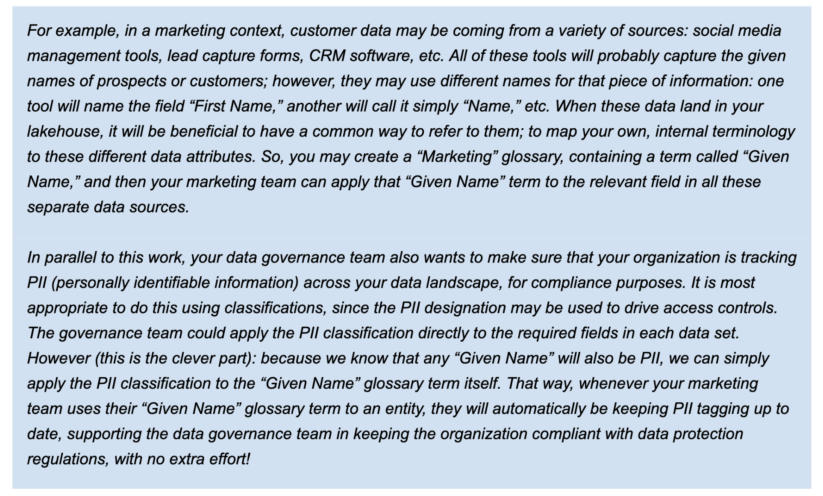
First, we will show how as a data steward you can create a policy that grants read access to glossary objects with specific words in the name and validate that the data consumer is allowed to access the specific content.
3.1 Data Steward – admin user
To create a policy to control access to glossaries and terms, you can:
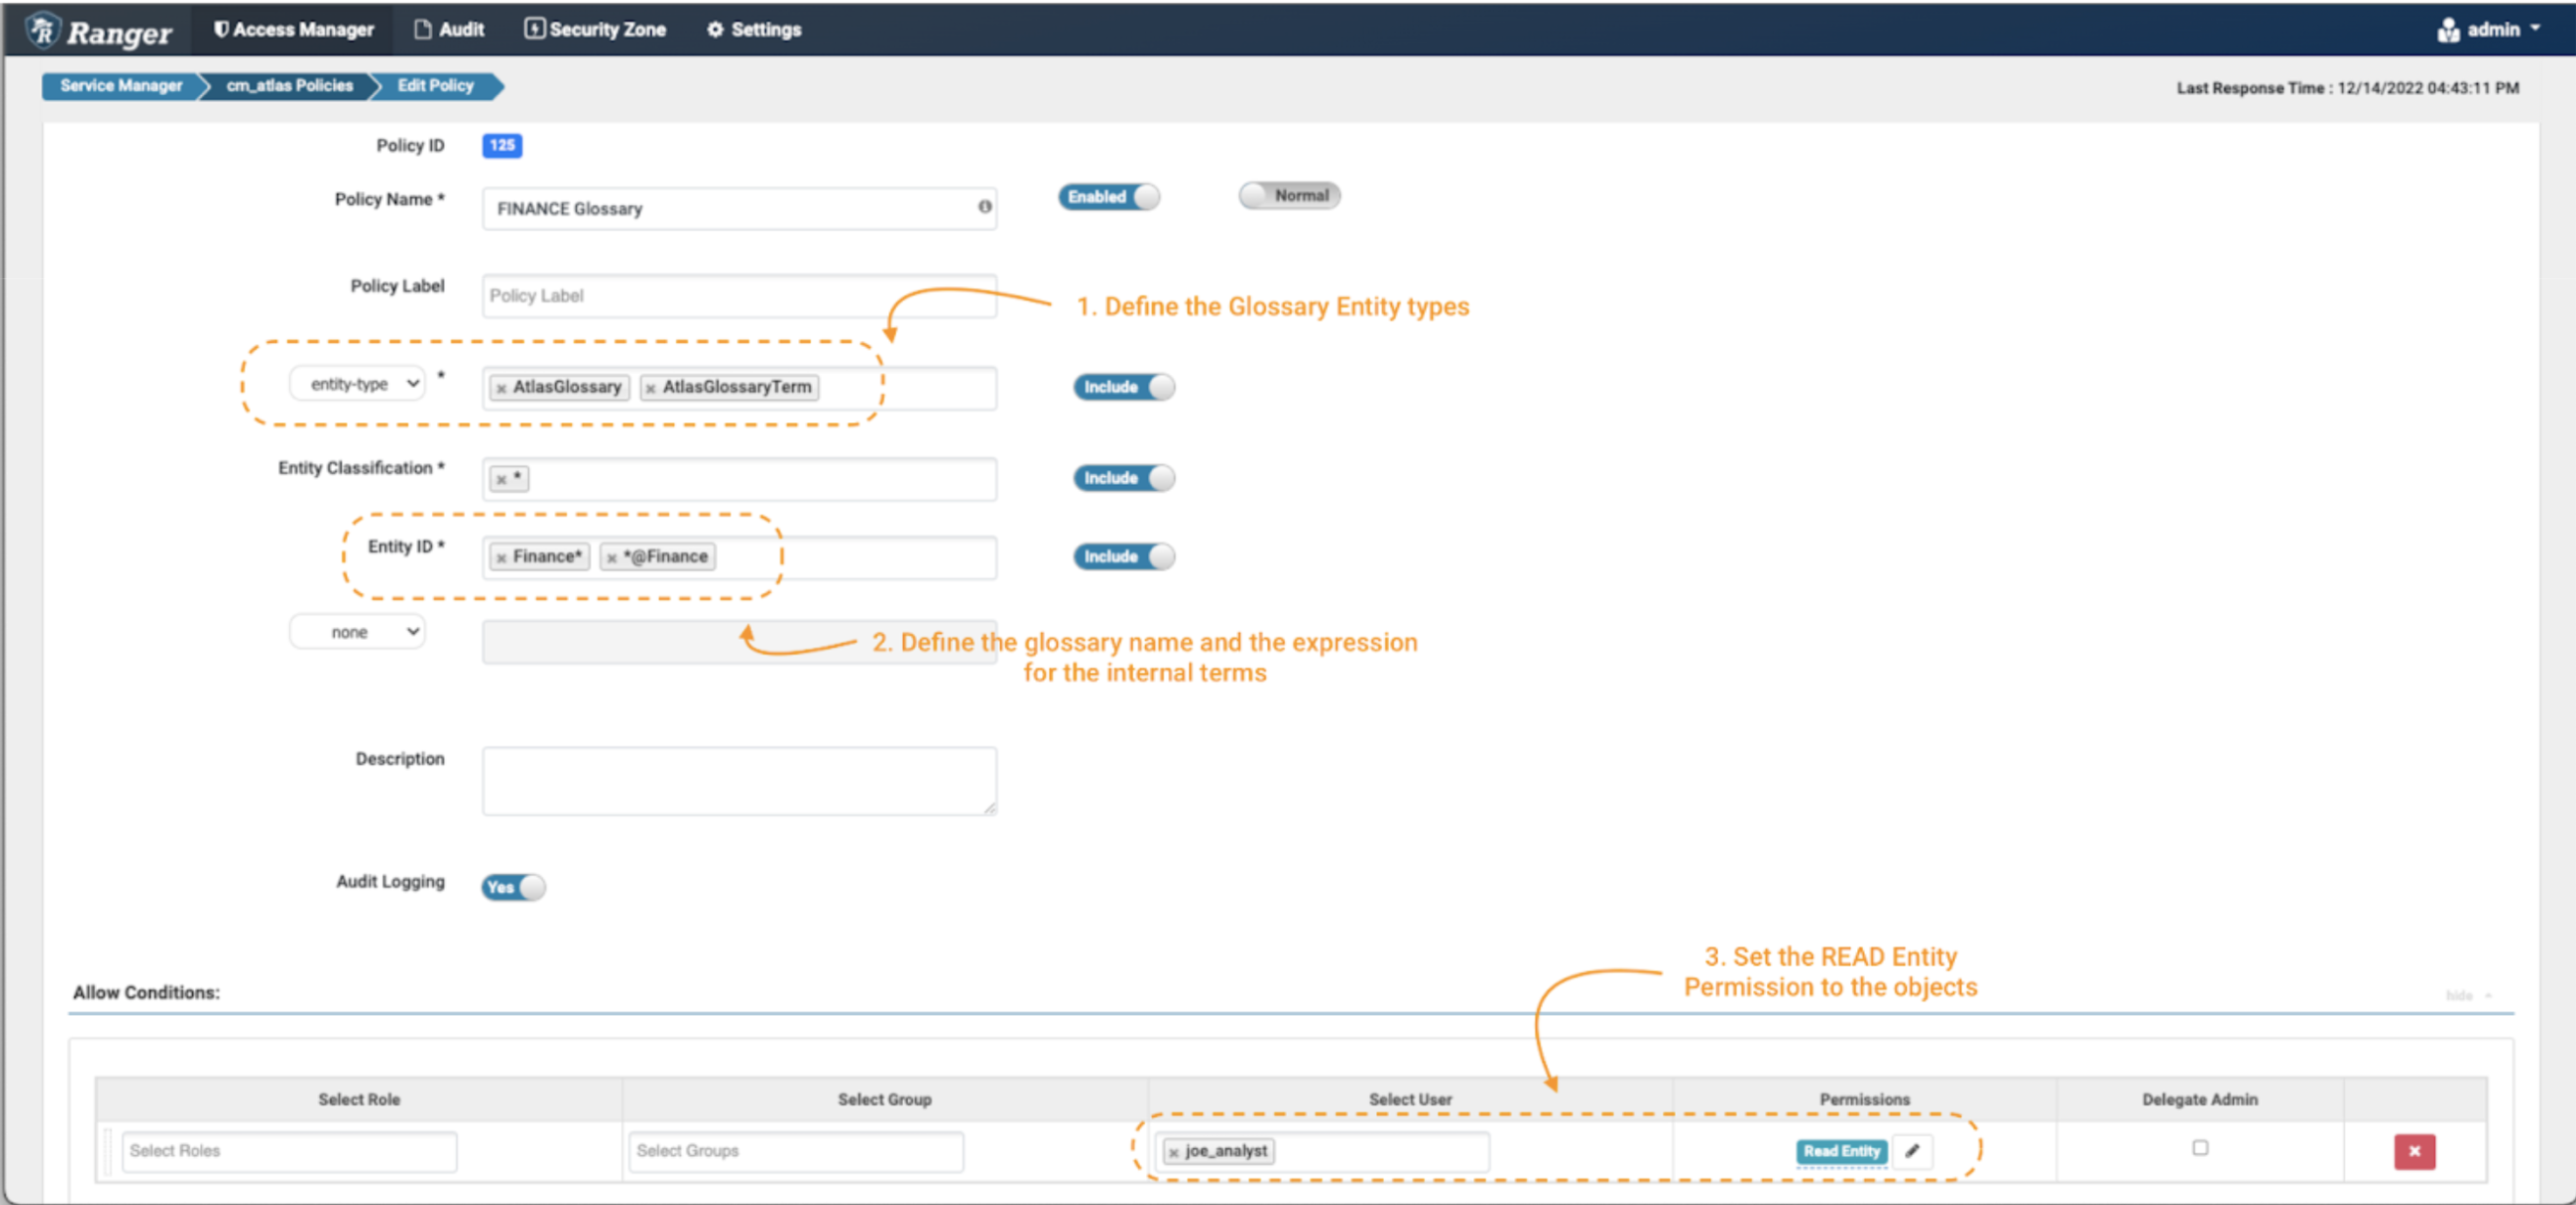
Image 19 – Glossary control policy
- Create a new policy, but this time use the “entity-type” AtlasGlossary and AtlasGlossaryTerm. (note 1)
- In the entity classifications field, use the wildcard expression: *
- The entity ID is where you can define which glossaries and terms you want to protect. In Atlas, all the terms of a glossary include a reference to it with an “@” at the end of its name (ex. term@glossary). To protect the “Finance” glossary itself, use Finance*; and to protect is terms, use *@Finance (note 2).
- In the Conditions, select the permissions Read Entity to the data consumer joe_analyst to be able to see the glossary and its terms. (note 3)
3.2 Data Consumer – joe_analyst user
To validate that only “Finance” glossary objects can be accessed:
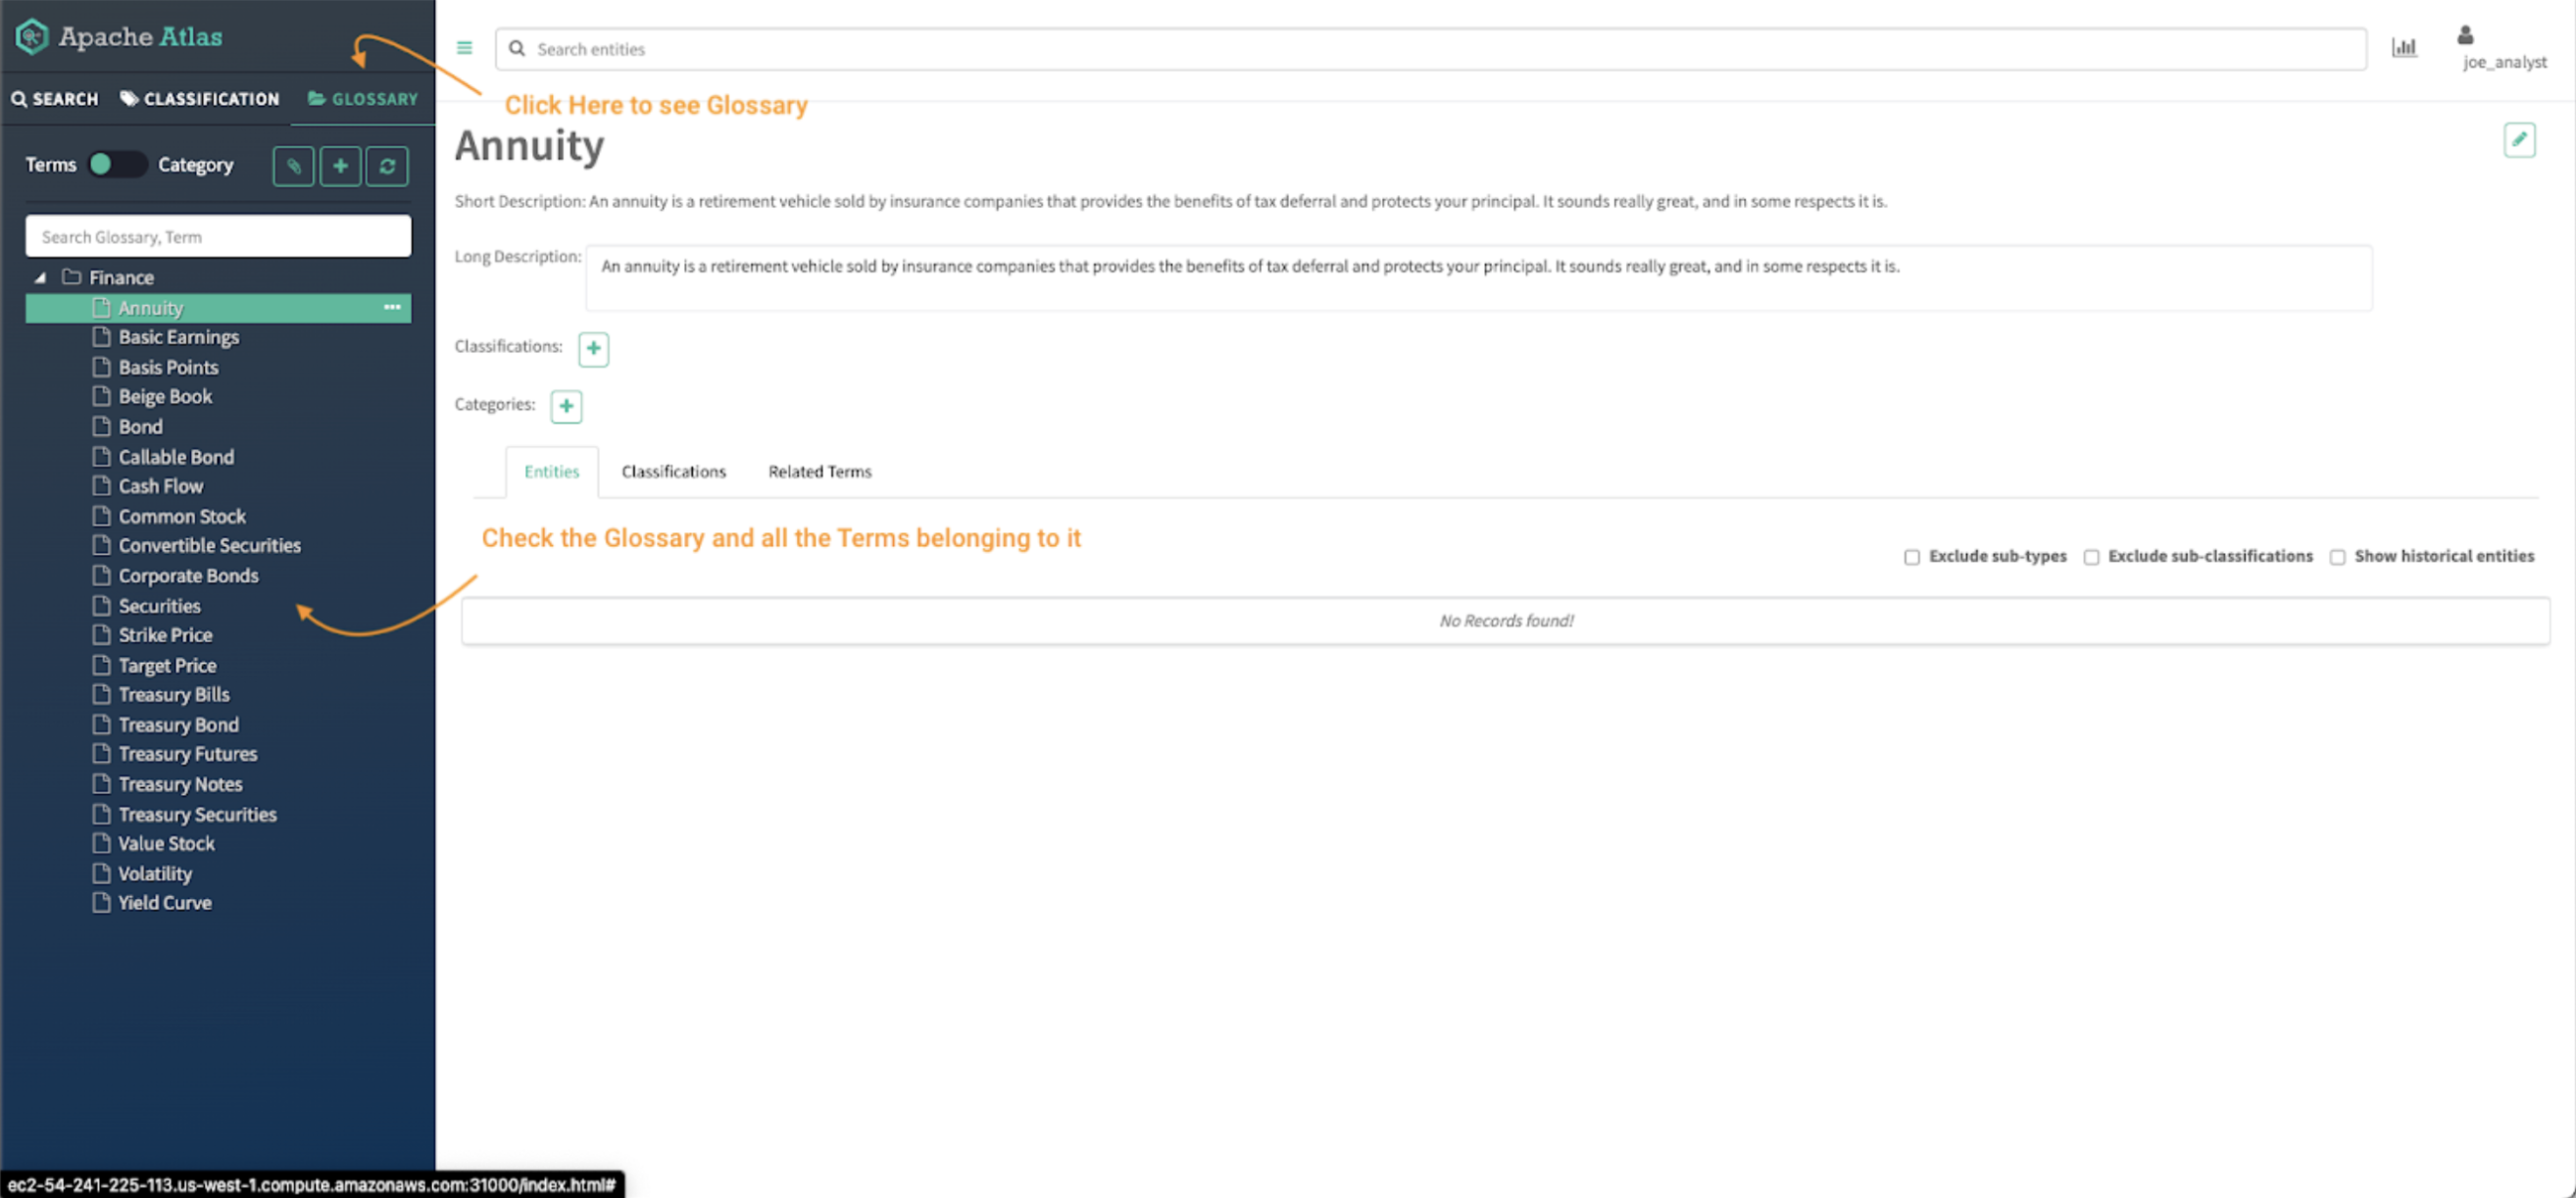
Image 20 – Finance Atlas glossary
- Click on the glossary tab in the Atlas panel.
- Check the glossaries available in the Atlas UI and the access to the details of the terms of the glossary.
Conclusion
This article has shown how an organization can implement a fine grained access control strategy over the data governance components of the Cloudera platform, leveraging both Apache Atlas and Apache Ranger, the fundamental and integral components of SDX. Although most organizations have a mature approach to data access, control of metadata is typically less well defined, if considered at all. The insights and mechanisms shared in this article can help implement a more complete approach to data as well as metadata governance. The approach is critical in the context of a compliance strategy where data governance components play a critical role.
You can learn more about SDX here; or, we would love to hear from you to discuss your specific data governance needs.


