Update August 2021: Starting with CDE v1.9, you can now use the python-env resource (Option 2) for all Python packages, including those dependent on C base libraries such as Pandas, Pyarrow, etc. Use custom-runtime-image (Option 3) only for custom libraries & more advanced scenarios.
Apache Spark is now widely used in many enterprises for building high-performance ETL and Machine Learning pipelines. If the users are already familiar with Python then PySpark provides a python API for using Apache Spark. When users work with PySpark they often use existing python and/or custom Python packages in their program to extend and complement Apache Spark’s functionality. Apache Spark provides several options to manage these dependencies. For legacy Cloudera CDH, Hortonworks Data Platform (HDP) customers and customers currently using Apache Spark on Cloudera Data Platform (CDP) Private Cloud Base, the standard way to manage dependencies are as follows –
- Use the –py-files option or spark.submit.pyFiles configuration to include Python dependencies as part of the spark-submit command.
- For dependencies that need to be made available at runtime, the options are to
- Install Python dependencies on all nodes in the Cluster
- Install Python dependencies on a shared NFS mount and make it available on all node manager hosts
Package the dependencies using Python Virtual environment or Conda package and ship it with spark-submit command using –archives option or the spark.yarn.dist.archives configuration.
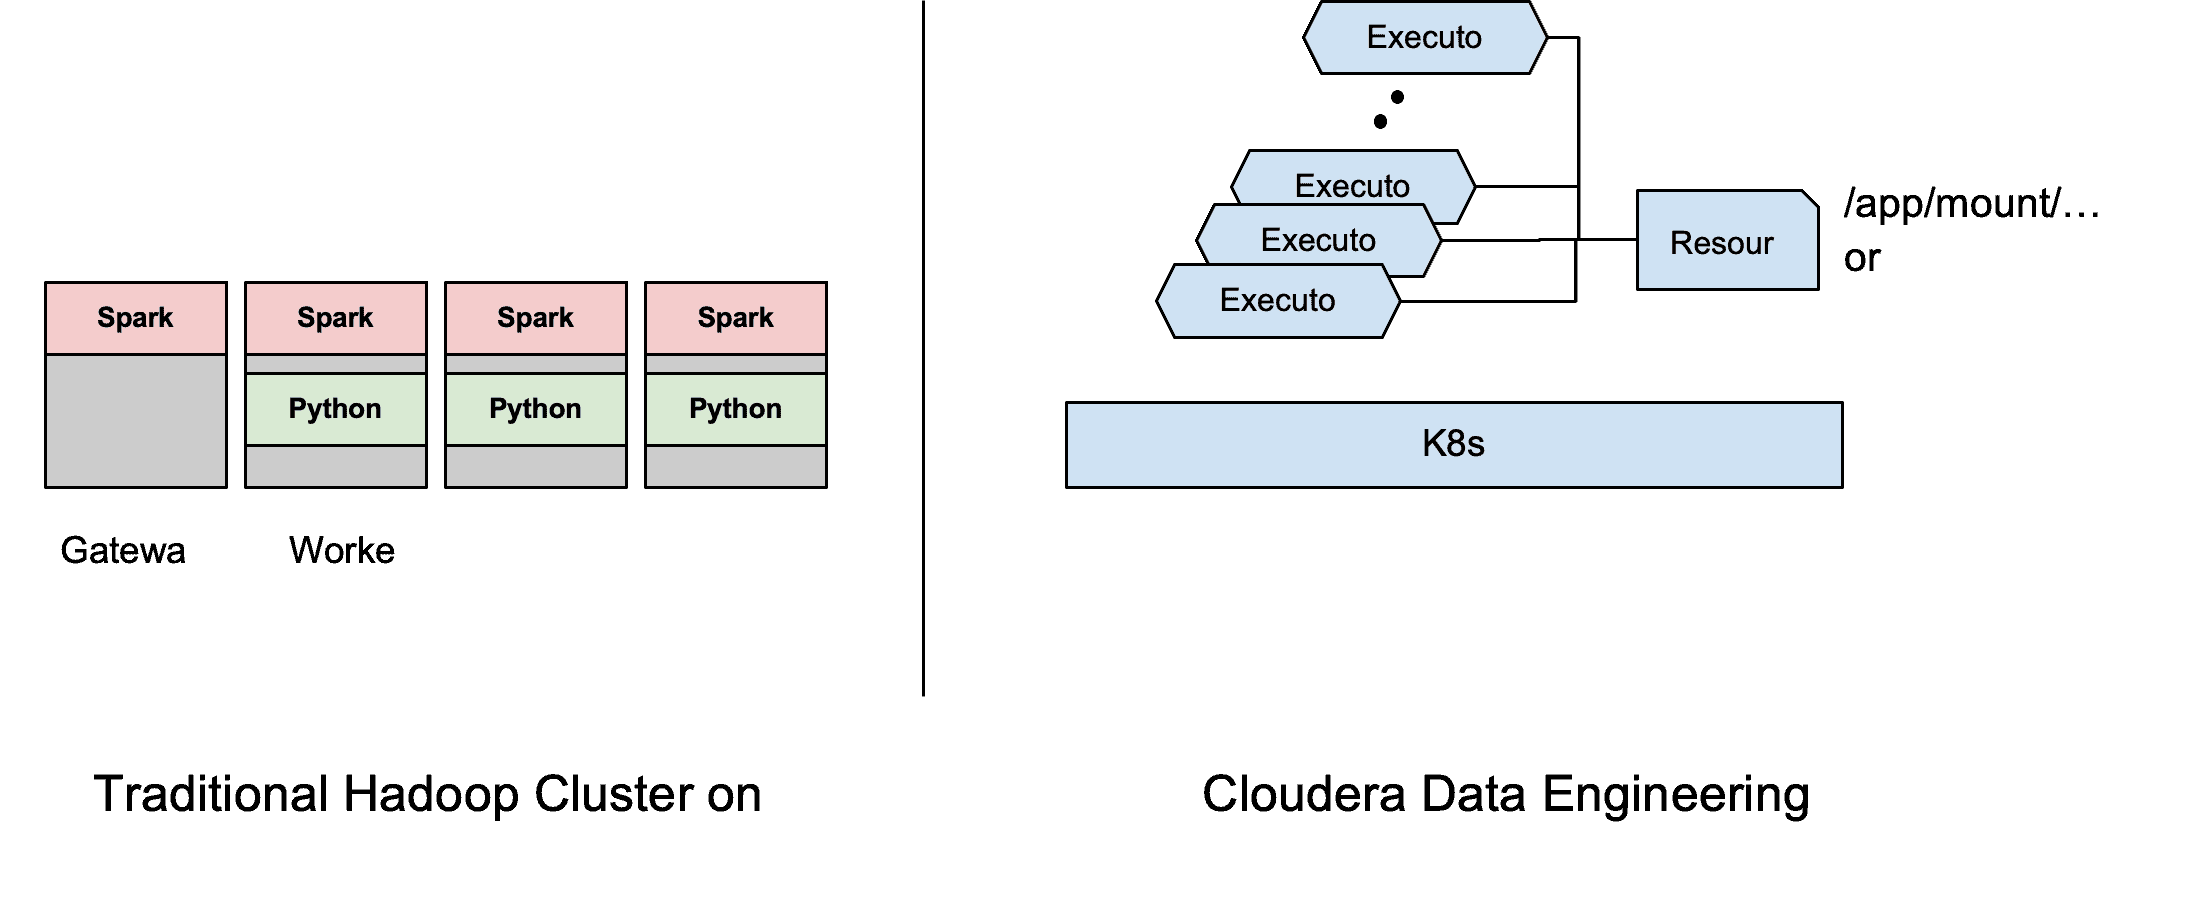
Cloudera Data Engineering (CDE) is a cloud-native service purpose-built for enterprise data engineering teams. CDE is already available in CDP Public Cloud (AWS & Azure) and will soon be available in CDP Private Cloud Experiences. CDE runs Apache Spark on K8S using Apache YuniKorn scheduler. To find out more about CDE review this article. This blog reviews the available options for managing Python dependencies in Cloudera Data Engineering (CDE) using resources, a new API abstraction available out of the box to make managing spark jobs and their associated artifacts much easier. Using CDE’s APIs allows for easy automation of ETL workload and integration with any CI/CD workflows. We will first start out showing how to run a simple PySpark job in CDE then provide a few options of managing dependencies to help highlight the flexibility of the jobs APIs.
Getting started with CDE
This is a simple scenario where the Spark job does not require any additional dependencies. All required dependencies (such as the Hive Warehouse connector) are already included in the base image run by CDE and are made available to the Spark program at runtime. In this case, no additional steps are required.
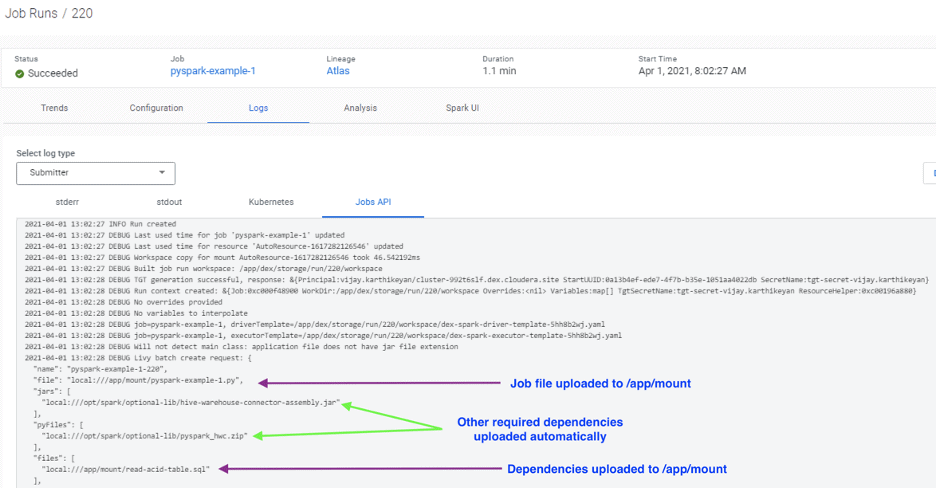
We can use CDE’s “spark-submit” to easily submit our PySpark job from a local machine without having to worry about uploading any files to nodes running on the cluster. CDE’s APIs automatically generate the required resource behind the scenes, and mount the files to all the Spark pods at /app/mount path.
Here is an example showing a simple PySpark program querying an ACID table. Create and trigger the job using the CDE CLI.
# Using Spark Submit to submit an Ad-Hoc job
cde spark submit pyspark-example-1.py \

--file read-acid-table.sql
Here is a view of the job configuration from the CDE UI showing the .sql file being uploaded under the other dependencies section.

Job logs showing how files are uploaded to the container.
Option 1: Jobs using user-defined Python functions
In some scenarios, the Spark jobs are dependent on homegrown Python packages. This is usually done for easy maintenance and reusability. These dependencies are supplied to the job as .py files or in a packaged format such as Egg or Zip files. For such cases, you have a couple of options for including them in the job submission. These scenarios are illustrated with the example below. In this example, the PySpark job has three dependencies (1) a .py file (2) A zip file, and (3) An Egg file which defines functions used by the main application file.
Option 1a: Include the dependencies in every job
The first option is to include all the files required as part of the job definition. To run this example through CDE CLI, run the following command to trigger the job.
# Create CDE job or use cde spark submit
cde spark submit pyspark-example-2a.py \

--py-file file_printDF.py \

--py-file egg-zip/ReadCsvEggFile-1.0-py3.7.egg \

--py-file egg-zip/printPath.zip
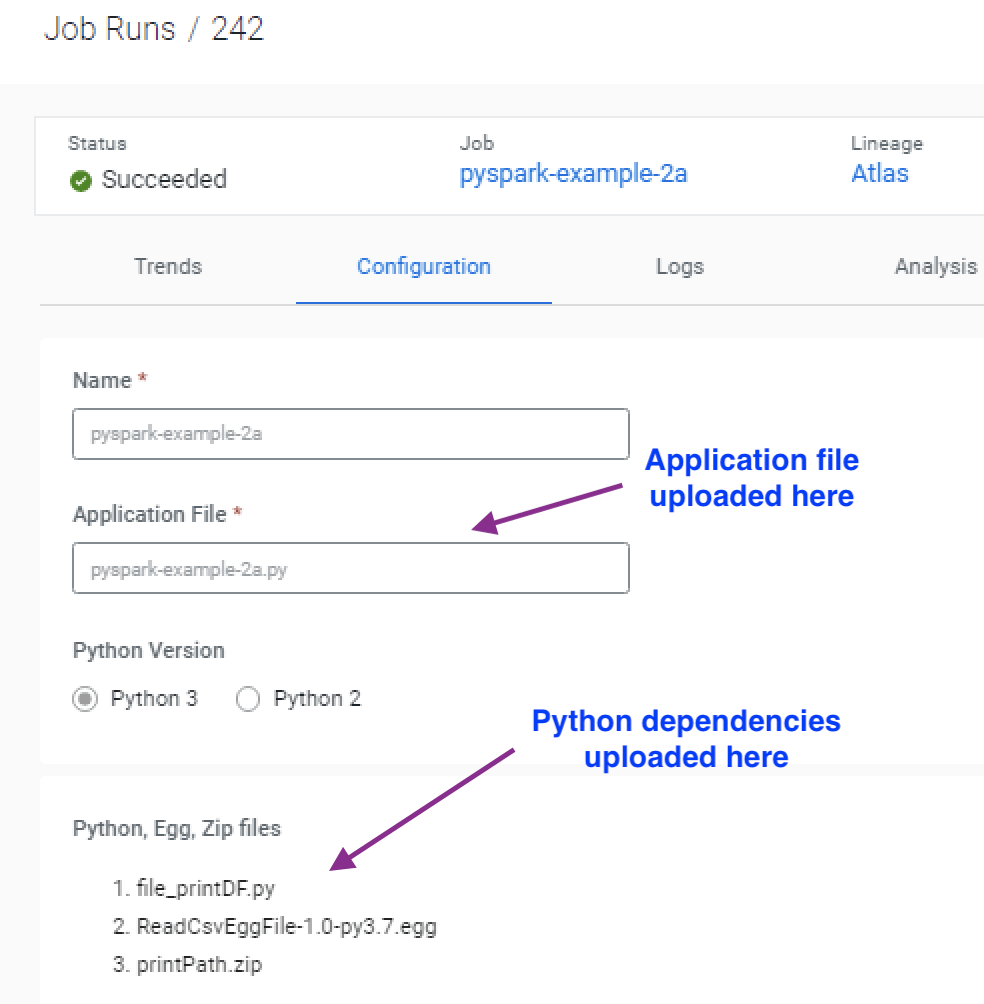
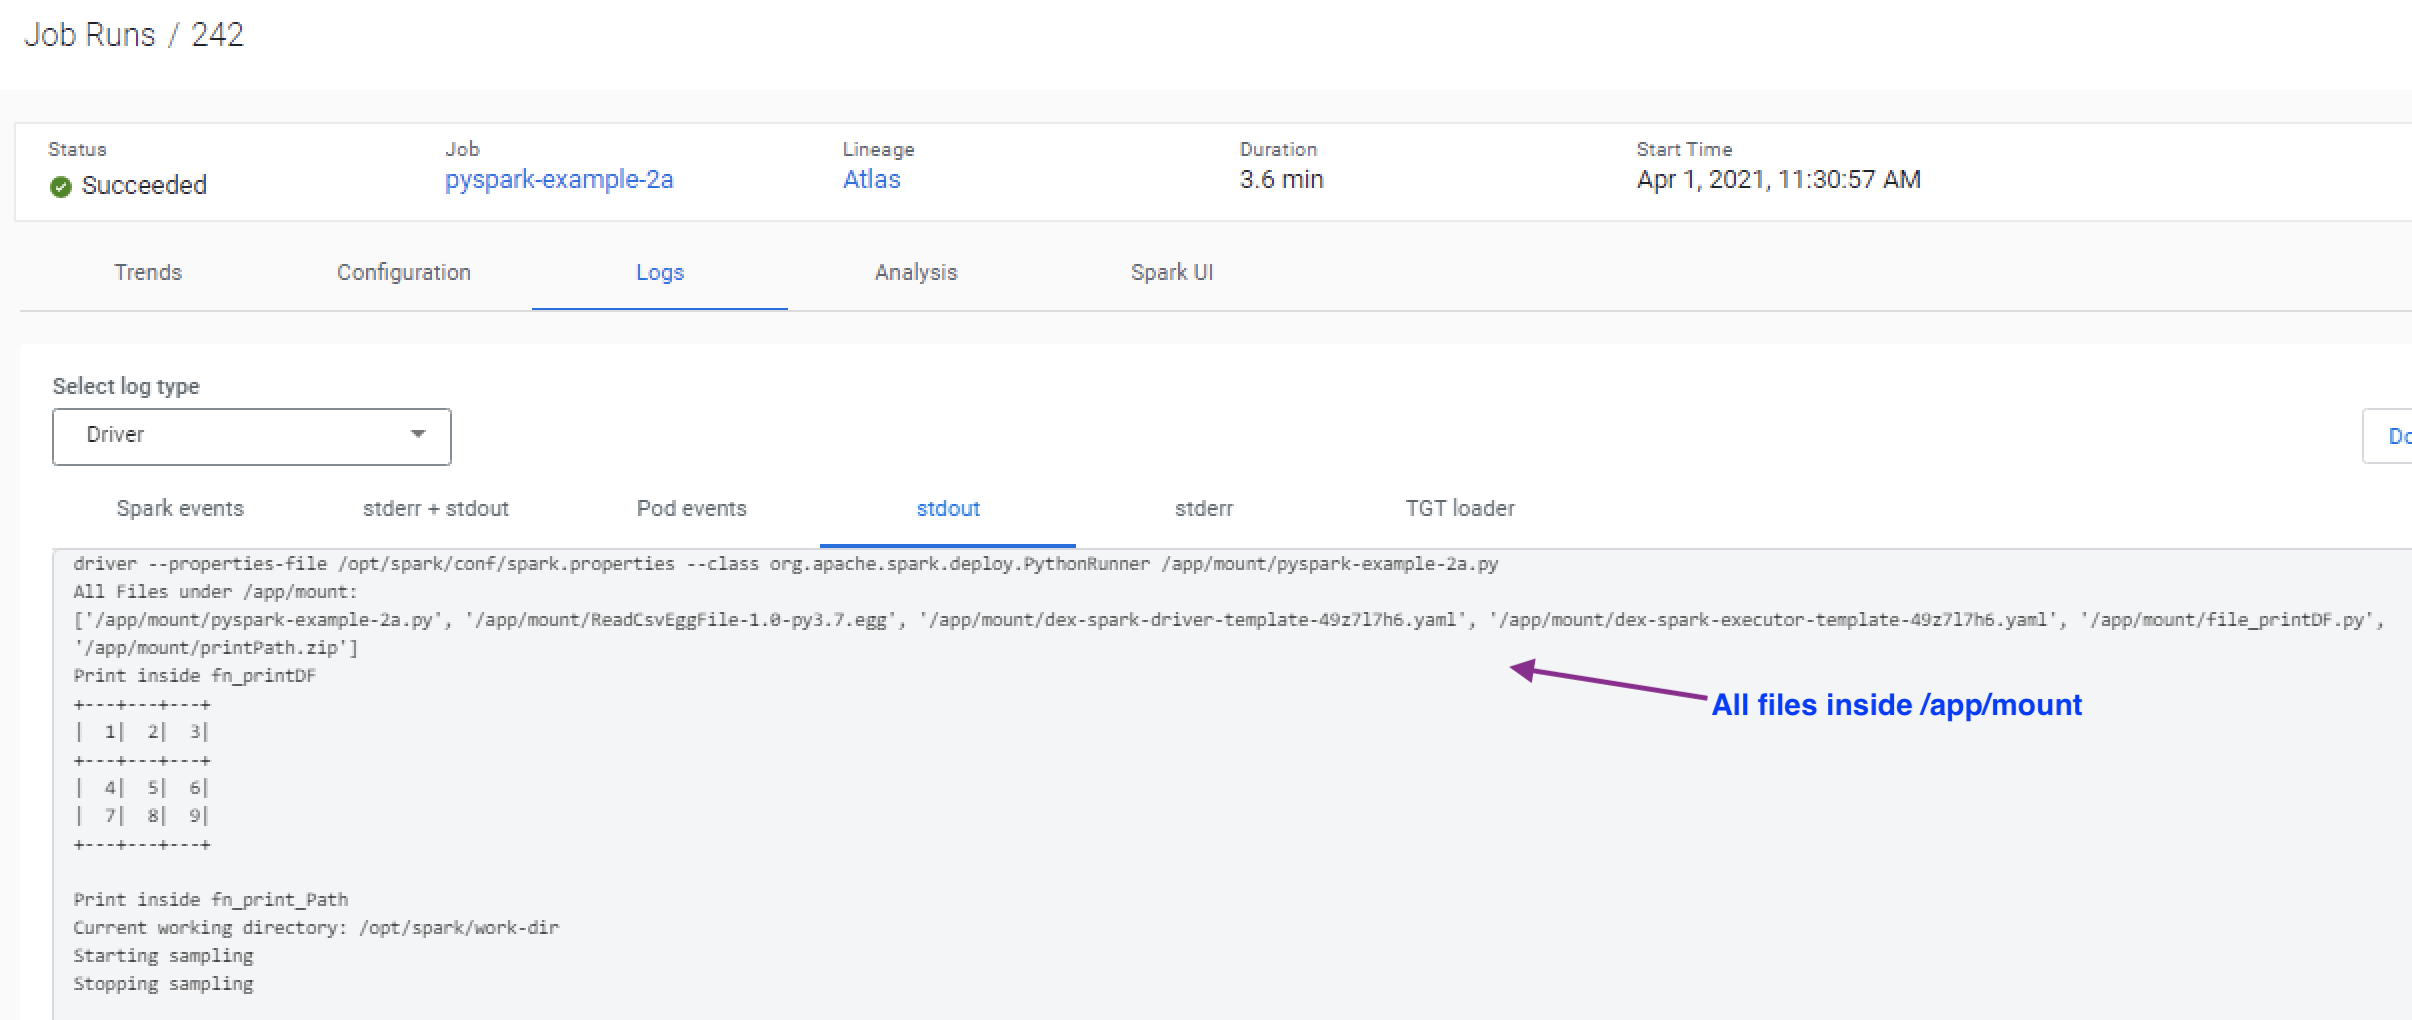
The job definition from the UI shows that the dependent .py, .zip, and .egg files are uploaded into the “Python, Egg, Zip files” section and are uploaded to the “/app/mount” path inside the container.
Option 1b: Create a resource & attach it to the jobs (recommended)
If you have a common setup of dependencies, then you can create a resource to upload all the files and mount them to the container at runtime. This way you can manage the dependencies centrally and re-use the same resource across multiple jobs.
The below example creates two resources – the first one containing the application file and the second one containing the three dependencies used by the application file.
# Create a resource for the application file

cde resource create --type files --name pyspark-example-2b-resource

cde resource upload --name pyspark-example-2b-resource \

--local-path pyspark-example-2b.py


# Create a resource for the common dependencies
cde resource create --type files --name common-py-files
cde resource upload --name common-py-files \

--local-path file_printDF.py \

--local-path egg-zip/ReadCsvEggFile-1.0-py3.7.egg \

--local-path egg-zip/printPath.zip
Here is a view of the uploaded files in the resource:
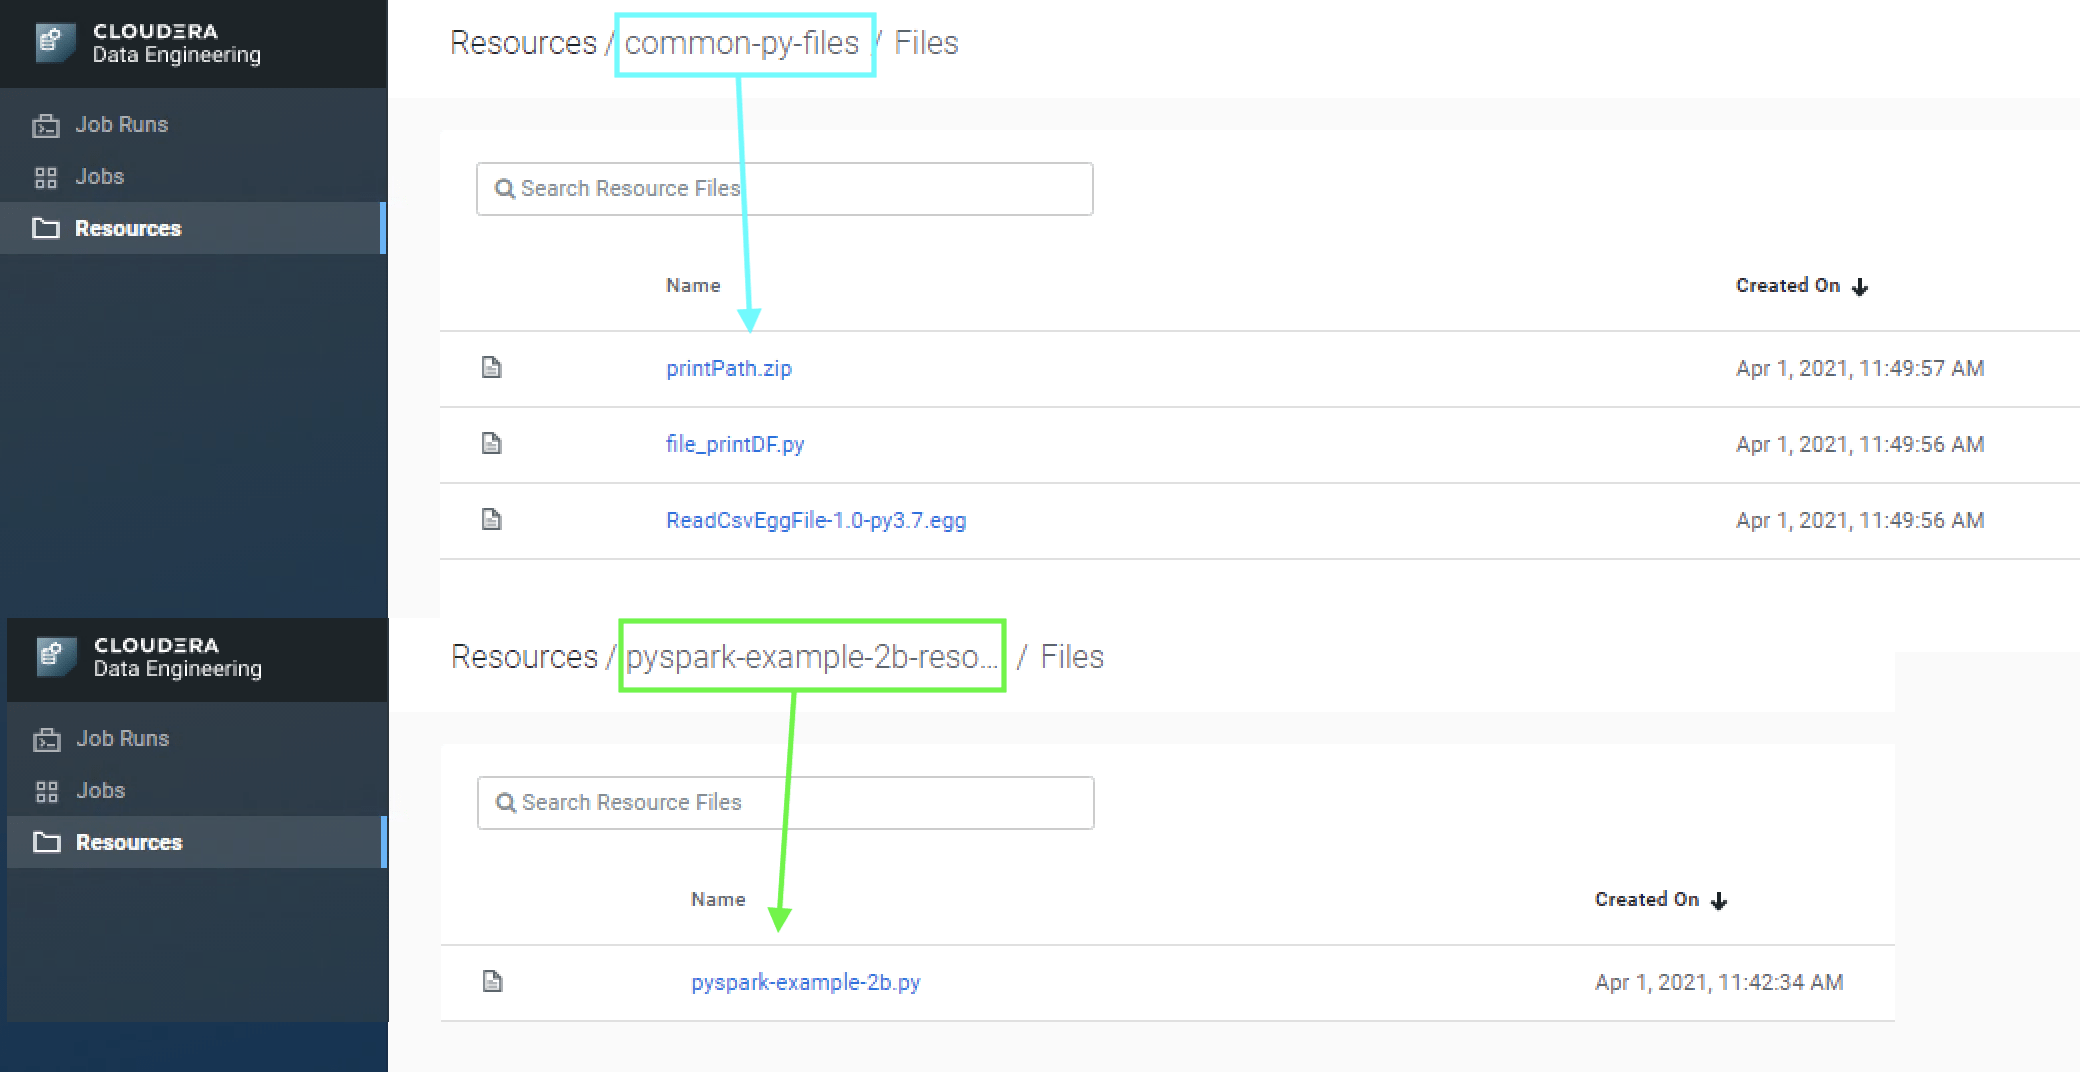
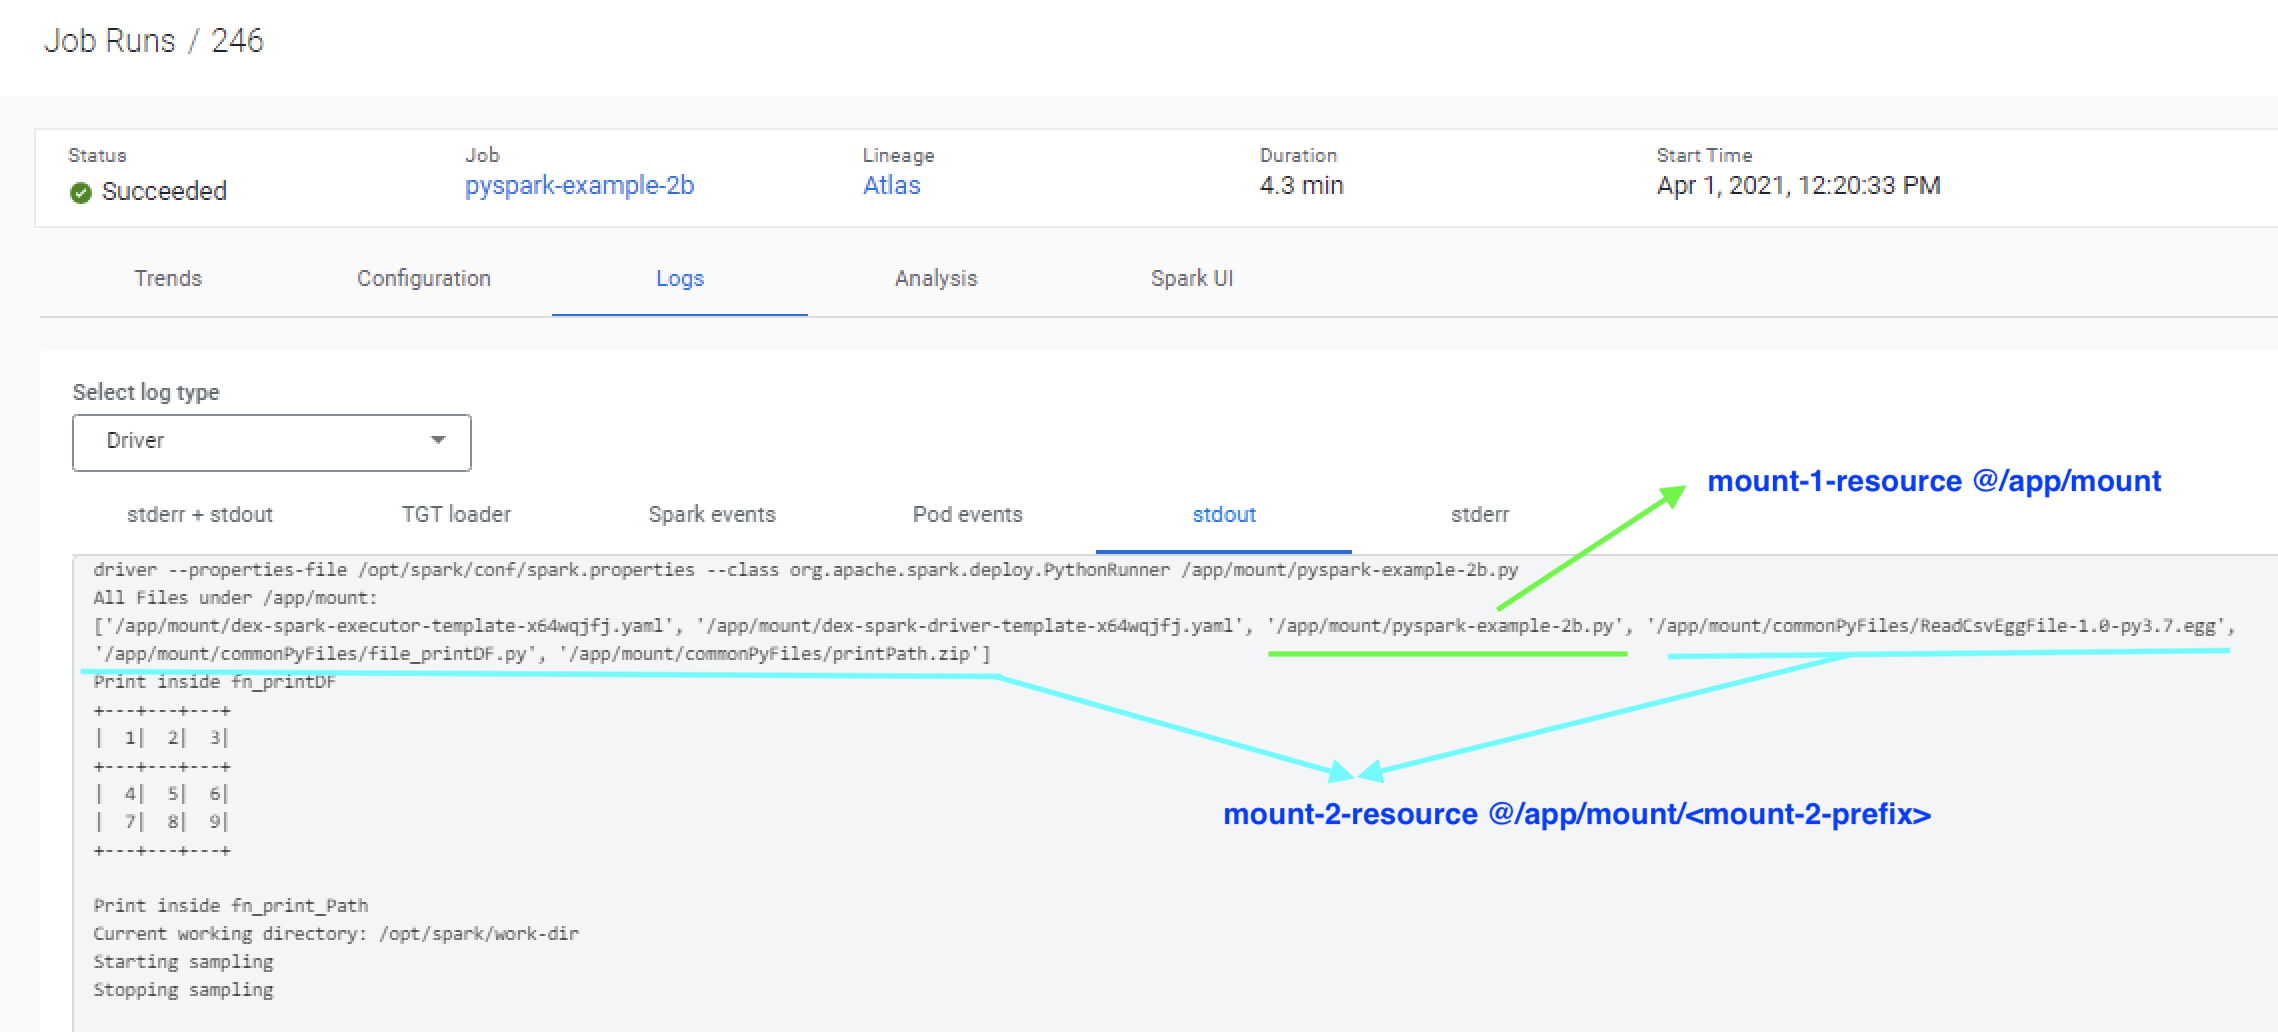
Run the following command to create the job and trigger it. Note the syntax “–mount-N-resource” pointing to the resources created in the earlier step. Also, note that each mounted resource can also be mounted to a specific path. Resources are mounted to the “/app/mount” directory which is the case for pyspark-example-2b-resource. For the common-py-files resource, the mount prefix is set to “commonPyFiles/” which means all the files for this resource will be made available under “/app/mount/commonPyFiles/”.
# Create the CDE job

cde job create --type spark \

--application-file pyspark-example-2b.py \

--mount-1-resource pyspark-example-2b-resource  \

--mount-2-prefix "commonPyFiles/" \

--mount-2-resource common-py-files  \

--name pyspark-example-2b


# Run the job
cde job run --name pyspark-example-2b
Here is a view from the logs showing that the resource is mounted as /commonPyFiles and made available during job execution.
Option 2: Jobs using pure Python libraries
When a job is dependent on pure Python packages users can create a resource of type “python-env” with the requirements.txt file. This file contains the list of items to be installed using pip install. When a resource of type “python-env”, CDE internally creates a virtual environment using the provided requirements.txt file and mounts it with the job. You can now launch jobs with this resource as the python-env-resource-name. Let us review an example to understand this better.
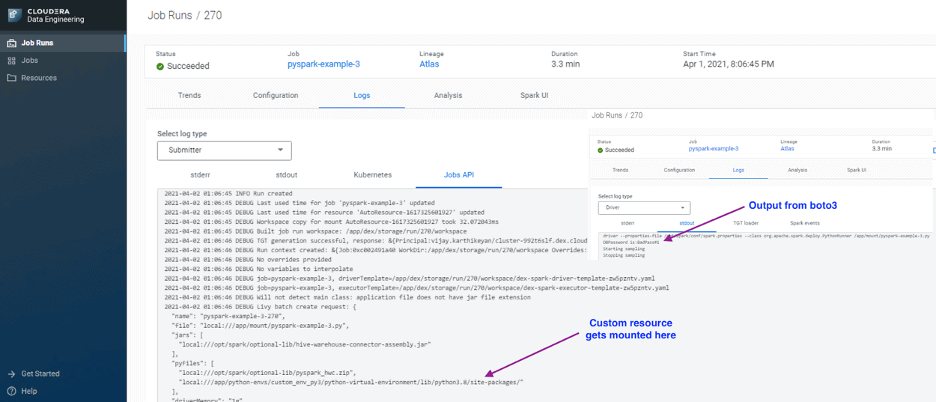
In this example, the python program uses the boto3 Python API to retrieve the database password from AWS Secrets Manager before kicking off the Spark program. The default CDE image does not include this package hence we will first create a resource of type “python-env” and upload the requirements.txt file to it.
# Create resource of type python-env

cde resource create --name custom_env_py3 --type python-env


# Upload the requirements.txt file to the resource

cde resource upload --name custom_env_py3 \
            --local-path requirements.txt
Review the status of the resource from UI or use the command cde resource describe from CDE CLI to get the status. If you try to create a job immediately then you may get the error “Error: create job failed: can not use resource ‘custom_env_py3’ in status ‘building’”. Here is a view of the resource from the UI.

Create and trigger the job. You should now see the custom resource is mounted inside the container
# Create job

cde job create --type spark \

--application-file pyspark-example-3.py \

--python-env-resource-name custom_env_py3 \

--name pyspark-example-3 \

--log-level INFO

# Run the job

cde job run --name pyspark-example-3
Option 3: Jobs using custom libraries and packages
If the job accesses more custom libraries that require RPM packages or other compiled C libraries then you can build a custom docker image built on top of the CDE base image to run the jobs. Some libraries such as pandas, Pyarrow which are frequently used with PySpark are good examples of this scenario (in the future all python libraries would be handled through venv mentioned in Option 2, but for now we will use this as an example for option 3).
In this example, CDE is used to execute a Machine learning scoring job that is dependent on packages such as pandas, NumPy, XGBoost, and more using a custom container. To deploy this example, follow these steps –
- Get the base image name & tag from the Cloudera docker repository
# Login to the Cloudera Docker Repo
docker login https://container.repository.cloudera.com \
 -u $CLDR_REPO_USER -p $CLDR_REPO_PASS

# Check the Available catalogs

curl -u $CLDR_REPO_USER:$CLDR_REPO_PASS  \

-X GET https://container.repository.cloudera.com/v2/_catalog


# Check the images list & select an image

curl -u $CLDR_REPO_USER:$CLDR_REPO_PASS \

-X GET https://container.repository.cloudera.com/v2/cloudera/dex/dex-spark-runtime-2.4.5/tags/list
- Build the custom container and publish it to a container registry. Dockerfile used in this example can be found here.
# Build Container
docker build --network=host -t vka3/cde:cde-runtime-ml . -f Dockerfile

# Push to Container registry

docker push docker.io/vka3/cde:cde-runtime-ml
- On the CDE cluster, create a resource of type “custom-runtime-image”. If you need to use credentials for the docker repository then review these additional instructions from the Cloudera documentation to follow additional steps.
# Create the resource for the Docker container

cde resource create --type="custom-runtime-image" \
 --image-engine="spark2" \

--name="cde-runtime-ml" \

--image="docker.io/vka3/cde:cde-runtime-ml"
- Create a job using the newly created resource.
# Create the job

cde job create --type spark --name ml-scoring-job \

--runtime-image-resource-name cde-runtime-ml \
 --application-file ./ml-scoring.py
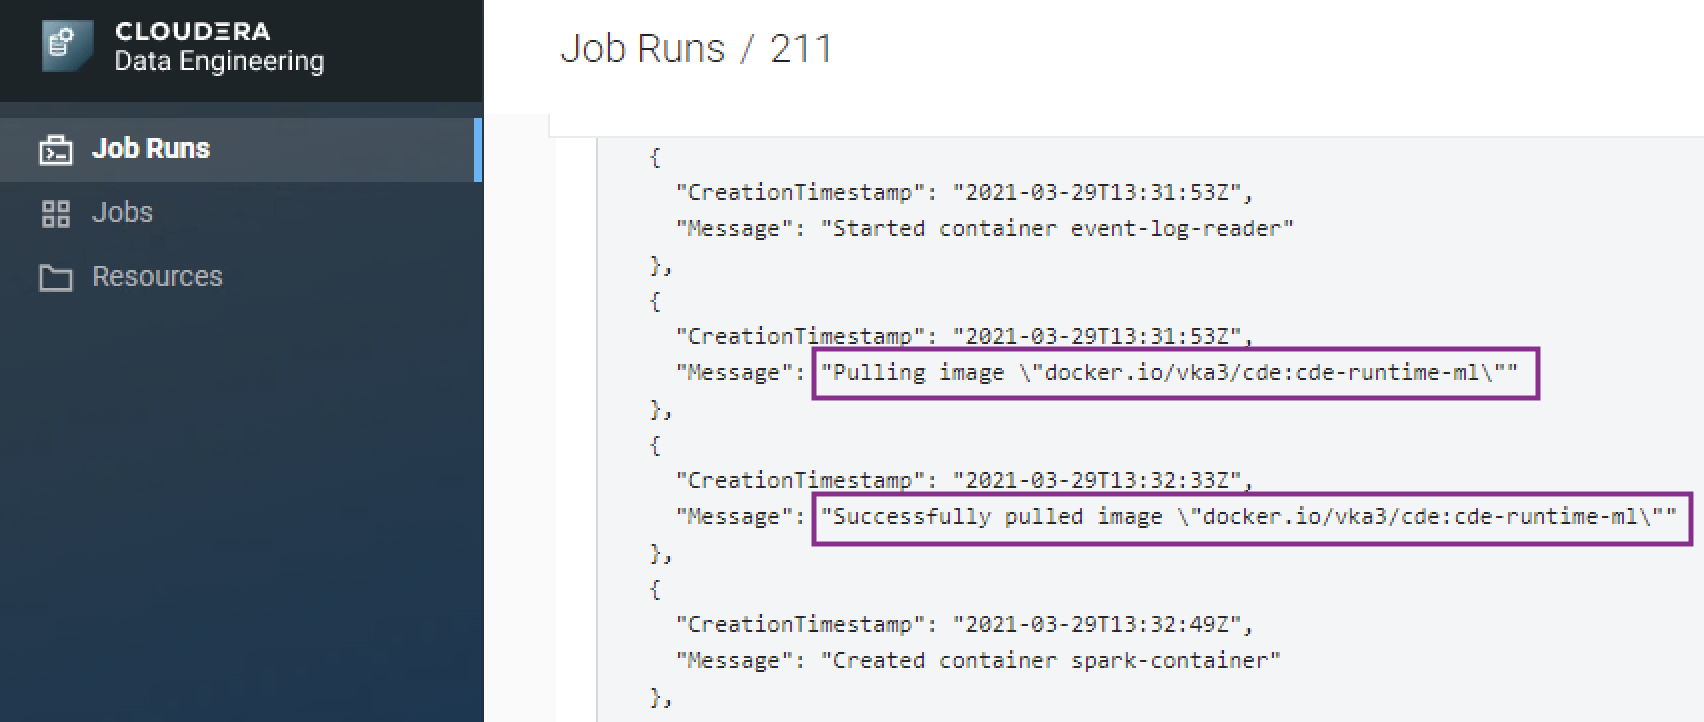
- When the job is run, the job will run using the custom container image.
# Run job
cde job run --name ml-scoring-job
This post reviewed the available options in CDE to manage Python dependencies for your PySpark jobs. CDE provides flexible options for fully operationalizing your data engineering pipelines and is fully integrated with Shared Data Experience for comprehensive security and governance. Try out Cloudera Data Engineering today!
The following folks all contributed to the blog through reviews, edits and suggestions: Shaun Ahmadian, Jeremy Beard, Ian Buss
References:
- Cloudera Data Engineering (CDE) documentation – https://docs.cloudera.com/data-engineering/cloud/index.html
- Cloudera Community Articles on CDE – https://community.cloudera.com/t5/Community-Articles/tkb-p/CommunityArticles/label-name/cloudera%20data%20engineering%20(cde)
- Sample Code used in the post – https://github.com/karthikeyanvijay/cdp-cde
- Setup CDE CLI with Git Bash – https://community.cloudera.com/t5/Community-Articles/Setup-CDE-CLI-with-Git-Bash-on-Windows/ta-p/312808
- CDE custom runtime image build with AWS ECR & CodeBuild – https://community.cloudera.com/t5/Community-Articles/CDE-custom-runtime-image-build-with-AWS-ECR-amp-CodeBuild/ta-p/314762


