


Apache Spark is a very popular analytics engine used for large-scale data processing. It is widely used for many big data applications and use cases. CDP Operational Database Experience Experience (COD) is a CDP Public Cloud service that lets you create and manage operational database instances and it is powered by Apache HBase and Apache Phoenix.
To know more about Apache Spark in CDP and CDP Operational Database Experience, see Apache Spark Overview and CDP Operational Database Experience Overview.
Apache Spark enables you to connect directly to databases that support JDBC. When integrating Apache Spark with Apache Phoenix in COD, you can leverage capabilities provided by Apache Phoenix to save and query data across multiple worker nodes, and use SELECT columns and pushdown predicates for filtering.
In this blog post, let us look at how you can read and write data to COD from Apache Spark. We are going to use an Operational Database COD instance and Apache Spark present in the Cloudera Data Engineering experience.
Prerequisites
- Ensure that you have a COD instance already created. For information about creating a database instance, see CDP Operational Database Experience quick start.
- Ensure that you have a Cloudera Data Engineering experience instance already provisioned, and a virtual cluster is already created. For more information about creating virtual clusters, see Creating virtual clusters.
Steps to configure the Apache Spark – Apache Phoenix integration
You can use Apache Spark in CDE to connect to Apache Phoenix in COD. Before you can do this integration, you must download the hbase-site.xml configuration file from your COD instance.
Collect the COD configuration and connection information
1. Go to the COD control plane user interface, and select your COD database instance.
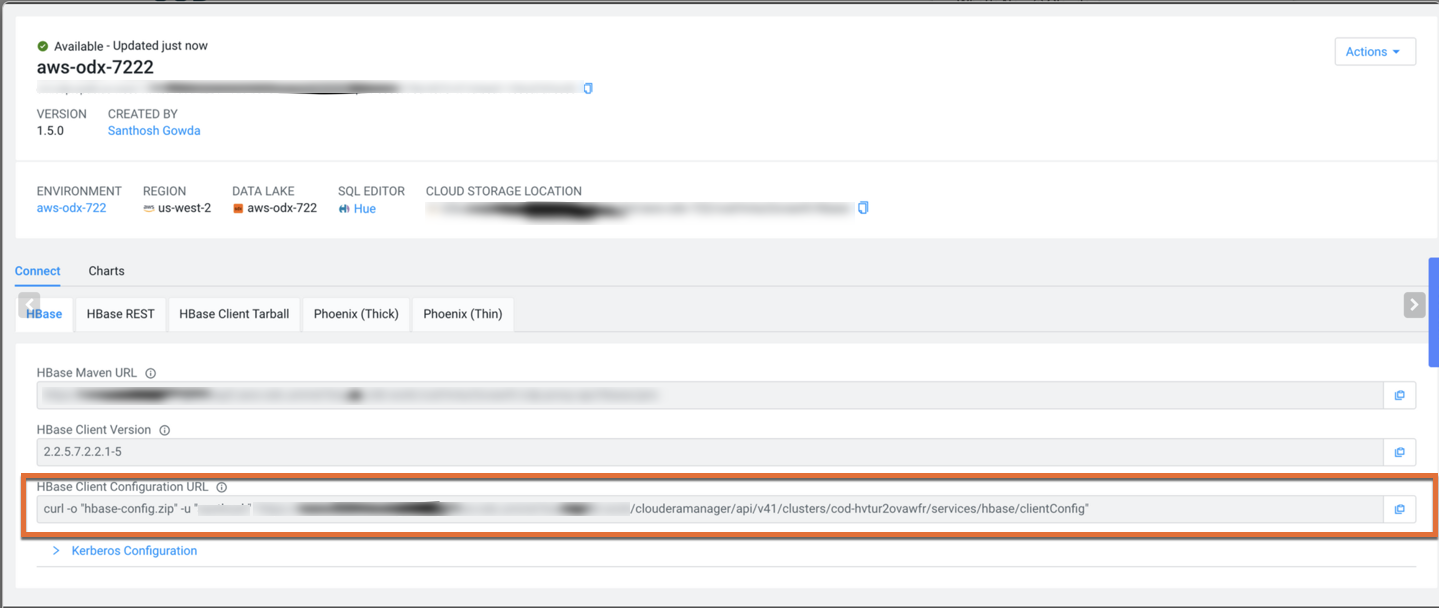
2. In the Connect tab, locate the HBase Client Configuration URL field. Copy the curl URL and use your terminal to download the client configuration archive file. Unzip the archive file and copy the hbase-site.xml configuration file. Use your CDP workload password with the curl command.
The configuration can be downloaded using the following curl command:
curl -o "hbase-config.zip" -u "user" "https://XXXXXX.cldr.work/clouderamanager/api/v41/clusters/cod-name/services/hbase/clientConfig"
3. Copy the Phoenix JDBC URL from the Phoenix (Thick) tab. You will be using the URL later to connect to the COD instance.
Create a table in your COD instance
You must create a table in COD before you can interact with that table using Spark. You can create a table using Apache Phoenix.
- Configure an edge that you can use to connect to the COD instance
- Use SQLLine external client to do Apache Phoenix SQL operations
- In the SQLLine command-line interface, use the following command to create a table in the COD instance
CREATE TABLE OUTPUT_TEST_TABLE (id BIGINT NOT NULL PRIMARY KEY, col1 VARCHAR, col2 INTEGER);
Build phoenix-spark project
You can build a demo Spark project and use the demo JAR file to test your Phoenix-Spark integration with CDE. You can use this example data read-write project to test your configuration: https://github.com/bgsanthosh/spark-hbase/tree/master/spark-hbase.
In the example, ensure that you have updated the phoenix-spark, hbase-spark, and hbase-client versions based on the latest version of Cloudera Runtime available and used by you in your project.
Also, you must add the COD maven repository to the pom.xml, as described here: Compile an application for your COD database.
If you are using Cloudera Runtime 7.2.9 or higher, you must use the phoenix5-spark JAR. For more information, see Configure Phoenix-Spark connector | CDP Public Cloud.
Run the following command from the project home to compile your project:
mvn clean compile package
Configure and run your job on CDE
1. Configure the CDE CLI to point to a virtual cluster in your CDE service. If you do not have a virtual cluster, you must create one. For more information, see Configuring the CLI client.
2. Create a Spark resource in CDE using the following command:
cde resource create --name odx-spark-resource
3. Upload the hbase-site.xml that you downloaded from COD earlier using the following command:
cde resource upload --name odx-spark-resource --local-path hbase-site.xml --resource-path conf/hbase-site.xml
4. Upload the demo app JAR that you built earlier using the following command:
cde resource upload --name odx-spark-resource --local-path ./spark-hbase/target/spark-hbase-1.0-SNAPSHOT.jar --resource-path spark-hbase-1.0-SNAPSHOT.jar
5. Create the CDE job using the following json and import command:
{ "mounts": [ { "resourceName": "odx-spark-resource" } ], "name": "odx-read-write", "spark": { "className": "org.cloudera.e2e.spark.PhoenixReadWrite", "conf": { "spark.executor.extraClassPath": "/app/mount/conf", "spark.driver.extraClassPath": "/app/mount/conf" }, "args": [ "{{ phoenix_jdbc_url }}"], "driverCores": 1, "driverMemory": "1g", "executorCores": 1, "executorMemory": "1g", "file": "spark-hbase-1.0-SNAPSHOT.jar", "pyFiles": [], "files": ["conf/hbase-site.xml"], "numExecutors": 4 } } cde job import --file odx-readwrite-var.json
6. Next, run the job using the following command:
cde job run --name odx-read-write --variable phoenix_jdbc_url=<phoenix_jdbc_url>
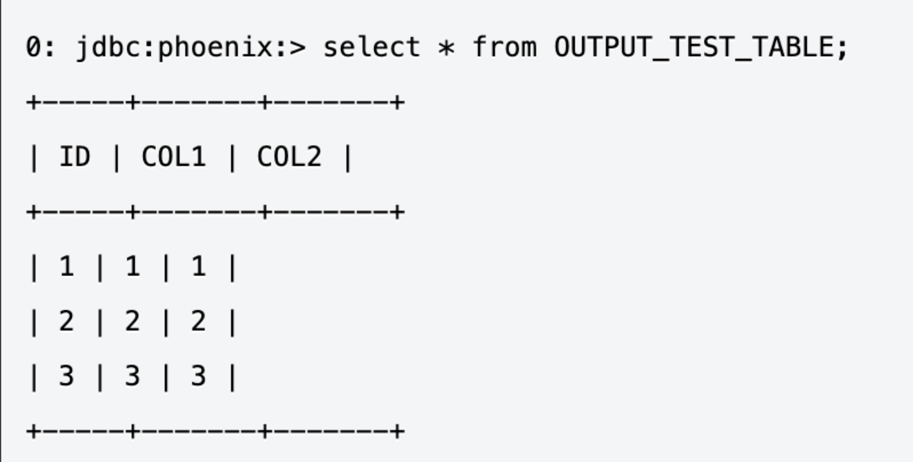
7. Using the phoenix-sqlline tool, check if the following data should is present in the table:
Conclusion
If you are interested in learning more about Apache Spark integration with Cloudera Operational Database experience, see the following documentation:
- Using the HBase-Spark connector
- Understanding Apache Phoenix-Spark Connector
- Cloudera Data Engineering
- CDP Operational Database Experience
Editor's Choice

