

In the previous posts in this series, we have discussed Kerberos, LDAP and PAM authentication for Kafka. In this post we will look into how to configure a Kafka cluster and client to use a TLS client authentication.
The examples shown here will highlight the authentication-related properties in bold font to differentiate them from other required security properties, as in the example below. TLS is assumed to be enabled for the Apache Kafka cluster, as it should be for every secure cluster.
security.protocol=SSL

ssl.truststore.location=/opt/cloudera/security/jks/truststore.jks
We use the kafka-console-consumer for all the examples below. All the concepts and configurations apply to other applications as well.
TLS Client Authentication
TLS client authentication is another method of authentication supported by Kafka. It allows clients to connect to the cluster using their own TLS client certificates to authenticate.
Certificate management and keystore generation is out of the scope of this article but these are standard TLS practice. Note that certificate keystores are as sensitive as a Kerberos keytab and should be treated as such. Keystore permissions should always be set restrictively to avoid them being compromised and they should not be shared. Each client should be issued with their own certificates.
The following Kafka client properties must be set to configure the Kafka client to authenticate using a TLS certificate:
# Uses SSL security protocol
security.protocol=SSL
ssl.keystore.location=./alice-keystore.jks
ssl.keystore.password=supersecret1
ssl.key.password=supersecret1
# TLS truststore
ssl.truststore.location=/opt/cloudera/security/jks/truststore.jks
The configuration above uses TLS (SSL) for both authentication and data encryption.
Enabling TLS authentication on the Kafka Broker
TLS authentication is not enabled by default for the Kafka brokers when the Kafka service is installed but it is fairly easy to configure it through Cloudera Manager.
By default, in a secure cluster, Kafka has a single listener that is configured for handling SASL_SSL authentication. To enable TLS authentication we need to create an additional listener, on a different port, to handle the SSL protocol. This is configured through the Kafka broker’s listeners property. When this property is set we need to be careful to also list the original SASL_SSL listener in it to ensure that clients can still authenticate through Kerberos and LDAP, if those are being used.
Additionally, to use TLS client authentication we must ensure that the brokers and clients mutually trust each other’s certificates. We already configured the client in the previous examples with a truststore containing the certificate of the broker’s certificates issuer (ssl.truststore.location property). Now, we must also ensure that the certificate for the CA that issued the client certificates is added to the brokers’ truststore, if this is a different CA from the one who issues the brokers’ certificates.
We recommend that the client certificates (and the brokers’, for that matter) be issued by a private CA that you own and control. Never add certificates of CAs over which you don’t have control (especially public CAs) to the cluster truststore.
In Cloudera Data Platform (CDP) deployments, TLS is enabled consistently across all clusters and services that share the same environment. The environment has a common Shared Data Experience (SDX) layer which contains a common security and governance context shared across all the environment clusters and TLS certificates can be issued and managed by SDX’s embedded FreeIPA service.
- In Cloudera Manager, click on Kafka > Instances > Kafka Broker (click on an individual broker) > Configuration. An alert will be shown and you can ignore it by clicking on Continuing Editing Role Instance.
- Set the following property for the Kafka Broker (using your own broker’s fully-qualified hostname) and save the configuration.
We are setting two different properties at once in this safety valve: listeners and ssl.principal.mapping.rules. Note the different protocols and ports for each listener in the listeners property.
- Repeat the process for all the other brokers.
- Now set the following at the service level, clicking on Kafka > Configuration, and checking “required” in the configuration below. Save your change:

- As explained above, Kafka needs to trust the certificates issued to your clients. If those certificates were signed by a different CA from the Kafka Broker certificates, you need to add the client certificates’ CA to the Kafka truststore. You can find the location of the truststore in the following property in Cloudera Manager:

- Run the following command (as root) to add the CA certificate to the truststore:
keytool \
  -importcert \
  -keystore /opt/cloudera/security/jks/truststore.jks \
  -storetype JKS \
  -alias ldap-ca \
  -file /path/to/ca-cert.pem
- Click on Kafka > Actions > Restart to restart the Kafka service and make the changes effective.
Security Inter Broker Protocol
The security protocol used for inter-broker communication is controlled by Kafka’s security.inter.broker.protocol property. Cloudera Manager’s default setting for this property is set to INFERRED.
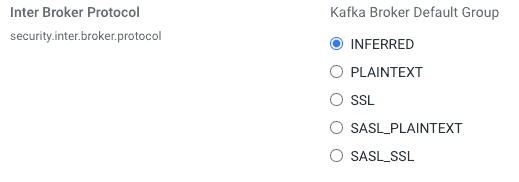
In this configuration, CM will set the security.inter.broker.protocol property according to the following logic:
- If Kerberos or LDAP authentication are being used:
- If TLS is enabled, set it to SASL_SSL
- If TLS is not enabled, set it to SASL_PLAINTEXT
- Otherwise:
- If TLS is enabled, set it to SSL
- If TLS is not enabled, set it to PLAINTEXT
If you defined multiple listeners with different security protocols and the inferred inter-broker protocol is not the one you want to use, you can override using the property shown above.
Principal name mapping
When a client authenticates using a TLS keystore, by default Kafka assumes that the username for that client is the certificate’s subject name, which is usually a Distinguished Name like this:
cn=alice,cn=groups,cn=accounts,dc=hadoopsecurity,dc=local
Working with these long names is cumbersome. Security policies and group mappings are usually defined in terms of the user’s short name (alice) rather than the full distinguished name. Hence, we need to configure Kafka to translate the certificate’s subject into a short name that we can use as the user’s unique identifier.
If you are using Kafka 2.4.0(*) or later versions, this can be done by setting the ssl.principal.mapping.rules parameter with the necessary mapping rules. For older versions you can provide a custom principal builder. Creating the custom builder is out of the scope of this document but you can find a good example here.
The rule takes the form of a regular expression to match the certificate’s subject name and the transformation to apply to the match. There can be multiple rules, separated by commas. The last rule is usually the DEFAULT rule, which simply uses the full subject name
For example, consider the following setting:
ssl.principal.mapping.rules=RULE:^.*[Cc][Nn]=([a-zA-Z0-9.]*).*$/$1/L,DEFAULT
The above configuration has 2 rules, which are processed in order:
-
RULE:^[Cc][Nn]=([a-zA-Z0-9.]*).*$/$1/L -
DEFAULT
The first rule to match the certificate’s subject name will be used and the later ones will be ignored. The DEFAULT rule is a “catch all”. It will always match and won’t do any replacement, if none of the previous ones were matched.
The regular expression of the first rule above (^[Cc][Nn]=([a-zA-Z0-9.]*).*$) will match any subject that starts with CN= (or: cn=, Cn=, cN=), followed by the user’s short name (which should contain only the following characters: a-zA-Z0-9.), followed by anything after that. It replaces the matched string with the user short name, which is the content matched inside the parenthesis and is referenced in the second part of the rule as $1. You can see that in action and play with the regular expression and examples here.
The L at the end of the rule converts the resulting string to lowercase. You can see more details and examples of rules in the Kafka official documentation.
Certificate Revocation Lists
Certificate Revocation Lists (or CRL) are lists of digital certificates that have been revoked by the issuing certificate authority (CA) before their scheduled expiration date and should no longer be trusted. CRLs are an important feature in TLS authentication to ensure that client certificates that have been compromised can be marked as expired so that the Kafka brokers refuse connections from clients using them.
Although the use of CRLs is not yet directly supported by Kafka (see KAFKA-3700), the option is available in the Java framework. Revocation checks can be performed either through CRL Distribution Points (CRLDP) or through the Online Certificate Status Protocol (OCSP). To use either of those you must first ensure that your Certificate Authority (CA) is correctly configured for certificate revocation checks using one of those methods and that the certificates contain the necessary information for that. The configuration of CAs and generation of certificates with the correct attributes is beyond the scope of this document.
To enable certificate revocation checks for Kafka, perform the following steps:
To enable revocation checks using CRLDP:
a. In Cloudera Manager, go Kafka > Configuration and search for the Additional Broker Java Options property.
b. Append the following values to the end of that property:
-Dcom.sun.security.enableCRLDP=true

-Dcom.sun.net.ssl.checkRevocation=true

To enable revocation checks using OCSP:
a. In addition to the properties described above for CRLDP, also append the following value to the end of the same property:
-Djava.security.properties=<(echo "ocsp.enable=true")
The Kafka service must be restarted after any of the changes above are made. If support to CRLDP and/or OCSP are not configured correctly in the CA and certificates the service may fail to start.
Even if certificate revocation is not enabled, access to Kafka resources can still be blocked to revoked certificates by ensuring that all the authorization policies that apply to those certificates (either through Ranger, Sentry or ACLs) are revoked and/or denied.
Example
The following is an example using the Kafka console consumer to read from a topic using TLS authentication. Note that when connecting to the cluster we provide a bootstrap server using the port of the SSL listener (9094), instead of the default 9093.
$ cat tls-client.properties
security.protocol=SSL
ssl.keystore.location=./alice-keystore.jks
ssl.keystore.password=supersecret1
ssl.key.password=supersecret1
ssl.truststore.location=/opt/cloudera/security/jks/truststore.jks
$ kafka-console-consumer \
    --bootstrap-server host-1.example.com:9094 \
    --topic test \
    --consumer.config ./tls-client.properties
NOTE: The client configuration above contains sensitive credentials. When storing this configuration in a file, ensure that the files permissions are set so that only the file owner can read it.
More to come
All these authentication methods that we are reviewing in this blog series provide you flexibility to configure your Kafka cluster to integrate with the authentication mechanisms that work with your environment.
We will continue exploring other authentication alternatives in the next posts in this series. In the meantime, if you are interested in understanding Cloudera’s Kafka offering, download this white paper.
(*) The ssl.principal.mapping.rules property is available since Kafka 2.2.0, but it can’t handle spaces in the certificate distinguished name (KAFKA-8860). Kafka 2.4.0 is a more robust starting point.
Editor's Choice

