Introduction
For more than a decade now, the Hive table format has been a ubiquitous presence in the big data ecosystem, managing petabytes of data with remarkable efficiency and scale. But as the data volumes, data variety, and data usage grows, users face many challenges when using Hive tables because of its antiquated directory-based table format. Some of the common issues include constrained schema evolution, static partitioning of data, and long planning time because of S3 directory listings.
Apache Iceberg is a modern table format that not only addresses these problems but also adds additional features like time travel, partition evolution, table versioning, schema evolution, strong consistency guarantees, object store file layout (the ability to distribute files present in one logical partition across many prefixes to avoid object store throttling), hidden partitioning (users don’t have to be intimately aware of partitioning), and more. Therefore, Apache Iceberg table format is poised to replace the traditional Hive table format in the coming years.
However, as there are already 25 million terabytes of data stored in the Hive table format, migrating existing tables in the Hive table format into the Iceberg table format is necessary for performance and cost. Depending on the size and usage patterns of the data, several different strategies could be pursued to achieve a successful migration. In this blog, I will describe a few strategies one could undertake for various use cases. While these instructions are carried out for Cloudera Data Platform (CDP), Cloudera Data Engineering, and Cloudera Data Warehouse, one can extrapolate them easily to other services and other use cases as well.
There are few scenarios that one might encounter. One or more of these use cases might fit your workload and you might be able to mix and match the potential solutions provided to suit your needs. They are meant to be a general guide. In all the use cases we are trying to migrate a table named “events.”
Approach 1
You have the ability to stop your clients from writing to the respective Hive table during the duration of your migration. This is ideal because this might mean that you don’t have to modify any of your client code. Sometimes this is the only choice available if you have hundreds of clients that can potentially write to a table. It could be much easier to simply stop all those jobs rather than allowing them to continue during the migration process.
In-place table migration
Solution 1A: using Spark’s migrate procedure
Iceberg’s Spark extensions provide an in-built procedure called “migrate” to migrate an existing table from Hive table format to Iceberg table format. They also provide a “snapshot” procedure that creates an Iceberg table with a different name with the same underlying data. You could first create a snapshot table, run sanity checks on the snapshot table, and ensure that everything is in order.
 Once you are satisfied you can drop the snapshot table and proceed with the migration using the migrate procedure. Keep in mind that the migrate procedure creates a backup table named “events__BACKUP__.” As of this writing, the “__BACKUP__” suffix is hardcoded. There is an effort underway to let the user pass a custom backup suffix in the future.

Keep in mind that both the migrate and snapshot procedures do not modify the underlying data: they perform in-place migration. They simply read the underlying data (not even full read, they just read the parquet headers) and create corresponding Iceberg metadata files. Since the underlying data files are not changed, you may not be able to take full advantage of the benefits offered by Iceberg right away. You could optimize your table now or at a later stage using the “rewrite_data_files” procedure. This will be discussed in a later blog. Now let’s discuss the pros and cons of this approach.
PROS:
- Can do migration in stages: first do the migration and then carry out the optimization later using rewrite_data_files procedure (blog to follow).
- Relatively fast as the underlying data files are kept in place. You don’t have to worry about creating a temporary table and swapping it later. The procedure will do that for you atomically once the migration is finished.
- Since a Hive backup is available one can revert the change entirely by dropping the newly created Iceberg table and by renaming the Hive backup table (__backup__) table to its original name.
CONS:
- If the underlying data is not optimized, or has a lot of small files, those disadvantages could be carried forward to the Iceberg table as well. Query engines (Impala, Hive, Spark) might mitigate some of these problems by using Iceberg’s metadata files. The underlying data file locations will not change. So if the prefixes of the file path are common across multiple files we may continue to suffer from S3 throttling (see Object Store File Layout to see how to configure it properly.) In CDP we only support migrating external tables. Hive managed tables cannot be migrated. Also, the underlying file format for the table has to be one of avro, orc, or parquet.
Note: There is also a SparkAction in the JAVA API.
Solution 1B: using Hive’s “ALTER TABLE” command
Cloudera implemented an easy way to do the migration in Hive. All you have to do is to alter the table properties to set the storage handler to “HiveIcebergStorageHandler.”

The pros and cons of this approach are essentially the same as Solution 1B. The migration is done in place and the underlying data files are not changed. Hive creates Iceberg’s metadata files for the same exact table.
Shadow table migration
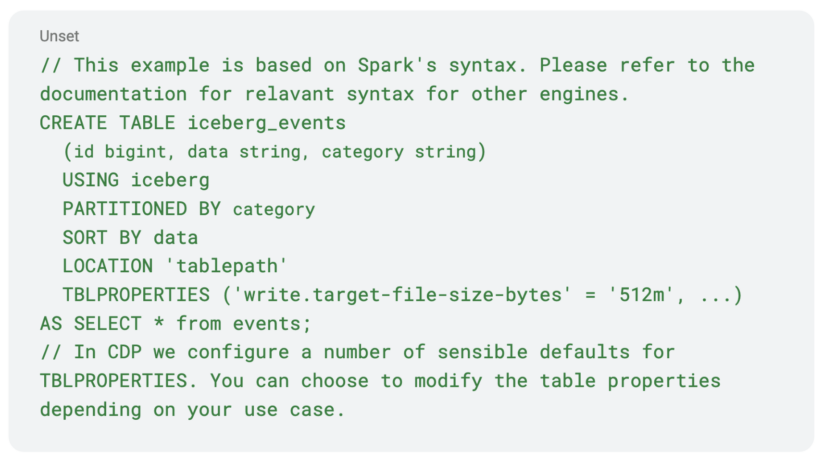
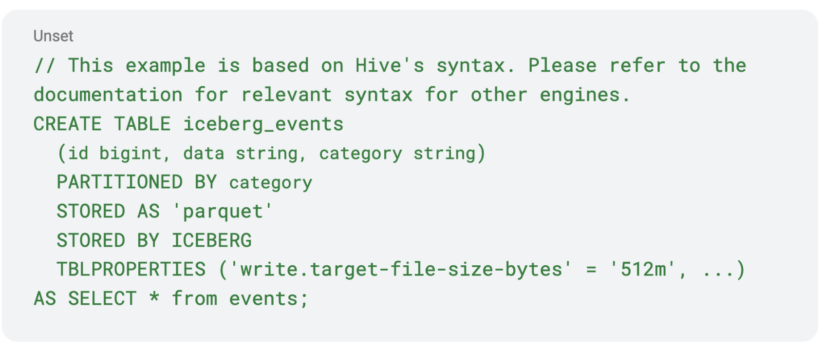
Solution 1C: using the CTAS statement
This solution is most generic and it could potentially be used with any processing engine (Spark/Hive/Impala) that supports SQL-like syntax.


You can run basic sanity checks on the data to see if the newly created table is sound.


Once you are satisfied with your sanity checking you could rename your “events” table to a “backup_events” table and then rename your “iceberg_events” to “events.” Keep in mind that in some cases the rename operation might trigger a directory rename of the underlying data directory. If that is the case and your underlying data store is an object store like S3, that will trigger a full copy of your data and could be very expensive. If while creating the Iceberg table the location clause is specified, then the renaming operation of the Iceberg table will not cause the underlying data files to move. The name will change only in the Hive metastore. The same applies for Hive tables as well. If your original Hive table was not created with the location clause specified, then the rename to backup will trigger a directory rename. In that case, If your filesystem is object store based, then it might be best to drop it altogether. Given the nuances around table rename it is critical to test with dummy tables in your system and check that you are seeing your desired behavior before you perform these operations on critical tables.

You can drop your “backup_events” if you wish.
 Your clients can now resume their read/write operations on the “events” and they don’t even need to know that the underlying table format has changed. Now let’s discuss the pros and cons of this approach.
PROS:
- The newly created data is well optimized for Iceberg and the data will be distributed well.
- Any existing small files will be coalesced automatically.
- Common procedure across all the engines.
- The newly created data files could take advantage of Iceberg’s Object Store File Layout, so that the file paths have different prefixes, thus reducing object store throttling. Please see the linked documentation to see how to take advantage of this feature.
- This approach is not necessarily restricted to migrating a Hive table. One could use the same approach to migrate tables available in any processing engine like Delta, Hudi, etc.
- You can change the data format say from “orc” to “parquet.’’
CONS
- This will trigger a full read and write of the data and it might be an expensive operation.
- Your entire data set will be duplicated. You need to have sufficient storage space available. This shouldn’t be a problem in a public cloud backed by an object store.
Approach 2
You don’t have the luxury of long downtime to do your migration. You want to let your clients or jobs continue writing the data to the table. This requires some planning and testing, but is possible with some caveats. Here is one way you can do it with Spark. You can potentially extrapolate the ideas presented to other engines.
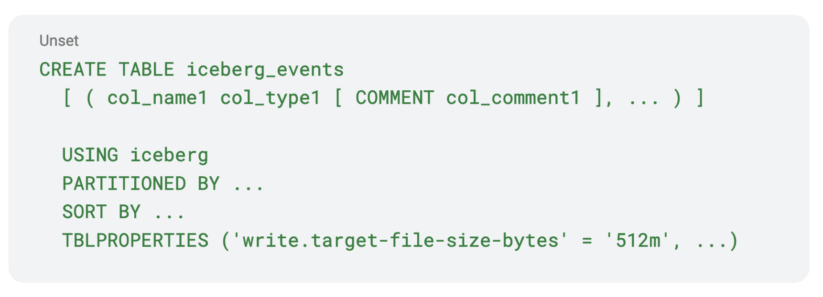
- Create an Iceberg table with the desired properties. Keep in mind that you have to keep the partitioning scheme the same for this to work correctly.

- Modify your clients or jobs to write to both tables so they write to the “iceberg_events” table and “events” table. But for now, they only read from the “events” table. Capture the timestamp from which your clients started writing to both of the tables.
- You programmatically list all the files in the Hive table that were inserted before the timestamp you captured in step 2.
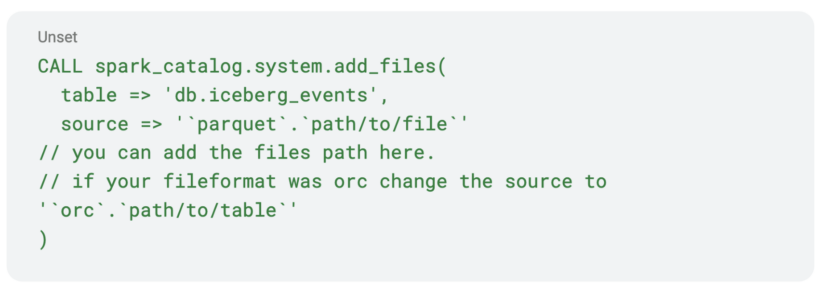
- Add all the files captured in step 3 to the Iceberg table using the “add_files” procedure. The “add_files” procedure will simply add the file to your Iceberg table. You also might be able to take advantage of your table’s partitioning scheme to skip step 3 entirely and add files to your newly created Iceberg table using the “add_files” procedure.

- If you don’t have access to Spark you might simply read each of the files listed in step 3 and insert them into the “iceberg_events.”
- Once you successfully add all the data files, you can stop your clients from reading/writing to the old “events” and use the new “iceberg_events.”
Some caveats and notes
- In step 2, you can control which tables your clients/jobs will have to write to using some flag that can be fetched from external sources like environment variables, some database (like Redis) pointer, and properties files, etc. That way you only have to modify your client/job code once and don’t have to keep modifying it for each step.
- In step 2, you are capturing a timestamp that will be used to calculate files needed for step 3; this could be affected by clock drift on your nodes. So you might want to sync all your nodes before you start the migration process.
- If your table is partitioned by date and time (as most real world data is partitioned), as in all new data coming will go to a new partition everyday, then you might program your clients to start writing to both the tables from a specific date and time. That way you just have to worry about adding the data from the old table (“events”) to the new table (“Iceberg_events”) from that date and time, and you can take advantage of your partitioning scheme and skip step 3 entirely. This is the approach that should be used whenever possible.
Conclusion
Any large migration is tough and has to be thought through carefully. Thankfully, as discussed above there are multiple strategies at our disposal to do it effectively depending on your use case. If you have the ability to stop all your jobs while the migration is happening it is relatively straightforward, but if you want to migrate with minimal to no downtime then that requires some planning and careful thinking through your data layout. You can use a combination of the above approaches to best suit your needs.
To learn more:
- For more on table migration, please refer to respective online documentations in Cloudera Data Warehouse (CDW) and Cloudera Data Engineering (CDE).
- Watch our webinar Supercharge Your Analytics with Open Data Lakehouse Powered by Apache Iceberg. It includes a live demo recording of Iceberg capabilities.
- Try Cloudera Data Warehouse (CDW), Cloudera Data Engineering (CDE), and Cloudera Machine Learning (CML) by signing up for a 60 day trial, or test drive CDP. You can also schedule a demo by clicking here or if you are interested in chatting about Apache Iceberg in CDP, contact your account team.


