

Cloudera Machine Learning (CML) is a cloud-native and hybrid-friendly machine learning platform. It unifies self-service data science and data engineering in a single, portable service as part of an enterprise data cloud for multi-function analytics on data anywhere. CML empowers organizations to build and deploy machine learning and AI capabilities for business at scale, efficiently and securely, anywhere they want. It’s built for the agility and power of cloud computing, but isn’t limited to any one cloud provider or data source.
Data professionals who use CML spend the vast majority of their time in an isolated compute session that comes pre-loaded with an editor UI. Apache Zeppelin is a popular open-source, web-based notebook editor used for interactive data analysis. Zeppelin supports a variety of different interpreters, including Apache Spark. What’s more, Zeppelin has been part of the Cloudera Data Platform (CDP) runtime since the beginning of the CDP in both public and private clouds. Many users are accustomed to its friendly and flexible interface, but want even more flexibility with deployment options.
CML users are able to use their desired programming language and version, as well as install any other packages or libraries that are required for their project. To enable a seamless programming experience for data scientists, CML also supports multiple editors. With the introduction of machine learning (ML) runtimes and the new runtime registration feature, both options got even more flexible. CML administrators can now create and add custom runtimes with all their required packages and libraries, including multiple new editors.
The rest of this blog post will focus on providing instructions for a CML administrator to customize an ML runtime by adding Zeppelin as a new editor.
Prerequisites
- A Docker repository available for the user and also accessible for CML (e.g. docker.io)
- A machine with Docker tools installed
Instructions
Preparing a custom ML runtime is a multi-step process. First, we’ll create two configuration files for Zeppelin. Second, a Dockerfile will be created on the basis of which an image will be built. Third, the image will be uploaded to a repository from where CML can pick it up. Finally, we’ll add the image to a CML workspace and test to make sure Apache Zeppelin UI comes up in the session. The steps outlined below follow this general process.
Note: If you want to short circuit the build steps described below, a pre-built image is publicly available on docker hub: https://hub.docker.com/r/aakulov1/cml-zeppelin-runtime/tags.
Step 1: Preparing Apache Zeppelin configuration
Two configuration files need to be created to ensure that (a) Zeppelin is launched on session startup; and (b) Zeppelin is launched in the right configuration.
The first is a shell script (run-zeppelin.sh) that serves as the launch script. An important point here is that you cannot have a script that launches a daemon and runs in the background. This will cause the CML session to exit without ever getting to Zeppelin UI.

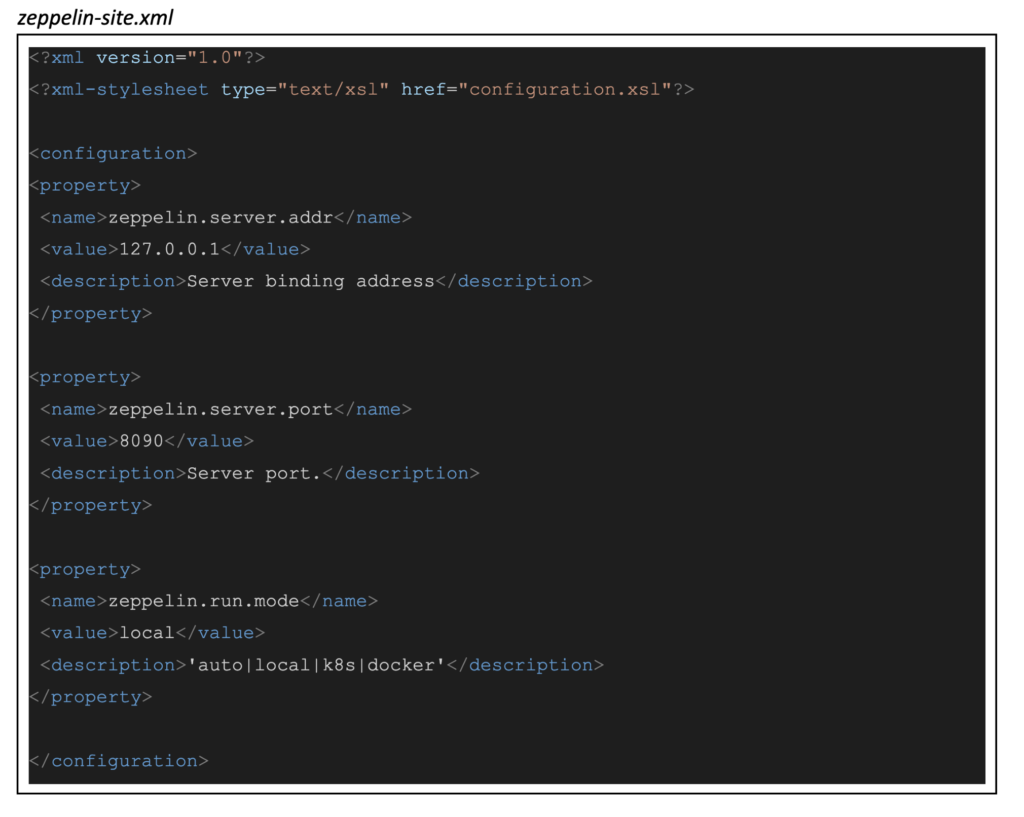
The second file is zeppelin-site.xml, and contains some important configurations in terms of the CML session. Namely, you must tell Zeppelin to listen on 127.0.0.1:8090 and to run in “local” mode. This run mode choice is to stop Zeppelin from trying to (unsuccessfully) spin up interpreters in different Kubernetes pods. With “local” mode everything stays neatly within one session pod.
Step 2: Prepare Dockerfile and build image
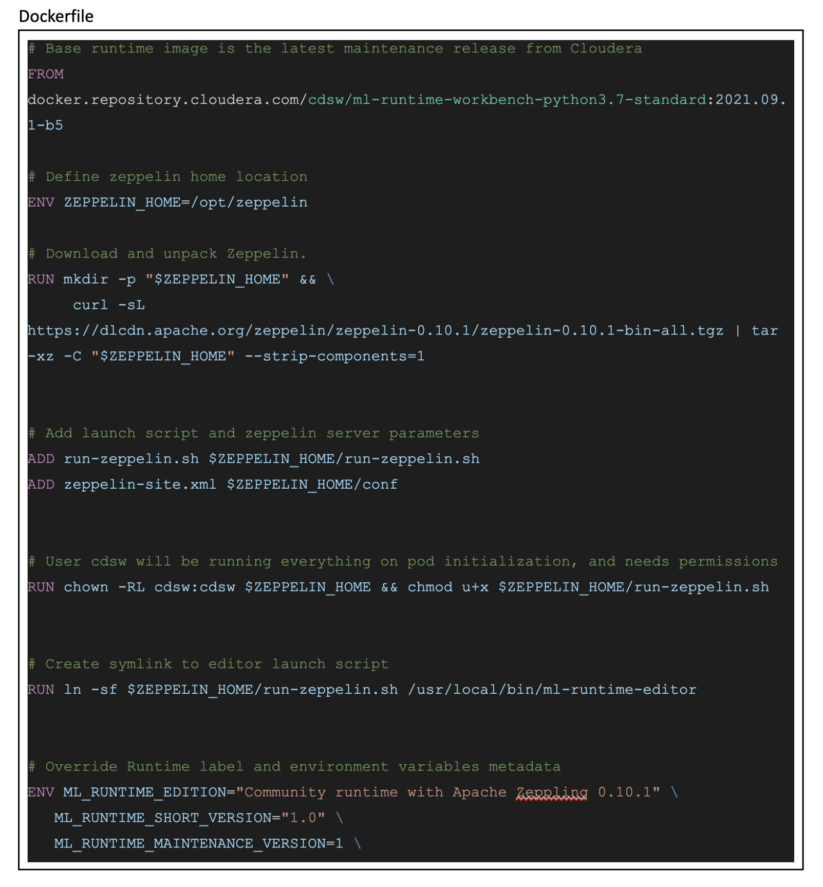
Once configuration files are in place, you’ll need to create a Dockerfile. Starting with a base runtime image, adding Zeppelin install instructions, adding files from step 1 should be self explanatory. What is worth calling out is the symlink created to point to the launch script (run-zeppelin.sh). This is how CML knows that an editor startup is needed in this session. As for the container labels, you can find more information about this in Metadata for Customer ML Runtime, within Cloudera documentation.

All three files we’ve created should be placed in the same directory. From this directly an image can be built with the following command, where <your-repository> is your Docker repo. Right after the build, the image can be pushed to your repo. Note that these commands may take a few minutes to execute and a lot depends on your network speed.

Step 3: Add Apache Zeppelin image to CML
When your Docker image is done uploading, you can use it in CML. To do this you will need to be granted an admin role in the CDP environment you are working in.
These steps can be found in Adding New ML Runtime in Cloudera Documentation.
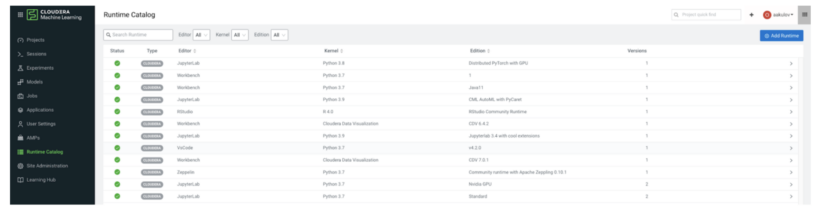
Go to your CML workspace and in the left menu click on Runtime Catalog
Click on +Add Runtime
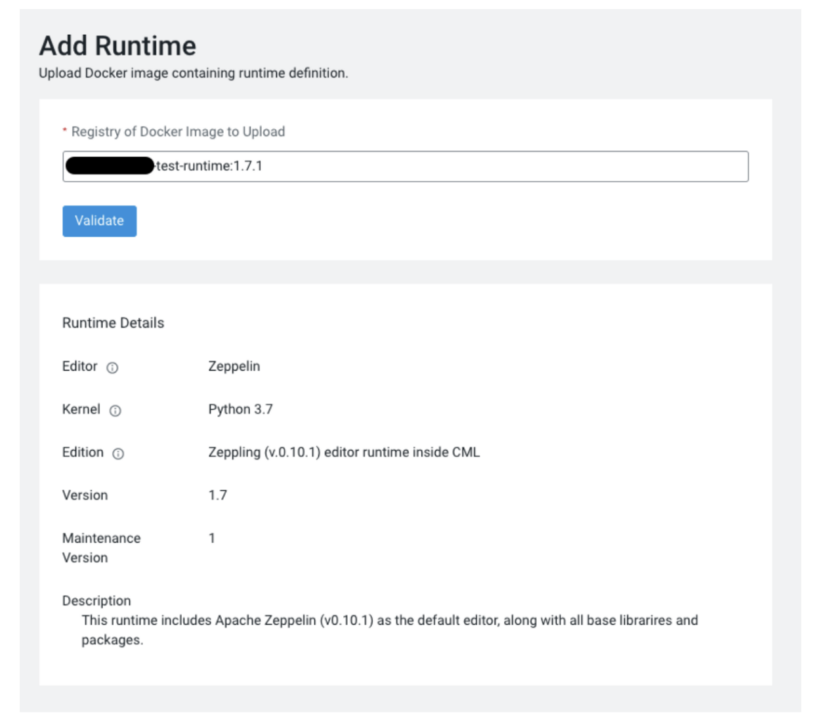
Input the name of your image, along with repo location and tags
Click Validate (this checks whether the image is accessible from CML and if metadata is correct)
Click Add to Catalog in the bottom right corner
Step 4: Use Apache Zeppelin in CML session
The instructions in this step will differ based on whether you want to create a new project in your CML workspace, or use the Zeppelin runtime in an existing project. By default, a newly added ML runtime will be automatically available in any newly created project. However, to add a runtime to an existing project you’ll need to perform a couple of additional steps:
- Go to the project when you want to use the Apache Zeppelin runtime
- In the left menu click on Project Settings
- Navigate to Runtime/Engine tab
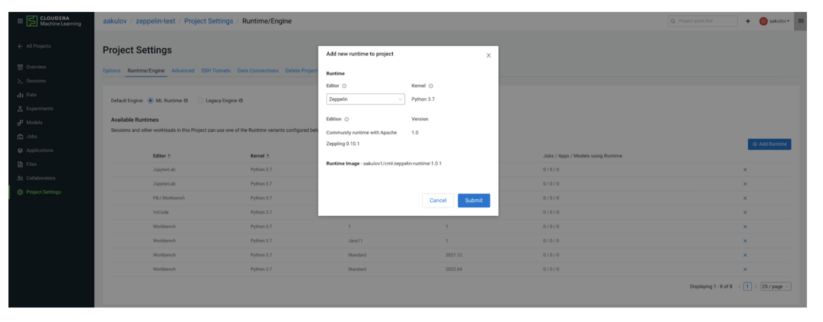
- Click +Add Runtime
- In the window that opens, select Zeppelin editor and the version of the runtime you’d like to add (if there are multiple versions in the workspace)
- Click Submit to finalize adding the runtime to your existing project
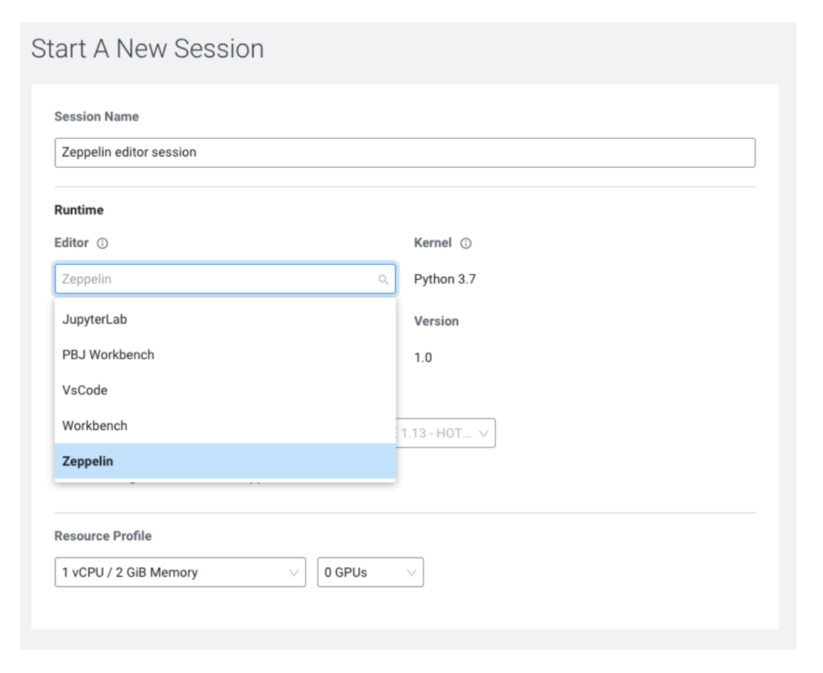
Now when you start a new session inside of a CML project, you’ll have the option to select Zeppelin as the editor.
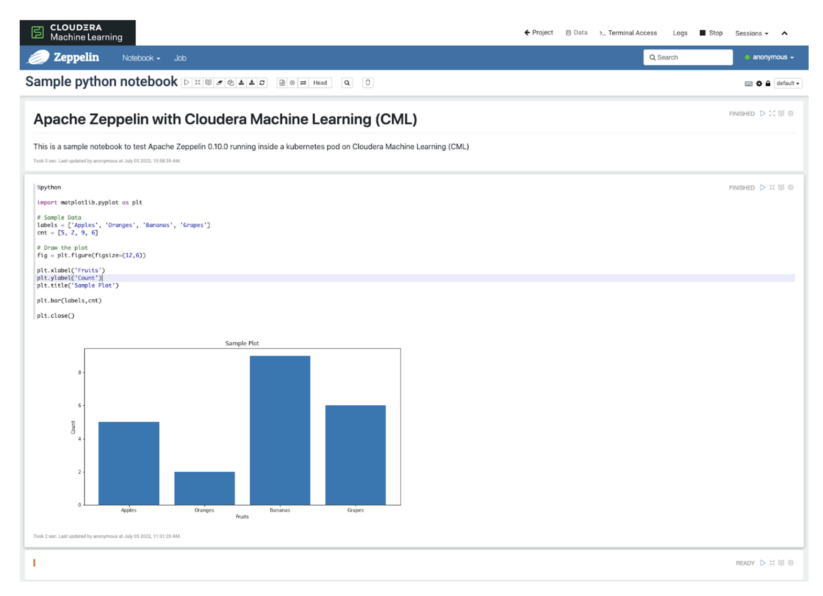
Zeppelin UI will launch inside of a session, so you will still have the ability to connect to existing data sources and access the pod through the terminal window.
Note: Zeppelin has many interpreters available, and the author has not tested all of them. Some may require additional configuration or different versions of Zeppelin; some may not be compatible.
Next Steps
This blog post has walked through an end-to-end process to customize an ML runtime with a third party editor (Apache Zeppelin) in the context of CML Public Cloud. The same steps are applicable for 1.10 or later versions of Cloudera Data Science Workbench (CDSW), as well as for CML Private Cloud. Following the above steps will result in a basic installation of Apache Zeppelin, allowing Zeppelin users interested in CML, or CML users interested in Zeppelin, to leverage both technologies in a best-of-both-worlds integrated manner. However, similar steps can be taken to create any further custom ML runtimes based on the needs of the users.
Cloudera is continuing its commitment to an open, pluggable ecosystem. It is especially important in the sphere of machine learning and AI, where innovation should not be constrained by proprietary code. Cloudera is proud to announce an initial set of community ML runtimes that can be used as-is or built upon, depending on your project needs. We encourage data scientists and other data professionals to explore what’s available and contribute their own customizations in the spirit of open source. We will continue to invest heavily in this capability within CDP, both in public and private cloud form factors.
References
Editor's Choice

