The Cloudera Operational Database (COD) is a managed dbPaaS solution available as an experience in Cloudera Data Platform (CDP). It offers multi-modal client access with NoSQL key-value using Apache HBase APIs and relational SQL with JDBC (via Apache Phoenix). The latter makes COD accessible to developers who are used to building applications that use MySQL, Postgres, etc. Main benefits of COD include:
- Auto-scaling – based on the workload utilization of the cluster and will soon have the ability to scale up/down the cluster
- Auto-tune – better performance within the existing infrastructure footprint.
- Auto-heal – resolve operational problems automatically (coming soon).
In this blog, I will demonstrate how COD can easily be used as a backend system to store data and images for a simple web application. To build this application, we will be using Phoenix, one of the underlying components of COD, along with Flask. For storing images, we will be using an HBase (Apache Phoenix backend storage) capability called MOB (medium objects). MOB allows us to read/write values from 100k-10MB quickly.
*For development ease of use, you can also use the Phoenix query server instead of COD. The query server is a small build of phoenix that is meant for development purposes only, and data is deleted in each build.
All code is in my github repo.
Instructions:
1. Log in to Cloudera Management Console and select the Operational Database experience

2. Choose your environment and name your DB

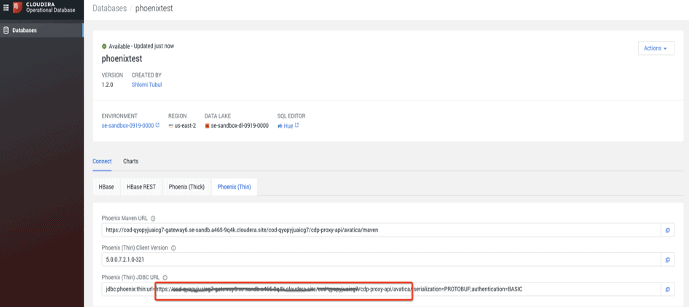
3. Once the DB is up, take the URL from the thin JDBC client

4. Set your CDP workload password
5. Clone project git repo and install requirements: $ pip install -r requirements.txt
6. Go to app folder and run “setup.py” – this will create a table with 3 records of users and their images $ python setup.py
7. Run the flask web server for the web application to start: $ FLASK_APP=app.py python -m flask run –port=8888 –host=127.0.0.1 –reload –with-threads –debugger
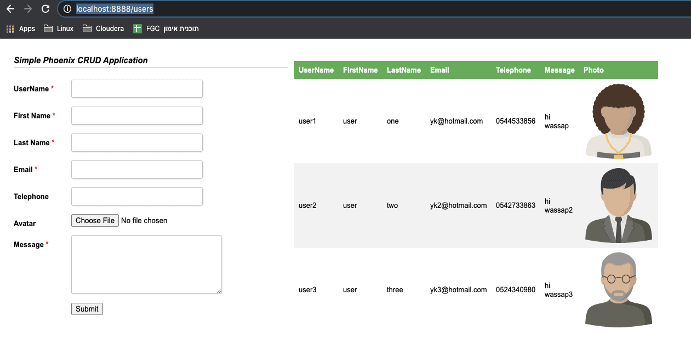
8. Go to http://localhost:8888/users on your browser. You should be able to see the application running! Simple as that.

Going through The Code
1. The Schema class, Basically holds the connection details and create and drop table methods. As you can see, the “photo” column is a VARBINARY type, which translate to an MOB object in HBase:
import phoenixdb
import phoenixdb.cursor
class Schema:
    def __init__(self):
        opts = {}
        opts['authentication'] = 'BASIC'
        opts['avatica_user'] = '<cod workload username>'
        opts['avatica_password'] = '<cod workload pw>'
        database_url = "<cod thin jdbc url>"
        self.TABLENAME = "users"
        self.conn = phoenixdb.connect(database_url, autocommit=True,**opts)
        self.curs = self.conn.cursor()

    def create_users_table(self):
        query = """
        CREATE TABLE IF NOT EXISTS """+self.TABLENAME+""" (
        username VARCHAR NOT NULL,
        firstname VARCHAR,
        lastname  VARCHAR,
        telephone VARCHAR,
        message VARCHAR,
        email VARCHAR,
        photo VARBINARY,
        photo_name VARCHAR,
        photo_type VARCHAR,
        photo_chars VARCHAR
        CONSTRAINT my_pk PRIMARY KEY (username))
        """
        self.curs.execute(query)

    def drop_users_table(self):
        query = "DROP TABLE "+self.TABLENAME
        self.curs.execute(query)
2 The users class is responsible for all application operations with Phoenix. We can update/insert (upsert in phoenix language) , delete, list , and handle images transactions:
import phoenixdb
from schema import Schema
import json
class UsersModel:
    TABLENAME = "users"

    def __init__(self):
        db = Schema()
        self.conn=db.conn
        self.curs=db.curs

    def upsert(self, params):

        sql = "upsert into " + self.TABLENAME + \
            " (username ,message,telephone,firstname,lastname,email) \
             values (?,?,?,?,?,?)"
        data = (params.get('username'),params.get('message'),\
            params.get('telephone'),params.get('firstname'),\
            params.get('lastname'),params.get('email'))
        results = self.curs.execute(sql,data)
        return results

    def upsert_photo(self, params):
        if params.get('photo') is None:
            photo = bytes('','utf-8')
        else:
            photo = params.get('photo')

        sql = "upsert into " + self.TABLENAME + \
            " (username, photo,photo_name) values (?,?,?)"

        data = (params.get('username'),photo, params.get('photo_name'))
        results = self.curs.execute(sql,data)
        return results

    def delete(self, username):
        query = f"DELETE from {self.TABLENAME} " \
                f"WHERE username = {username}"

        self.curs.execute(query)

    def list_items(self, where_clause="",format="json"):
        query = f"SELECT username ,email,message,telephone,firstname,\
            lastname,photo_name " \
            f"from {self.TABLENAME} WHERE  " + where_clause

        self.curs.execute(query)
        if format=="json":
            r = [dict((self.curs.description[i][0].lower(), value) \
                   for i, value in enumerate(row)) for row in \
                   self.curs.fetchall()]
            self.conn.close()
            data={'data': r }
            return json.dumps(data)

        result_set=self.curs.fetchall()
        result = [{column: row[i]
            for i, column in enumerate(result_set[0].keys())}
                for row in result_set]
        return result
    def get_image(self, username):
        query = f"SELECT photo,photo_name " \
                f"from {self.TABLENAME} WHERE  username='"+username+"'"

        self.curs.execute(query)
        row = self.curs.fetchone()
        return row
3. The app.py is the main router for the application. It contains all handling with user inputs and routing them to the connect methods. I separated the handling of images for the ease of use, and that way i can get a specific image for a user:
from flask import Flask, request, send_file ,jsonify,render_template
import phoenixdb
import io
from users import UsersModel
from schema import Schema
import json

app = Flask(__name__)

@app.after_request
def add_headers(response):
    response.headers['Access-Control-Allow-Origin'] = '*'
    response.headers['Access-Control-Allow-Headers'] =  \
        "Content-Type, Access-Control-Allow-Headers, Authorization, \
        X-Requested-With"
    response.headers['Access-Control-Allow-Methods']=  "POST, GET, PUT, \
    DELETE, OPTIONS"
    response.headers['Allow']=  "POST, GET, PUT, OPTIONS"
    return response

@app.route("/")
def hello():
    return "Hello World!"

@app.route("/users")
def return_form():
    return render_template("users.html")

@app.route("/handle_data",methods=['POST'])
def handle_data():
    if request.method == 'POST':
        username = request.form['username']
        firstname = request.form['firstname']
        lastname = request.form['lastname']
        email = request.form['email']
        telephone = request.form['telephone']
        message = request.form['message']
        photo = request.files['photo']
        photo_bytes = photo.read()
        model=Schema()
        usersmodel=UsersModel()
        data = {'username':f"{username}",'firstname':f"{firstname}",\
            'lastname':f"{lastname}",'telephone':f"{telephone}",\
            'message':f"{message}"}
        photo_data = {'username':f"{username}",\
            'photo':photo_bytes,\
            'photo_name':f"{photo.filename}"}
        usersmodel.upsert(data)
        usersmodel.upsert_photo(photo_data)
        return render_template('users.html')
    else:
        return render_template('users.html')

@app.route("/get_users",methods=['GET'])
def get_users():
    if request.method == 'GET':
        usersmodel=UsersModel()
        users = usersmodel.list_items("1=1")
        return users

@app.route("/get_image",methods=['GET'])
def get_image():
    if request.method == 'GET':
        username = request.args.get('username')
        usersmodel=UsersModel()
        imagedb = usersmodel.get_image(username)
        return send_file(io.BytesIO(imagedb[0]),mimetype='image/png', \
            attachment_filename=imagedb[1])

if __name__ == "__main__":
    Schema()
    app.run(debug=True, port=8888)
Next steps, you can use this github repo to test your application.
Hope you find it useful, Happy coding!!


Excellent article. I just have one question: is it really necessary to verify if the HTTP request method is the same that you are setting into the decorator?