This article shows how to build and publish a customized Docker image for usage as an engine in Cloudera Data Science Workbench. Such an image or engine customization gives you the benefit of being able to work with your favorite tool chain inside the web based application.
Motivation:
Cloudera Data Science Workbench (CDSW) enables data scientists to use their favorite tools such as R, Python, or Scala based libraries out of the box in an isolated secure sandbox environment. In a previous blog post I have shown an Apache Maven based approach for managing your own Apache Spark modules, especially how to create your uber-JARs for individual jobs which can automatically be triggered by Apache Oozie workflows.
Cloudera Data Science Workbench is a tool for data workers. Nick Porter describes data workers in his blog post from 2013: “Data Workers … , are normally ‘at the coalface’ hewing out chunks of data with a range of ETL, Data Integration, BI and other tools.”
Instead of forcing data movements out of secure enterprise clusters, Cloudera Data Science Workbench connects data workers directly to the enterprise data hub, while at the same time a personal sandbox is provided. Coexistence of cluster integration and workload isolation are a high value: both, data engineers and data scientists get short paths to the data while no additional risk or negative impact on each other is introduced.
Intro: The bigger picture
One of the core concepts of Cloudera Data Science Workbench is isolation of environments for interactive work on data inside Apache Hadoop clusters, usually done by data scientists. This also means that individual tools and libraries should be provided in a reliable and repeatable way.
In order to achieve repeatability of your data-based experiments, each project should fully specify the version of its dependencies. Python and R packages and JARs can be installed to the project filesystem from a workbench session in a terminal. This filesystem is persistent and isolated between projects, so a simply pip install or install.packages() is enough to install a specific library version.
Some packages and tools, however, need to be installed as root or installed to some path outside of /home/cdsw, where the persistent project filesystem is mounted. For these circumstances, the recommended approach is to build a custom Cloudera Data Science Workbench engine image and add some additional tools to it. Administrators can curate these base images to ensure that common tools and libraries are available to users.
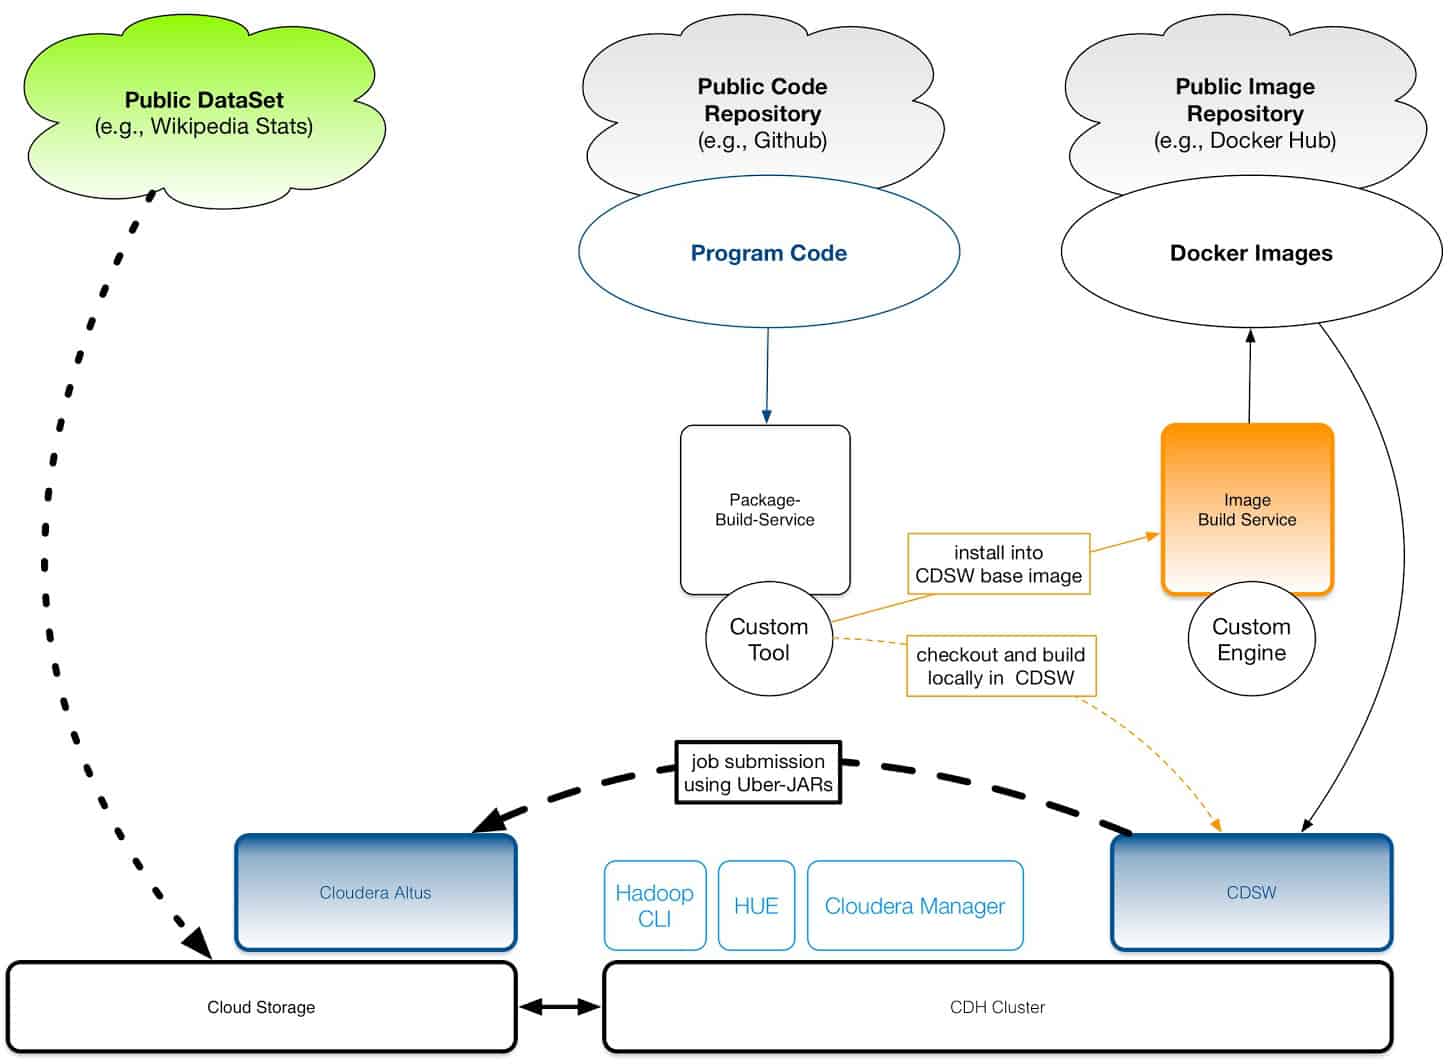
To illustrate this approach, we use Apache Maven to build an uber-JAR for a custom project including all dependencies locally inside the workbench session. Later on, this uber-JAR gets submitted to Altus Data Engineering—Cloudera’s fully managed platform-as-a-service for data engineering.
This approach has the advantage that huge uber-JARs do not have to be copied manually into Cloudera Data Science Workbench engine. You are still very flexible—small code modifications and even a local rebuild can be done within your workbench session. Most importantly, such an approach is in line with modern continuous integration (CI) concepts.
Customize a Base Image
This article demonstrates how you can easily build your own custom engine in order to enrich the available toolchain for your data-centric work in Cloudera Data Science Workbench. We simply add some convenient tools to an existing Docker image and share the results via a public Docker Hub account. Later in the hands-on section you will need a Docker Hub account.
The Cloudera Data Science Workbench site administrator has to whitelist all the images you plan to use. Furthermore the project administrator can select which of those whitelisted images will be available for individual projects.
Step 1 : Preparation with Docker
We start with a simple Dockerfile as shown in Listing 1. You can simply clone it from this public Git repository: https://github.com/kamir/cdsw-engine-custom-01.
Create a new working directory for this exercise. Within this local working directory you can clone the repository with the following command:
$ git clone https://github.com/kamir/cdsw-engine-custom-01
$ cd cdsw-engine-custom-01
Now, checkout the branch named Blog_phase_1 for the first part:
$ git checkout Blog_phase_1
You will get a Dockerfile as shown in Listing 1 and a script for building the image. This Dockerfile contains the configuration to build a new layer on top of the public base image for Cloudera Data Science Workbench. This layer contains graphviz, and Apache Maven. In a second step, the Python package for graphviz will be preinstalled in your custom image.
# Dockerfile
FROM docker.repository.cloudera.com/cdsw/engine:2
# update packages and install some custom tools ...
RUN apt-get update && \
    apt-get install -y -q graphviz maven && \
    apt-get clean && \
    rm -rf /var/lib/apt/lists/*
RUN pip install graphviz && pip3 install graphviz
Listing 1: Dockerfile for building a custom CDSW image.
This way, you get graphviz already installed in the Docker image rather than a per project instance setup using pip.
We build the new Cloudera Data Science Workbench engine image locally using Docker’s command line tool.
Note: The dot in the next command is part of the command and specifies the build context folder. The -t option gives the new image a tag. Multiple custom tags can be used here to make the image self-documenting. Tagging also influences to which repository an image is pushed later. Here is a link to the official Docker documentation.
$ docker build -t kamir/cdsw-maven
Now investigate the list of locally available images to get the image ID of the new one.
$ docker images
kamir@My-Great-MacBook-Pro:/GITHUB.cloudera.internal/cdsw-engine-custom-01$ docker images
REPOSITORY                                       TAG                 IMAGE ID            CREATED             SIZE
ubuntu                                           14.04               302fa07d8117        5 weeks ago         188 MB
cloudera-cdsw-docker-repo.jfrog.io/cdsw/engine   1                   ac5affd81336        2 weeks ago         5.22 GB
kamir/cdsw-maven                                 latest              ac5affd81336        2 weeks ago         5.22 GB
ros                                              latest              dce91a48e2b4        2 months ago        957 MB
Next, we have to publish our new image in an image registry that is accessible by Cloudera Data Science Workbench. For convenience we start with a public Docker account on Docker Hub, but in many cases this may be an internal corporate registry. In case you want to offer custom images internally only to your enterprise users you can find the procedure in the next section.
Assuming, that you have already an account at Docker Hub you should login now. Otherwise, please go to: hub.docker.com and create your account.
1 https://www.howtoforge.com/tutorial/building-and-publishing-custom-docker-images/
On your local terminal window you login to Docker Hub with the following command:
$ docker login --username=kamir
Note: You have to replace kamir with your username!
Before we finally push the image to the repository, we start the container and test it. We have to make sure that expected functionality is available. Run a container with the new image using its tag as shown by the next two commands.
$ docker run -t -i kamir/cdsw-maven
Note: You have to replace kamir with your username and also for image id you can expect a different value!
In a shell inside this container you can execute Apache Maven as shown next for a quick test:
root@2615376c2aac:/home/cdsw# mvn --version
Apache Maven 3.3.9
Maven home: /usr/share/maven
Java version: 1.8.0_121, vendor: Oracle Corporation
Java home: /usr/lib/jvm/java-8-openjdk-amd64/jre
Default locale: en_US, platform encoding: UTF-8
OS name: "linux", version: "4.9.31-moby", arch: "amd64", family: "unix"
Now we are ready to push the image to Docker Hub. Note: Please replace the account name with yours.
$ docker push kamir/cdsw-maven
Optional: Managing Custom Images Yourself
Option 1: Run a Custom Docker Registry
To manage our custom images “in-house” we implement a local Docker registry server on a server that Cloudera Data Science Workbench will be able to communicate with but not on any of the Hadoop nodes. Assuming that our hostname for the registry server is: cdsw-image-repo.company.com you will get a custom image repository by following this procedure: First, install the Docker base rpm:
$ sudo yum install -y yum-utils
$ sudo yum-config-manager --add-repo \ https://download.docker.com/linux/centos/docker-ce.repo
$ sudo yum makecache fast
$ sudo yum -y install docker-ce
Next, we start the Docker service:
$ sudo systemctl start docker
$ sudo systemctl enable docker
Finally, you have to start a Docker repository. According to the Docker documentation, a registry is an instance of the registry image, and runs within Docker.
$ docker run -d -p 5000:5000 --restart=always --name registry registry:2
Instead of pushing to the public Docker repository, you can push the previously built image to your own registry. Simply replace your Docker account name by hostname:port of your own registry:
$ docker tag kamir/cdsw-maven cdsw-image-repo.company.com:5000/cdsw-maven:latest
$ docker push cdsw-image-repo.company.com:5000/cdsw-maven:latest
Option 2: Manually Deployment of Images to CDSW Nodes
Alternatively, you can simply save your custom image as a tar file. This can be deployed to all machines of your Cloudera Data Science Workbench cluster over the network. Then you simply load the image into Docker. You will use the Docker commands: docker save, docker cp (to remote machines), and docker load (on remote machines). You will not have to run a repository in this case.
On the host, where the image has been created:
$ docker save kamir/cdsw-maven:latest > cdsw-custom.tar
$ scp cdsw-custom.tar admin@cdsw-host1:cdsw-custom.tar
Finally, import the image on all CDSW hosts:
$ docker load --input cdsw-custom.tar
Step 2 : Preparation in Cloudera Data Science Workbench
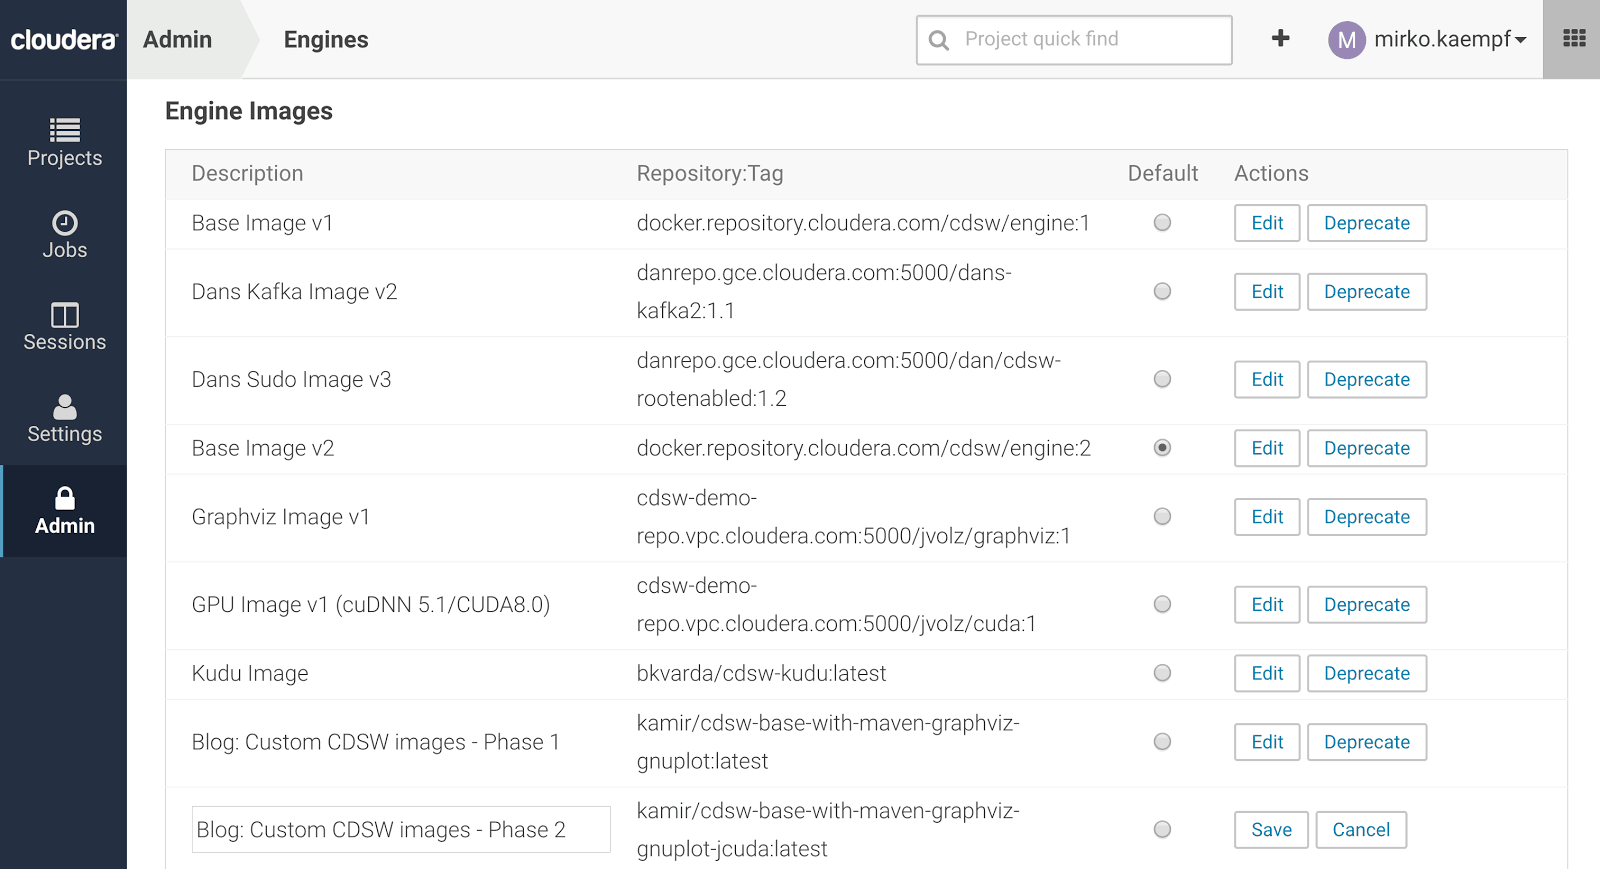
The next step has to be done once per image by a CDSW administrator. You have to whitelist the image in the CDSW Admin page. The procedure is simple. We provide a name for the image and its full name which was used by the docker push command. Figure 2 shows the three examples which have been created for demonstration on Docker Hub. Figure 3 shows how those images are added to a CDSW cluster by an admin. Please read the official CDSW administration guide for more details. After the image is whitelisted it can be selected per project.
Please have in mind, that the CDSW base image offers allready support for Python 2, Python 3, R, and Scala based sessions. The custom image can add features or functionality to one or all of those. The Java environment and CDH parcels including configuration files are imported from the host on which the CDSW session is executed. This makes a homogenous setup of software versions across CDSW nodes very important.
2 https://www.cloudera.com/documentation/data-science-workbench/latest/topics/cdsw_admin_guide.html
The steps so far are necessary to provide a custom engine for your Cloudera Data Science Workbench session.
Step 3 : Adding Custom Tools – Maven based Projects
Let’s access the Cloudera Manager time series API from a Java client within a Cloudera Data Science Workbench session.
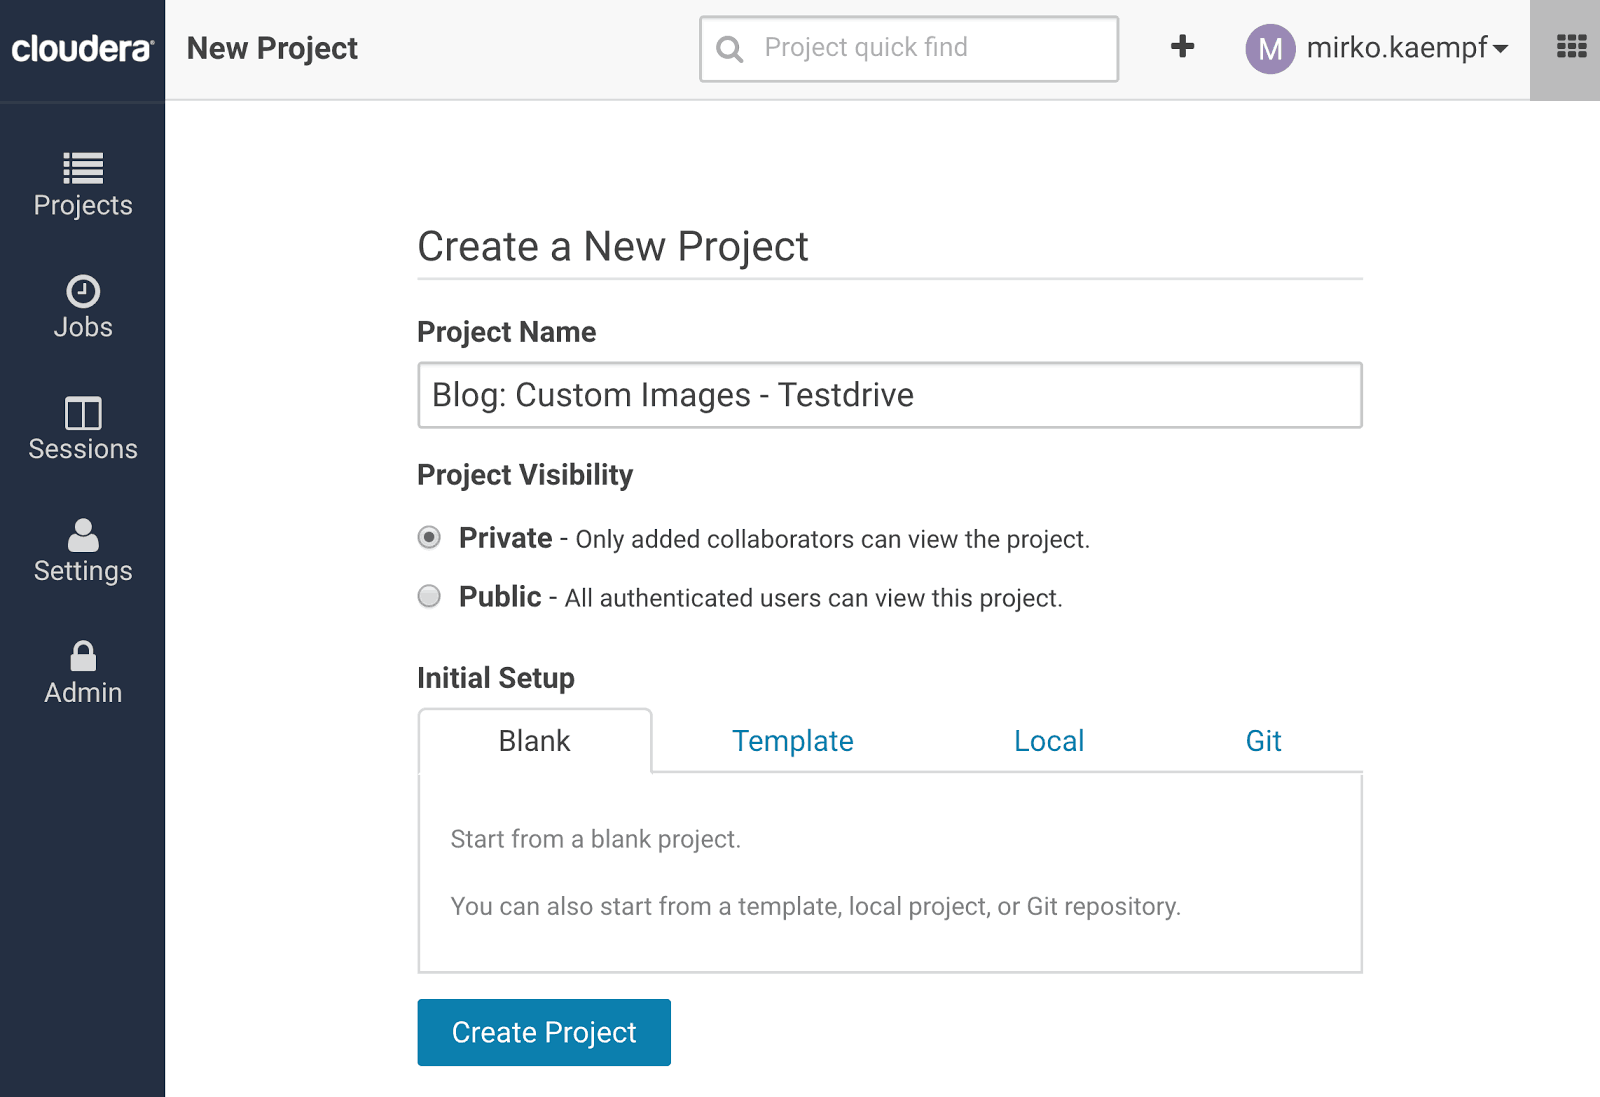
Select the custom image for your project: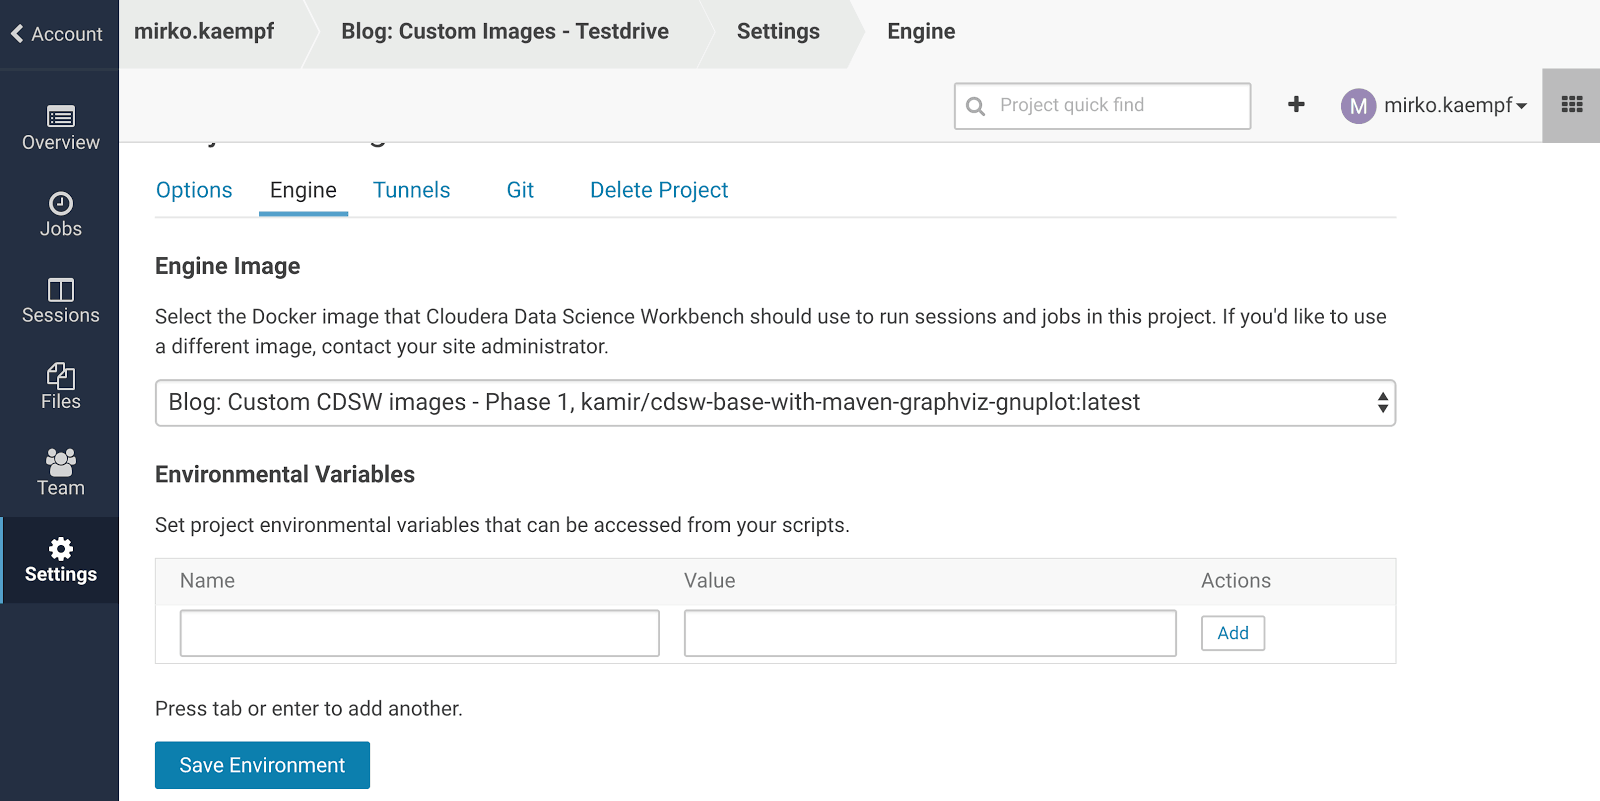
Open a new session (preferably a Scala session) and then a terminal window. Create a new folder inside the terminal window, e.g., demo1, and in this folder we clone the Java project used for a quick test.
Now we can clone the custom demo project with our custom code, which finally accesses the CM-API.
$ cd demo1
$ git clone https://github.com/kamir/blog_cdsw_custom_images_demo
$ cd blog_cdsw_custom_images_demo/
We simply added the dependency to the CM-API to our Java project using the pom.xml file.
Build the code and deploy the uber-JAR to the lib folder of your project.
$ mvn install
In the terminal window we can already test the program. We execute the main class via the following command:
$ mvn exec:java -Dexec.mainClass="connectors.cmtsq.ClouderaManagerTSQClient" -Dexec.args="CM_HOST 7180 admin admin"
Note: Please replace CM_HOST with the hostname of your Cloudera Manager server. Also the credentials (admin:admin) may have to be replaced.
If all works well you should see:
CM-API
------
* CM-HOST : cdsw-demo-4.vpc.cloudera.com
* CM-PORT : 7180
...
TS Dashboard:HOME_PAGE_VIEW [admin]
# of responses: 1
tsquery: select cpu_percent
# of series : 6

cpu_percent - cdsw-demo-3.vpc.cloudera.com
Data Point: Sun Jul 30 18:27:47 UTC 2017 -> 0.1
Data Point: Sun Jul 30 18:28:47 UTC 2017 -> 0.1
Data Point: Sun Jul 30 18:29:47 UTC 2017 -> 0.1
Data Point: Sun Jul 30 18:30:47 UTC 2017 -> 1.8
Data Point: Sun Jul 30 18:31:47 UTC 2017 -> 1.9
Data Point: Sun Jul 30 18:32:47 UTC 2017 -> 0.1
Data Point: Sun Jul 30 18:33:47 UTC 2017 -> 0.1
Data Point: Sun Jul 30 18:34:47 UTC 2017 -> 0.1
Data Point: Sun Jul 30 18:35:47 UTC 2017 -> 0.1
Data Point: Sun Jul 30 18:36:47 UTC 2017 -> 0.1
10
...
[INFO]
------------------------------------------------------------------------
[INFO] BUILD SUCCESS
[INFO]
------------------------------------------------------------------------
[INFO] Total time: 4.697 s
[INFO] Finished at: 2017-07-31T18:37:33+00:00
[INFO] Final Memory: 90M/1632M
------------------------------------------------------------------------
In order to use the locally built JAR file in Spark jobs one should keep the JARs in a libs folder in the project root. From here it can be managed via spark configuration files (see Listing 2).
$ mkdir /home/cdsw/lib
$ cp target/demo1-tsa-0.2.0-SNAPSHOT-jar-with-dependencies.jar /home/cdsw/lib/demo1-tsa-0.2.jar
Please be aware of the limited file size in Git repositories! Uber JARs larger than 50 MB trigger a warning and bigger than 100 MB an error (assuming a standard setup).
Since all project artifacts (including generated files) are persisted in CDSW you can keep them locally. Simply put the libs folder and its content to the ignore list of your repository settings and build the uber-JAR after initial checkout.
Finally, one has to create or modify the file spark-defaults.conf in the project’s root folder. We set all additional JARs via the variable spark.jars as shown in Listing 2.
| spark.jars file:///home/cdsw/libs/demo1-tsa-0.2.jar |
Listing 2: Example of spark-defaults.conf file with custom JAR locations.
Results
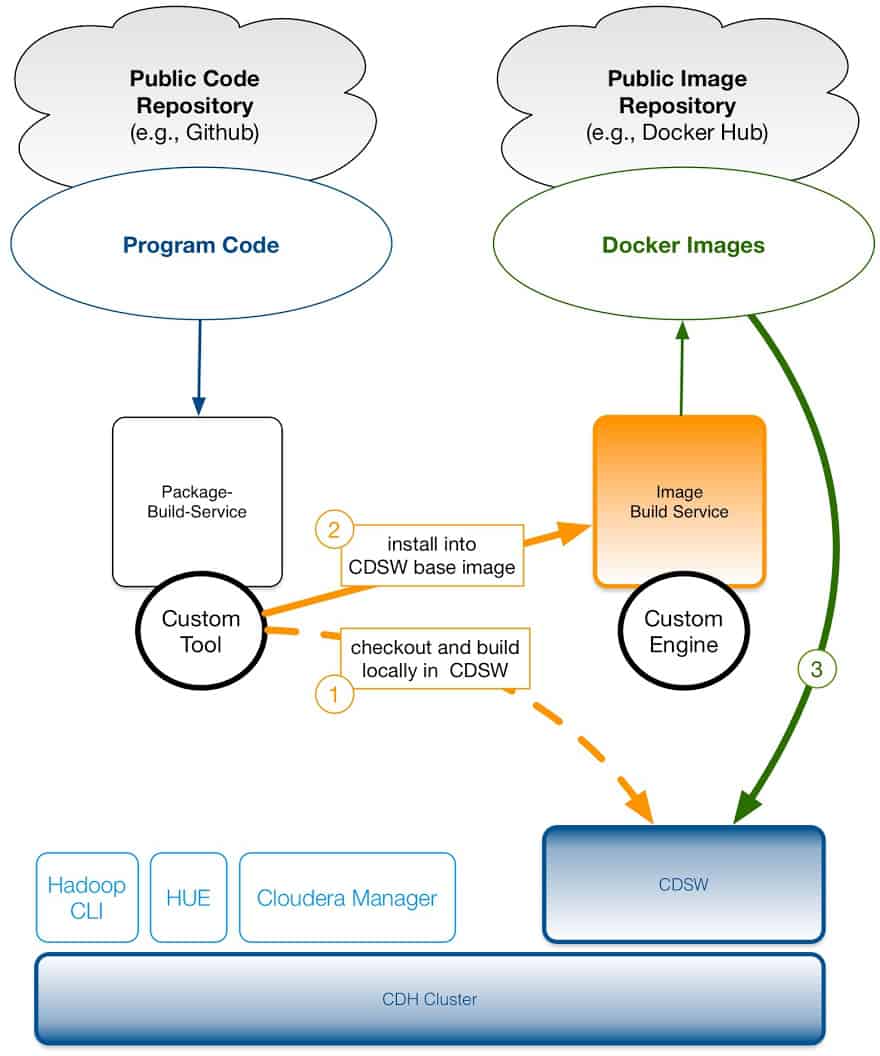
By using a custom library (see the dashed blue arrow with label (1) in sketch 1) we are able to access the Cloudera Manager API in a Spark session started within CDSW.
Our second approach for image customization is also illustrated in sketch 1 – see the dashed orange arrow with label (2). A modification of the base image allows us to use Maven inside a CDSW session and to utilize the GPUs in our own Java / Scala programs using the JCuda library. To test this, you should create a Scala session with 1 GPU and execute the code as shown in Listing 3.
import jcurand.samples.JCurandSample
val args = Array("15")
JCurandSample.main( args )
Listing 3: A Cuda based random number generator in a Scala Spark session.
Note:
The Git project https://github.com/kamir/cdsw-engine-custom-01 contains a Dockerfile which installs Cuda on the custom image. Please repeat the procedure as shown in this post but now on the branch: Blog_phase_2.
You can also use the prebuild image which is shared on Docker Hub (see last item in Figure 3).
Congratulations!
You have created and published a custom CDSW image via Docker Hub—or optionally in your own image repository. Furthermore, you managed a local build of a custom library—a time series collector using the Cloudera Manager API in this case—inside CDSW.
By using your favorite toolchain you can increase productivity in your personal data science and data analytics tasks simply by using CDSW your way!


