

In this post I will demonstrate how Kafka Connect is integrated in the Cloudera Data Platform (CDP), allowing users to manage and monitor their connectors in Streams Messaging Manager while also touching on security features such as role-based access control and sensitive information handling. If you are a developer moving data in or out of Kafka, an administrator, or a security expert this post is for you. But before I introduce the nitty-gritty first let’s start with the basics.
Kafka Connect
For the purpose of this article it is sufficient to know that Kafka Connect is a powerful framework to stream data in and out of Kafka at scale while requiring a minimal amount of code because the Connect framework handles most of the life cycle management of connectors already. As a matter of fact, for the most popular source and target systems there are connectors already developed that can be used and thus require no code, only configuration.
The core building blocks are: connectors, which orchestrate the data movement between a single source and a single target (one of them being Kafka); tasks that are responsible for the actual data movement; and workers that manage the life cycle of all the connectors.
Kafka allows native support for deploying and managing connectors, which means that after starting a Connect cluster submitting a connector configuration and/or managing the deployed connector can be done through a REST API that is exposed by Kafka. Streams Messaging Manager (SMM) builds on top of this and provides a user-friendly interface to replace the REST API calls.
Streams Messaging Manager
Disclaimer: descriptions and screenshots in this article are made with CDP 7.2.15 as SMM is under active development; supported features might change from version to version (like how many types of connectors are available).
SMM is Cloudera’s solution to monitor and interact with Kafka and related services. The SMM UI is made up of multiple tabs, each of which contain different tools, functions, graphs, and so on, that you can use to manage and gain clear insights about your Kafka clusters. This article focuses on the Connect tab, which is used to interact with and monitor Kafka Connect.
Creating and configuring connectors
Before any monitoring can happen the first step is to create a connector using the New Connector button on the top right, which navigates to the following view:
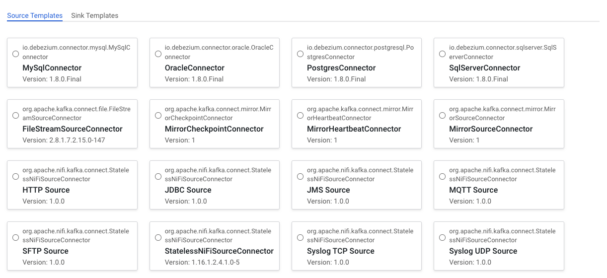
On the top left two types of connector templates are displayed: ![]() source to ingest data into, and sink to pull data out of Kafka. By default the Source Templates tab is selected so the source connector templates are displayed that are available in our cluster. Note that the cards on this page do not represent the connector instances that are deployed on the cluster, rather they represent the type of connectors that are available for deployment on the cluster. For example, there is a JDBC Source connector template, but that does not mean that there is a JDBC Source connector currently moving data into Kafka, it just means that the required libraries are in place to support deploying JDBC Source connectors.
source to ingest data into, and sink to pull data out of Kafka. By default the Source Templates tab is selected so the source connector templates are displayed that are available in our cluster. Note that the cards on this page do not represent the connector instances that are deployed on the cluster, rather they represent the type of connectors that are available for deployment on the cluster. For example, there is a JDBC Source connector template, but that does not mean that there is a JDBC Source connector currently moving data into Kafka, it just means that the required libraries are in place to support deploying JDBC Source connectors.
After a connector is selected the Connector Form is presented.
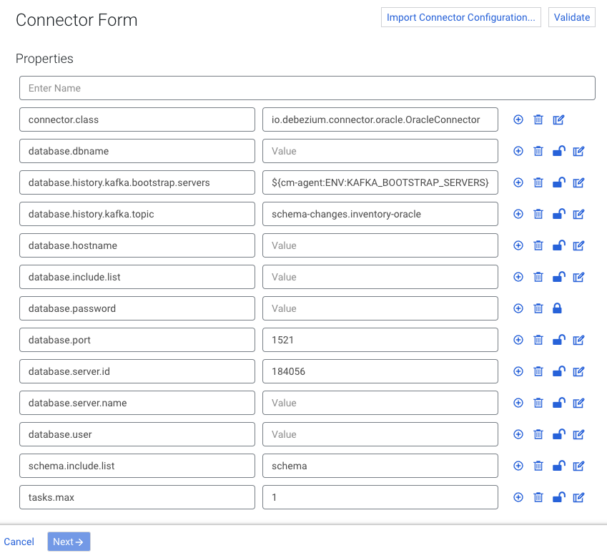
The Connector Form is used to configure your connector. Most connectors included by default in CDP are shipped with a sample configuration to ease configuration. The properties and values included in the templates depend on the selected connector. In general, each sample configuration includes the properties that are most likely needed for the connector to work, with some sensible defaults already present. If a template is available for a specific connector, it is automatically loaded into the Connector Form when you select the connector. The example above is the prefilled form of the Debezium Oracle Source connector.
Let’s have a look at the number of features the Connector Form provides when configuring a connector.
Adding, removing, and configuring properties
Each line in the form represents a configuration property and its value. Properties can be configured by populating the available entries with a property name and its configuration value. New properties can be added and removed using the plus/trash bin icons.
![]()
Viewing and editing large configuration values
The values you configure for certain properties may not be a short string or integer; some values can get pretty large. For example, Stateless NiFi connectors require the flow.snapshot property, the value of which is the full contents of a JSON file (think hundreds of lines). Properties like these can be edited in a modal window by clicking the Edit button. ![]()
Hiding sensitive values
By default properties are stored in plaintext so they are visible to anyone who has access to SMM with appropriate authorization rights. ![]()
There might be properties in the configurations like passwords and access keys that users would not want to leak from the system; to secure sensitive data from the system these can be marked as secrets with the Lock icon, which achieves two things:
- The property’s value will be hidden on the UI.
- The value will be encrypted and stored in a secure manner on the backend.
Note: Properties marked as secrets cannot be edited using the Edit button.
To go into the technical details for a bit, not only is the value simply encrypted, but the encryption key used to encrypt the value is also wrapped with a global encryption key for an added layer of protection. Even if the global encryption key is leaked, the encrypted configurations can be easily re-encrypted, replacing the old global key with a Cloudera provided tool. For more information, see Kafka Connect Secrets Storage.
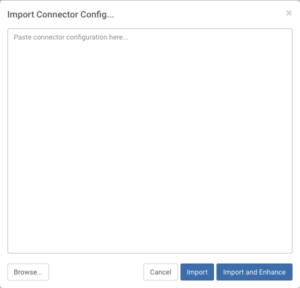
Importing and enhancing configurations
If you have already prepared native Kafka Connect configurations you can use the Import Connector Configuration button to copy and paste it or browse it from the file system using a modal window. ![]()
This feature can prove especially useful for migrating Kafka Connect workloads into CDP as existing connector configurations can be imported with a click of a button.
While importing there is even an option to enhance the configuration using the Import and Enhance button. Enhancing will add the properties that are most likely needed, for example:
- Properties that are missing compared to the sample configuration.
- Properties from the flow.snapshot of StatelessNiFi connectors.
Validating configurations
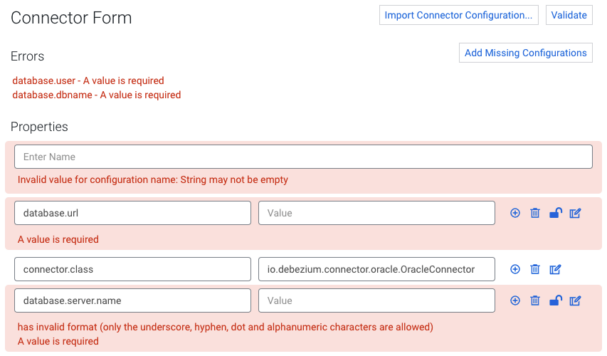
On the top right you can see the Validate button. Validating a configuration is mandatory before deploying a connector. If your configuration is valid, you’ll see a “Configuration is valid” message and the Next button will be enabled to proceed with the connector deployment. If not, the errors will be highlighted within the Connector Form. In general, you’ll encounter four types of errors:
- General configuration errors
Errors that are not related to a specific property appear above the form in the Errors section. - Missing properties
Errors regarding missing configurations also appear in the Errors section with the utility button Add Missing Configurations, which does exactly that: adds the missing configurations to the start of the form. - Property specific errors
Errors that are specific to properties (displayed under the appropriate property). - Multiline errors
If a single property has multiple errors, a multiline error will be displayed under the property.
Monitoring
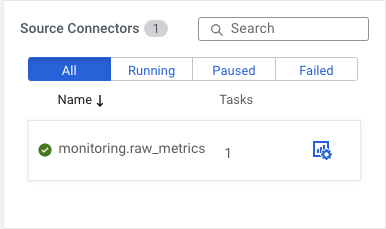
To demonstrate SMM’s monitoring capabilities for Kafka Connect I have set up two MySql connectors: “sales.product_purchases” and “monitoring.raw_metrics”. Now the purpose of this article is to show off how Kafka Connect is integrated into the Cloudera ecosystem, so I will not go in depth on how to set up these connectors, but if you want to follow along you can find detailed guidance in these articles:
MySQL CDC with Kafka Connect/Debezium in CDP Public Cloud
The usage of secure Debezium connectors in Cloudera environments
Now let’s dig more into the Connect page, where I previously started creating connectors. On the Connector page there is a summary of the connectors with some overall statistics, like how many connectors are running and/or failed; this can help determine if there are any errors at a glance.
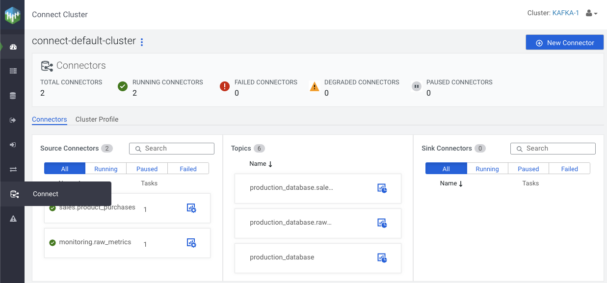
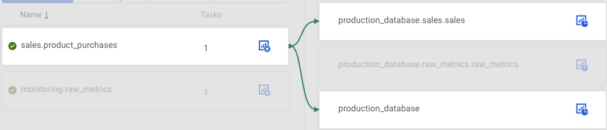
Below the overall statistics section there are three columns, one for Source Connectors, one for Topics, and one for Sink Connectors. The first and the last represent the deployed connectors, while the middle one displays the topics that these connectors interact with.

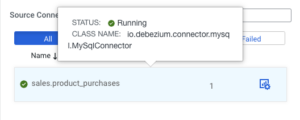
To see which connector is connected to which topic just click on the connector and a graph will appear.
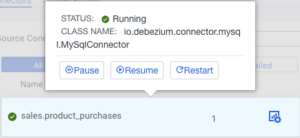
Apart from filtering based on connector status/name and viewing the type of the connectors some users can even do quick actions on the connectors by hovering over their respective tiles.
The sharp eyed have already noticed that there is a Connectors/Cluster Profile navigation button between the overall statistics section and the connectors section. ![]()
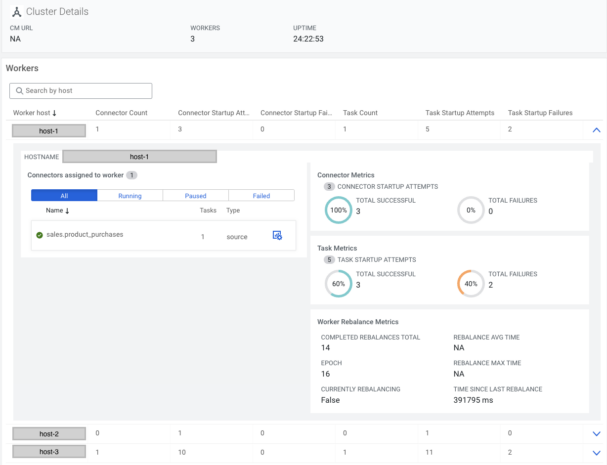
By clicking on the Cluster Profile button, worker-level information can be viewed such as how many connectors are deployed on a worker, success/failure rates on a connector/task level, and more.
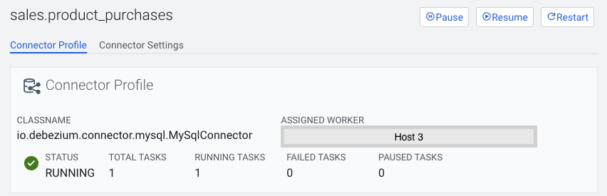
On the Connector tab there is an icon with a cogwheel, pressing that will navigate to the Connector Profile page, where detailed information can be viewed for that specific connector.

At the top information needed to evaluate the connector’s status can be viewed at a glance, such as status, running/failed/paused tasks, and which host the worker is located on. If the connector is in a failed state the causing exception message is also displayed.

Managing the connector or creating a new one is also possible from this page (for certain users) with the buttons located on the top right corner.
![]()
In the tasks section task-level metrics are visible, for example: how many bytes have been written by the task, metrics related to records, and how much a task has been in running or paused state, and in case of an error the stack trace of the error.

The Connector Profile page has another tab called Connector Settings where users can view the configuration of the selected connector, and some users can even edit it.
Securing Kafka Connect
Securing Connector management
As I have been hinting previously there are some actions that are not available to all users. Let’s imagine that there is a company selling some kind of goods through a website. Probably there is a team monitoring the server where the website is deployed, a team who monitors the transactions and increases the price of a product based on growing demand or set coupons in case of declining demand. These two teams have very different specialized skill sets, so it is reasonable to expect that they cannot tinker with each other’s connectors. This is where Apache Ranger comes into play.
Apache Ranger allows authorization and audit over various resources (services, files, databases, tables, and columns) through a graphical user interface and ensures that authorization is consistent across CDP stack components. In Kafka Connect’s case it allows finegrained control over which user or group can execute which operation for a specific connector (these specific connectors can be determined with regular expressions, so no need to list them one by one).
The permission model for Kafka Connect is described in the following table:
| Resource | Permission | Allows the user to… |
| Cluster | View | Retrieve information about the server, and the type of connector that can be deployed to the cluster |
| Manage | Interact with the runtime loggers | |
| Validate | Validate connector configurations | |
| Connector | View | Retrieve information about connectors and tasks |
| Manage | Pause/resume/restart connectors and tasks or reset active topics (this is what is displayed in the middle column of the Connect overview page) | |
| Edit | Change the configuration of a deployed connector | |
| Create | Deploy connectors | |
| Delete | Delete connectors |
Every permission in Ranger implies the Cluster-view permission, so that does not need to be set explicitly.
In the previous examples I was logged in with an admin user who had permissions to do everything with every connector, so now let’s create a user with user ID mmichelle who is part of the monitoring group, and in Ranger configure the monitoring group to have every permission for the connectors with name matching regular expression monitoring.*.

Now after logging in as mmichelle and navigating to the Connector page I can see that the connectors named sales.* have disappeared, and if I try to deploy a connector with the name starting with something other than monitoring. the deploy step will fail, and an error message will be displayed.
Let’s go a step further: the sales team is growing and now there is a requirement to differentiate between analysts who analyze the data in Kafka, support people who monitor the sales connectors and help analysts with technical queries, backend support who can manage the connectors, and admins who can deploy and delete sales connectors based on the needs of the analysts.
To support this model I have created the following users:
| Group | User | Connector matching regex | Permissions |
| sales+analyst | ssamuel | * | None |
| sales+support | ssarah | sales.* | Connector – View |
| sales+backend | ssebastian | sales.* | Connector – View/ Manage |
| sales+admin | sscarlett | sales.* | Connector – View/ Manage/ Edit/ Create/ Delete
Cluster – Validate |
If I were to log in with sscarlett I would see a similar picture as mmichelle; the only difference would be that she can interact with connectors that have a name starting with “sales.”.
So let’s log in as ssebastian instead and observe that the following buttons have been removed:
- New Connector button from the Connector overview and Connector profile page.
- Delete button from the Connector profile page.
- Edit button on the Connector settings page.
This is also true for ssarah, but on top of this she also does not see:
- Pause/Resume/Restart buttons on the Connector overview page’s connector hover popup or on the Connector profile page.
- Restart button is permanently disabled on the Connector profile’s tasks section.
Not to mention ssamuel who can login but can’t even see a single connector.
And this is not only true for the UI; if a user from sales would go around the SMM UI and try manipulating a connector of the monitoring group (or any other that is not permitted) directly through Kafka Connect REST API, that person would receive authorization errors from the backend.
Securing Kafka topics
At this point none of the users have access directly to Kafka topic resources if a Sink connector stops moving messages from Kafka backend support and admins can not check if it’s because there are no more messages produced into the topic or something else. Ranger has the power to grant access rights over Kafka resources as well.
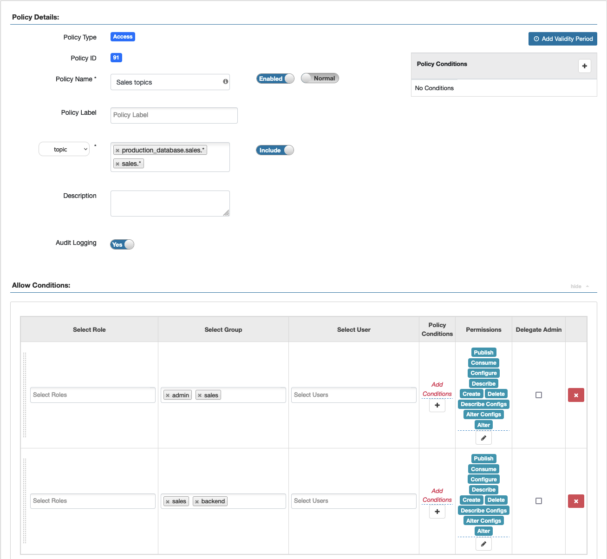
Let’s go into the Kafka service on the Ranger UI and set the appropriate permissions for the sales admins and sales backend groups previously used for the Kafka Connect service. I could give access rights to the topics matching the * regex, but in that case sscarlet and ssebastian could also accidentally interact with the topics of the monitoring group, so let’s just give them access over the production_database.sales.* and sales.* topics.
Now the topics that the sales connectors interact with appear on the topics tab of the SMM UI and they can view the content of them with the Data Explorer.
Securing Connector access to Kafka
SMM (and Connect) uses authorization to restrict the group of users who can manage the Connectors. However, the Connectors run in the Connect Worker process and use credentials different from the users’ credentials to access topics in Kafka.
By default connectors use the Connect worker’s Kerberos principal and JAAS configuration to access Kafka, which has every permission for every Kafka resource. Therefore with default configuration a user with a permission to create a Connector can configure that connector to read from or write to any topic in the cluster.
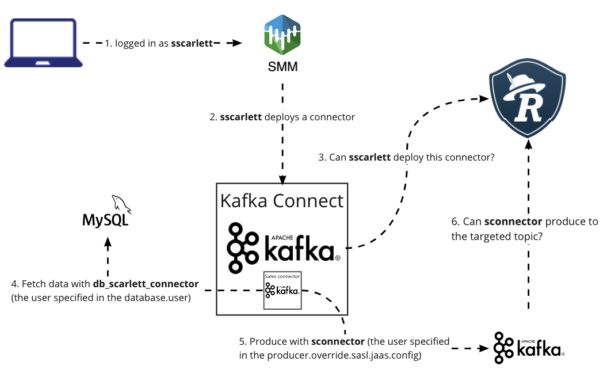
To regulate this Cloudera has introduced the kafka.connect.jaas.policy.restrict.connector.jaas property, which if set to “true” forbids the connectors to use the connect worker’s principal.
After enabling this in the Cloudera Manager, the previously working connectors have stopped working, forcing connector administrators to override the connector worker principal using the sasl.jaas.config property:

To fix this exception I created a shared user for the connectors (sconnector) and enabled PAM authentication on the Kafka cluster using the following article:
How to configure clients to connect to Apache Kafka Clusters securely – Part 3: PAM authentication.
In case of sink connectors, the client configurations are prefixed with consumer.override; in case of source connectors, the client configurations are prefixed with producer.override (in some cases admin.override. could also be needed).
So for my MySqlConnector I set producer.override.sasl.jaas.config=org.apache.kafka.common.security.plain.PlainLoginModule required username=”sconnector” password=”<secret>”;
This would cause the connector to access the Kafka topic using the PLAIN credentials instead of using the default Kafka Connect worker principal’s identity.
To avoid disclosure of sensitive information, I also set the producer.override.sasl.jaas.config as a secret using the lock icon.
Using a secret stored on the file system of the Kafka Connect Workers (such as a Kerberos keytab file) for authentication is discouraged because the file access of the connectors can not be set individually, only on a worker level. In other words, connectors can access each other’s files and thus use each other’s secrets for authentication.
Conclusion
In this article I have introduced how Kafka Connect is integrated with Cloudera Data Platform, how connectors can be created and managed through the Streams Messaging Manager, and how users can utilize security features provided in CDP 7.2.15. If you are interested and want try out CDP you can use the CDP Public Cloud with a 60 days free trial using the link https://www.cloudera.com/campaign/try-cdp-public-cloud.html.
Links:
How to configure clients to connect to Apache Kafka Clusters securely – Part 3: PAM authentication
MySQL CDC with Kafka Connect/Debezium in CDP Public Cloud
The usage of secure Debezium connectors in Cloudera environments
Editor's Choice

