

Have you ever asked a data scientist if they wanted their code to run faster? You would probably get a more varied response asking if the earth is flat. It really isn’t any different from anything else in tech, faster is almost always better. One of the best ways to make a substantial improvement in processing time is to, if you haven’t already, switched from CPUs to GPUs. Thanks to pioneers like Andrew NG and Fei-Fei Li, GPUs have made headlines for performing particularly well with deep learning techniques.
Today, deep learning and GPUs are practically synonymous. While deep learning is an excellent use of the processing power of a graphics card, it is not the only use. According to a poll in Kaggle’s State of Machine Learning and Data Science 2020, A Convolutional Neural Network was the most popular deep learning algorithm used amongst polled individuals, but it was not even in the top 3. In fact only 43.2% of respondents reported to use CNN’s. Ahead of the most popular deep learning method was (1) Linear or Logistic Regression with 83.7%, (2) Decision Trees or Random Forests with 78.1%, and (3) Gradient Boosting Machines with 61.4%.
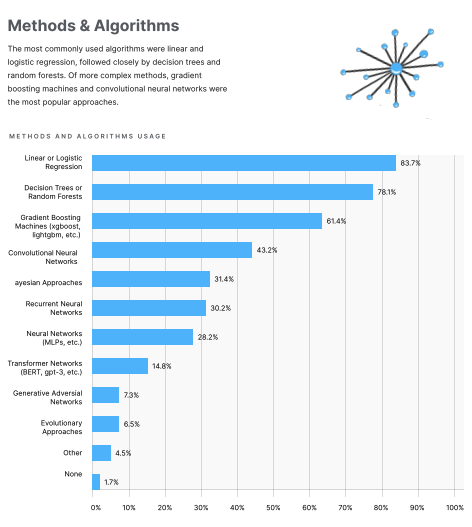
Photo Credit: Kaggle
Let’s revisit our very first question: have you ever asked a data scientist if they wanted their code to run faster. We know that every data scientist wants to spend more time exploring data and less time watching a jupyter cell run, but the vast majority of customers that we speak to are not even using GPUs when working with the top 3 most popular algorithms, or the 80% data science that isn’t training models (google data science 80/20 if this is news to you).
From my experience there are 3 main reasons (besides the obvious: cost) why data scientists do not use GPUs for workloads outside of deep learning:
- Data is too small (juice not worth the squeeze)
- Time required to configure an environment with GPUs
- Time required to refactor CPU code
I would like to make something very clear. If your data is very unlikely to ever reach a row count in the millions, you can probably disregard this blog (that is, unless you want to learn something new). However, if you are in fact working with a substantial amount of data, i.e. row count > 1M, then the barriers to start using GPUs for your data science, i.e. reasons 2 and 3, can be resolved easily with Cloudera Machine Learning and NVIDIA RAPIDS.
Cloudera Machine Learning (CML) is one of many Data Services available in the Cloudera Data Platform. CML offers all the functionality you would expect from a modern data science platform, like scalable compute resources and access to preferred tools, along with the benefit of being managed, governed, and secured by Cloudera’s Shared Data Experience, or SDX.
NVIDIA RAPIDS is a suite of software libraries that enables you to run end-to-end data science workflows entirely on GPUs. RAPIDS relies on NVIDIA CUDA primitives for low-level compute optimization, but exposes that high performance through user-friendly Python interfaces.
Together, CML and NVIDIA offer the RAPIDS Edition Machine Learning Runtime. ML Runtimes are secure, customizable, and containerized working environments. The RAPIDS Edition Runtime is built on top of community built RAPIDS docker images, enabling data scientists to get up and running on GPUs with the single click of a button, with all the resources and libraries they need at their fingertips. Checkmate reason 2.
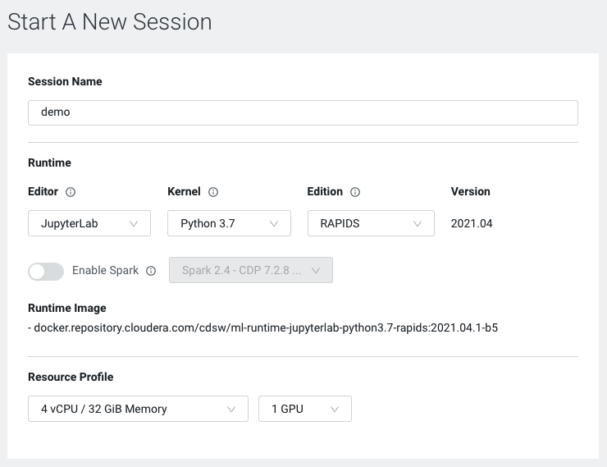
Note: The above image is the dialogue box for starting a session in Cloudera Machine Learning. It provides access to your company’s catalogue of ML Runtimes and enabled resource profiles. Here I’ve only selected a single GPU, but you can select more than one if needed
That still leaves us with reason 3 why data science practitioners are hesitant to use GPUs. Data science is already a field of many fields. You need to be proficient in programming, statistics, math, communication, and the domain you’re working in. The last thing you want to do is learn a bunch of new libraries, or worse, a new programming language! To that end, let’s explore the Python interfaces that RAPIDS offers.
NVIDIA claims that RAPIDS Python interfaces are user-friendly. But that statement fails to fully encapsulate just how friendly these interfaces are to a seasoned Python data science programmer. RAPIDS libraries like cuDF for dataframes and cuML for machine learning are essentially GPU versions of their CPU counterparts pandas and scikit-learn. It’s like moving to a new school and finding out that your best friend’s twin is in your home room.
When I first started working with RAPIDS libraries I was skeptical. I thought that the basics of the syntax would be similar to the CPU libraries they aim to speed up, but far from carbon copies. So I put it to a test, using only CPU based Python libraries I imported, cleaned, filtered, featurized, and trained a model using trip data for NYC taxis. I then replaced the CPU libraries with their corresponding NVIDIA libraries but left the name they were bound to the same. For example, instead of import pandas as pd I used import cudf as pd.
Guess what happened! It didn’t work… but it ALMOST worked.
Differences
In my case, for RAPIDS Release v0.18, I found two edge cases where cuDF and pandas differed, one involving handling date columns (why can’t the world agree on a common date/time format?) and the other applying a custom function. I’ll talk through how I handled these in the script, but note that we only need to slightly alter 3 of the 100+ lines of code.
The root cause of the first issue is that cuDF’s parse_dates does not handle unusual or non-standard formats as well as pandas. The fix is easy enough though, just explicitly specify dtype=’date’ for the date column and you’ll get the same datetime64 date type for your date column as you would with pandas.
The second issue is slightly more involved. cuDF does not offer an exact replica for DataFrame.apply like it does for other pandas operators. Instead, you need to use DataFrame.apply_rows. The expected input for these functions is not the same, but it is similar.
NVIDIA has recently released a Nightly build of RAPIDS 21.12 (NVIDIA switched from SemVer to CalVer in August for their versioning scheme) that is supposed to replicate the DataFrame.apply functionality in Pandas. At the time of publishing I was not able to validate this functionality, however builds post 21.12 should only require a single minor change to a data type to take advantage of GPU performance in CML for this project.
In my case, I was applying a function to calculate the haversine distance between two lat/long coordinates. Here is the function and how it is applied to a dataframe (taxi_df) in pandas, resulting in a new column (hav_distance):
def haversine_distance(x_1, y_1, x_2, y_2):
    x_1 = pi/180 * x_1
    y_1 = pi/180 * y_1
    x_2 = pi/180 * x_2
    y_2 = pi/180 * y_2

    dlon = y_2 - y_1
    dlat = x_2 - x_1
    a = sin(dlat/2)**2 + cos(x_1) * cos(x_2) * sin(dlon/2)**2

    c = 2 * asin(sqrt(a))
    r = 6371 # Radius of earth in kilometers
    return c * r

taxi_df['hav_distance'] = taxi_df.apply(lambda row:haversine_distance(row['pickup_latitude'],
                                                                      row['pickup_longitude'],
                                                                      row['dropoff_latitude'],
                                                                      row['dropoff_longitude']),axis=1)
By comparison, here is the haversine function applied in cuDF:
def haversine_distance(pickup_latitude,
                       pickup_longitude,
                       dropoff_latitude,
                       dropoff_longitude,
                       hav_distance):
    for i, (x_1, y_1, x_2, y_2) in enumerate(zip(pickup_latitude,
                                                 pickup_longitude,
                                                 dropoff_latitude,
                                                 dropoff_longitude)):

        x_1 = pi/180 * x_1
        y_1 = pi/180 * y_1
        x_2 = pi/180 * x_2
        y_2 = pi/180 * y_2

        dlon = y_2 - y_1
        dlat = x_2 - x_1
        a = sin(dlat/2)**2 + cos(x_1) * cos(x_2) * sin(dlon/2)**2

        c = 2 * asin(sqrt(a))
        r = 6371 # Radius of earth in kilometers

        hav_distance[i] = c * r

taxi_df = taxi_df.apply_rows(haversine_distance,
                             incols=['pickup_latitude',
                                     'pickup_longitude',
                                     'dropoff_latitude',
                                     'dropoff_longitude'],
                             outcols=dict(hav_distance=np.float64),
                             kwargs=dict())
The logic of the function is the same, but how you handle the function inputs and how user defined function is applied to the cuDF dataframe is very different from pandas. Notice that I had to zip and then enumerate through the arguments within the haversine_distance function.
Additionally, when applying this function to the dataframe, the apply_rows function has required input parameters with specific rules. For example, the value(s) passed to incols are the names of the columns passed to the function, they must either match the names of the arguments in the function, or you have to pass a dictionary which matches the column names to their corresponding function arguments.
For a more in depth explanation of using user defined functions with cuDF dataframes, you should take a look at the RAPIDS docs.
Fast and Furious Results
So, after a few minor modifications, I was successfully able to run pandas and scikit-learn code on GPUs thanks to RAPIDS.

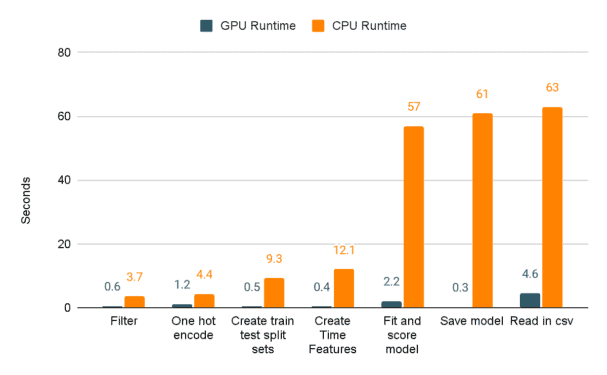
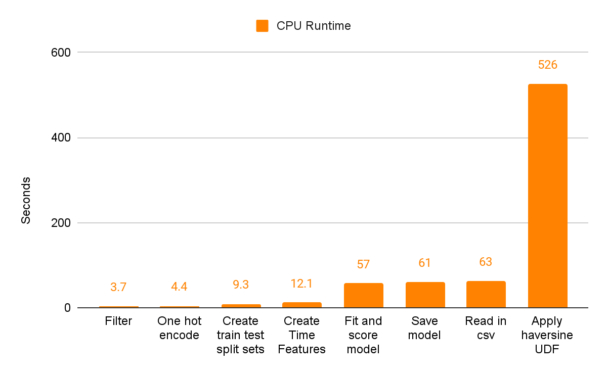
And now, without further ado, the moment you’ve all been waiting for. I’ll demonstrate the actual speed improvements when switching from pandas and scikit-learn to cuDF and cuML through a series of charts. The first compares the seconds spent on the shorter tasks between GPUs and CPUs. As you can see, the scales between CPU and GPU runtimes aren’t really the same.
Next up let’s examine the runtime, in seconds, of the longer running task. We’re talking about, you guessed it, the user defined function that we know has traditionally been a poor performer for pandas dataframes. Notice the EXTREME difference in performance between CPU and GPU. That’s a 99.9% decrease in runtime!
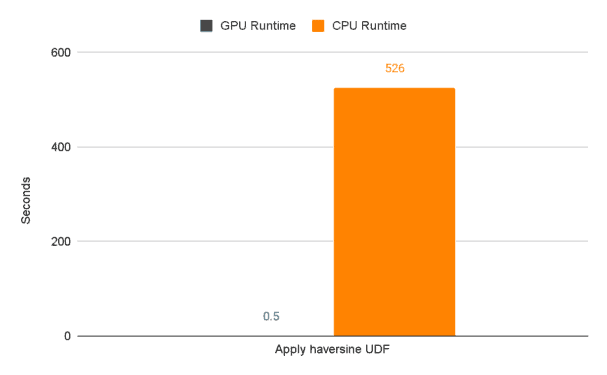
The UDF section of our CPU code performs the worst by far at 526 seconds. The next closest section is “Read in the csv” which takes 63 seconds.
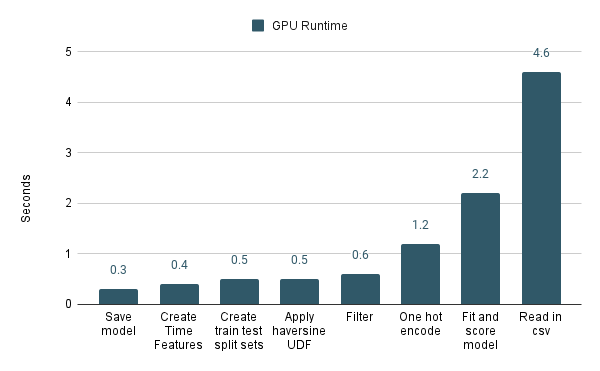
Now compare this to the performance of the sections running on GPUs. You’ll notice that “Apply haversine UDF” isn’t the worst performing section anymore. In fact, it’s FAR from the worst performing section. cuDF FTW!
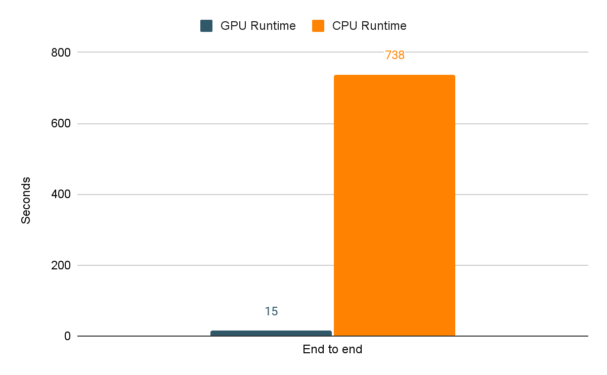
Last of all, here is a graph with the full end to end runtime of the experiment running on CPUs and then GPUs. In all, the cuDF and cuML code decreased the runtime by 98%! Best of all, all it took was switching to RAPIDS libraries and changing a few lines of code.
Conclusion
GPUs are not only for deep learning, with RAPIDS libraries GPUs can be used to speed up the performance of the full end to end data science lifecycle with minimal changes to CPU libraries that all data scientists know and love.
If you would like to learn more about this project, you should attend NVIDIA GTC on November 8-11 where I will be presenting “From CPU to GPU with Cloudera Machine Learning”. Register today to attend this session and others.
Additional Resources
Follow the links below if you would like to run the experiment for yourself:
- Video – watch a short demo video covering this use case
- Tutorial – follow step-by-step instructions to set up and run this use case
- Meetup / Recording – join an interactive meetup live-stream around this use case led by Cloudera experts
- Github – see the code for yourself
Lastly, don’t forget to check out the users page for more great technical content.
Editor's Choice

