

With the latest release of Cloudera DataFlow for the Public Cloud (CDF-PC) we added new CLI capabilities that allow you to automate data flow deployments, making it easier than ever before to incorporate Apache NiFi flow deployments into your CI/CD pipelines. This blog post walks you through the data flow development lifecycle and how you can use APIs in CDP Public Cloud to fully automate your flow deployments.
Understanding the data flow development lifecycle
Like any other software application, NiFi data flows go through a development, testing and production phase. While key NiFi features like visual flow design and interactive data exploration are front and center during the development phase, operational features like resource management, auto-scaling and performance monitoring become crucial once a data flow has been deployed in production and business functions depend on it.
CDF-PC, the first cloud-native runtime for Apache NiFi data flows, is focused on operationalizing NiFi data flows in production by providing resource isolation, auto-scaling and detailed KPI monitoring for flow deployments.
At the same time, Flow Management for Cloudera Data Hub provides a traditional NiFi experience focused on visual flow design and interactive data exploration. Together, Flow Management for Data Hub and Cloudera DataFlow for the Public Cloud provide all the capabilities you need to support the entire data flow development lifecycle from development to production.
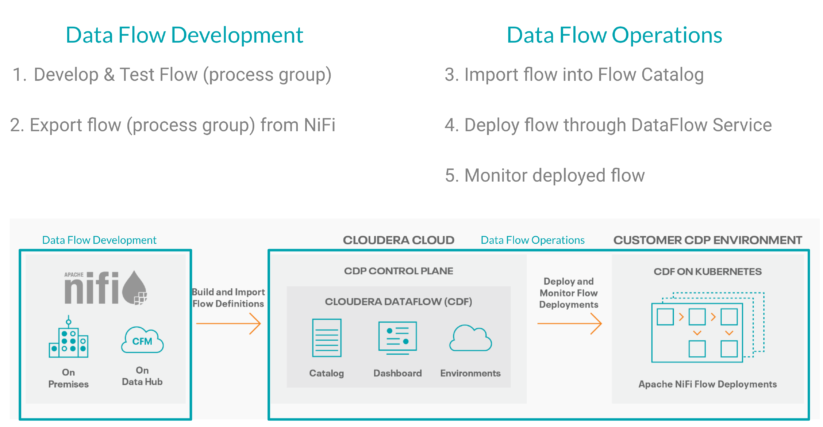
Figure 1: Develop your data flows using Flow Management for Data Hub and operationalize them using Cloudera DataFlow for the Public Cloud (CDF-PC)
Developing data flows with version control
As Figure 1 shows, Flow Management for Data Hub provides an ideal environment that allows developers to quickly iterate on their data flows until they’re ready to be deployed in production. Every Flow Management cluster comes preinstalled with NiFi Registry making it easy for developers to version control their data flows.
Note: While version controlling data flows is not required for manually exporting data flows from the NiFi canvas, it is a prerequisite for automating data flow export using the NiFi Registry API.
To start version controlling a data flow, simply right click the process group you want to version, select Version and Start version control.
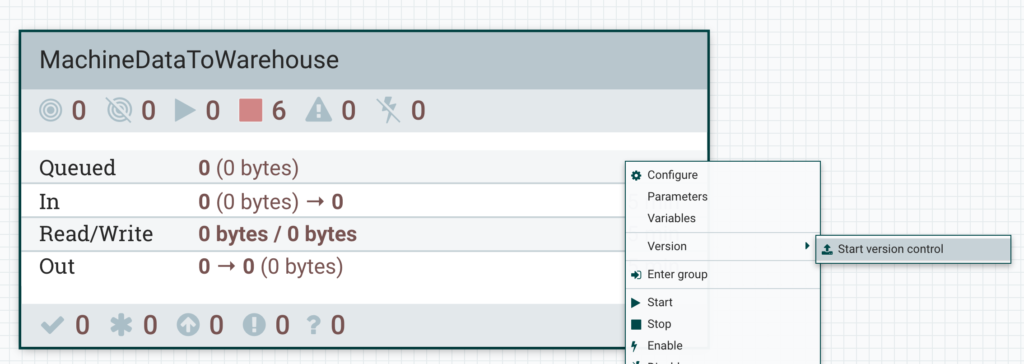
Figure 2: Starting version control stores process groups in the NiFi Registry and makes them accessible via the NiFi Registry API
In the next window, use the Bucket selection to associate your data flow with a particular project or team and specify a Flow Name. Optionally you can also provide a Flow Description and Version Comments.
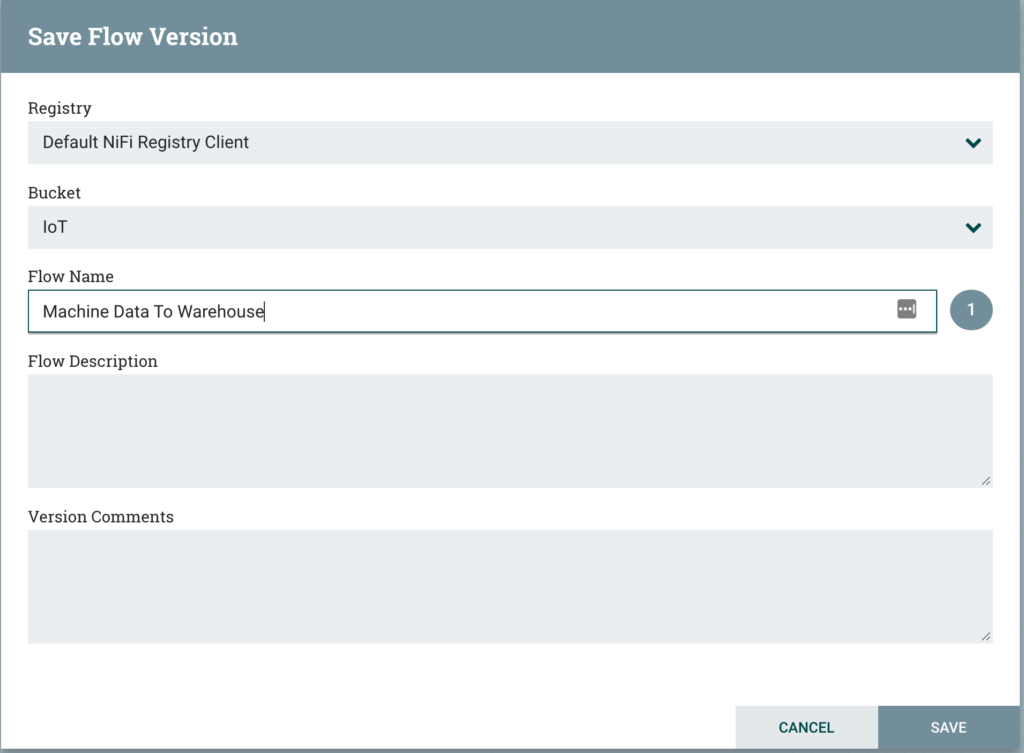
Figure 3: When you start version control you can pick a Bucket and provide a name for your flow definition
Once your data flow version has been saved to the NiFi Registry, you will notice a green tick appearing on your NiFi process group indicating that the process group is current and represents the latest version which is stored in the NiFi Registry.
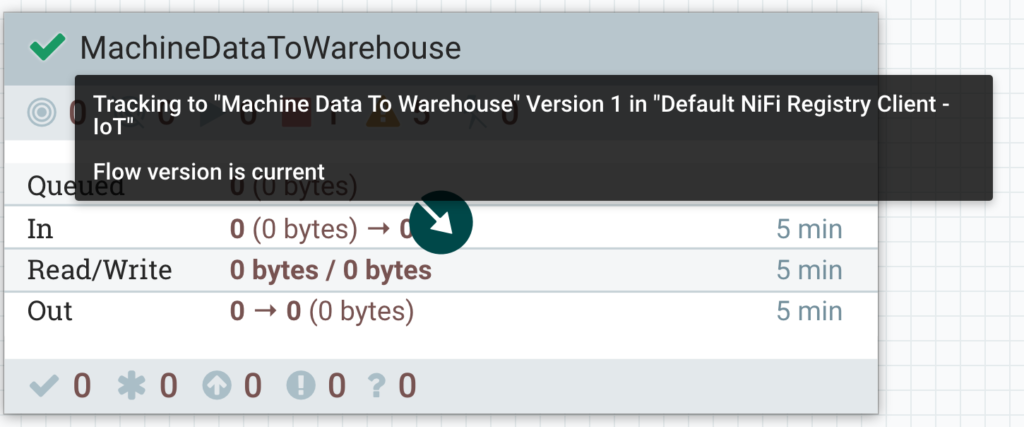
Figure 4: The green tick indicates that this process group is using the latest version of the flow definition
Changing your data flow logic in the NiFi canvas introduces local changes that are not yet synchronized to the NiFi Registry. Right click on the process group, select Version and Commit local changes to create a new version that includes your recent changes.
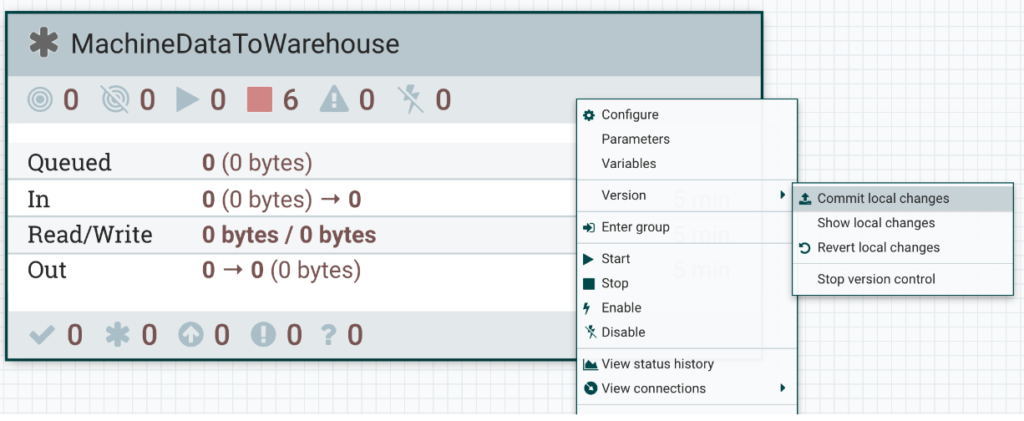
Figure 5: A grey star indicates that local changes need to be committed to the NiFi Registry resulting in a new version of the data flow
Note: If you are planning to export your data flows from the development environment using the NiFi Registry API, make sure that any local changes you want to include have been committed back to the Registry.
Now that you are familiar with versioning your data flows in your development environment, let’s look at how you can export these versions and deploy them using CDF-PC.
Exporting data flows from Flow Management for Data Hub
Apache NiFi 1.11 introduced a new Download flow definition capability which exports the data flow logic of a process group. The export includes any controller services that exist in the selected process group as well as parameter contexts that have been assigned to the selected process group.
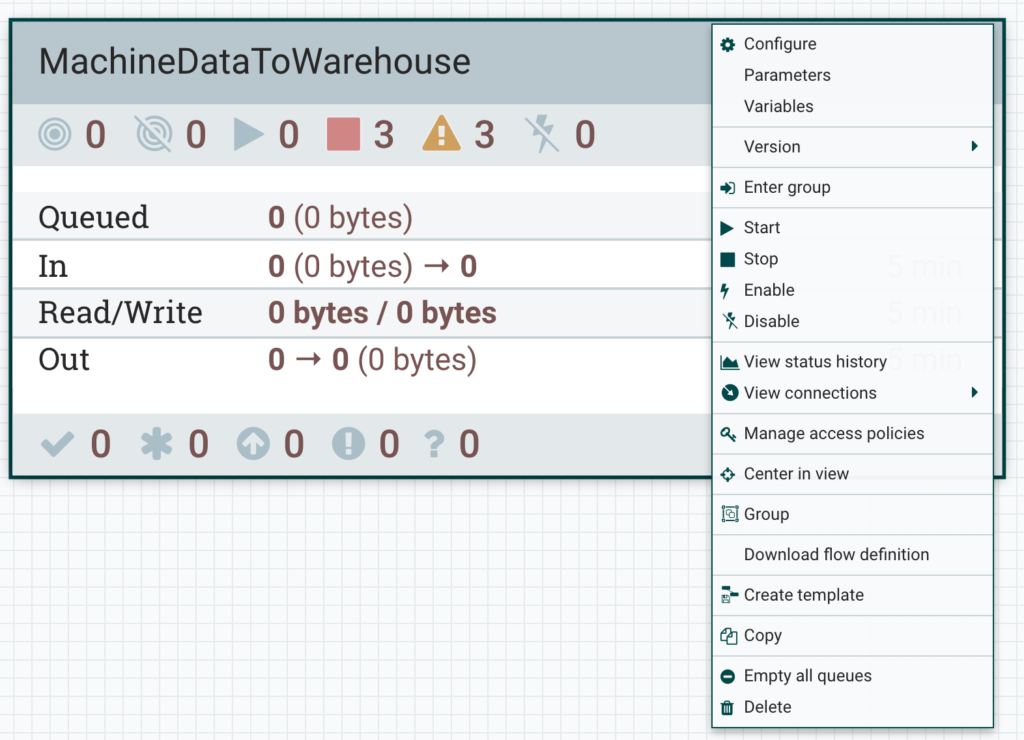
Figure 6: Exporting data flows using the “Download flow definition” capability in the NiFi canvas even works when you are not versioning your process groups
To manually export a flow definition from the NiFI canvas, right click the process group you want to export and select Download flow definition to obtain the flow definition in JSON format. This method exports the current process group from NiFi including any local changes which might not have been committed to the NiFi Registry yet. Since this operation does not rely on the NiFi Registry, you can download the flow definitions without versioning your data flows.
Exporting data flows using the NiFi Registry API
Downloading flow definitions right from the NiFi canvas is easy but it requires a manual action. One way to automate this process is to directly use the NiFi Registry API which allows you to programmatically export any version of your data flow that has been stored in the Registry.
Note: To use the NiFi Registry approach you have to version your data flows as explained in the previous section.
In CDP Public Cloud, endpoints like the NiFi Registry API are protected and exposed through a central Apache Knox proxy. To obtain the NiFi Registry API endpoint, navigate to your Flow Management Data Hub cluster and select the Endpoints tab.
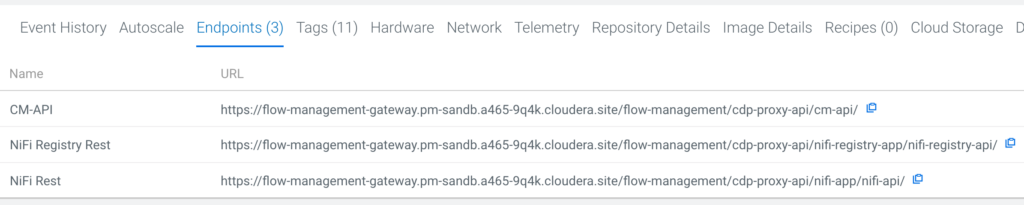
Figure 7: Flow Management cluster endpoints exposed through Knox
Copy the NiFi Registry Rest URL and use it as the base URL to construct your Rest calls. Refer to the Apache NiFi Registry Rest API documentation for all available API calls. First, you want to export the latest version of your data flow from the Registry, therefore the endpoint you need to use is /buckets/{bucketId}/flows/{flowId}/versions/latest .
After obtaining the Registry Rest URL and the API endpoint, you need to obtain the bucketID and flowId to construct the full API path. To do this, navigate to your Flow Management Data Hub cluster and click the NiFi Registry icon which logs you into the NiFi Registry UI.
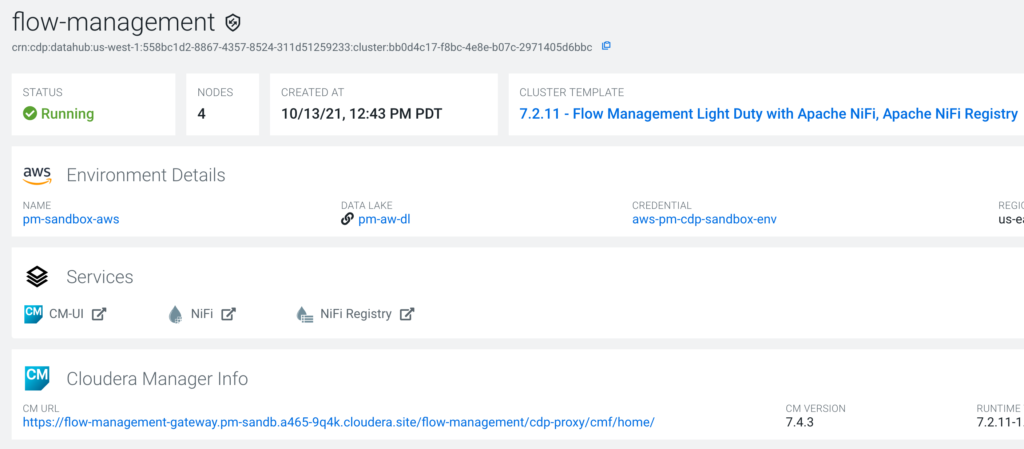
Figure 8: Navigating to the NiFi Registry UI
In the NiFi Registry UI, find the flow definition that you want to export by looking for the flow name that you provided when you started versioning your process group. Expand the corresponding entry and copy the BUCKET IDENTIFIER and the FLOW IDENTIFIER.
Using the NiFi Registry Rest URL as well as the Bucket and Flow identifiers you can now construct the final URL:
https://flow-management-gateway.pm-sandb.a465-9q4k.cloudera.site
/flow-management/cdp-proxy-api/nifi-registry-app/nifi-registry-api/
buckets/caea6227-2bde-452f-a325-3eac0424868f/flows/
f445e821-a373-448e-9b8b-bd54470b8f16/versions/latest
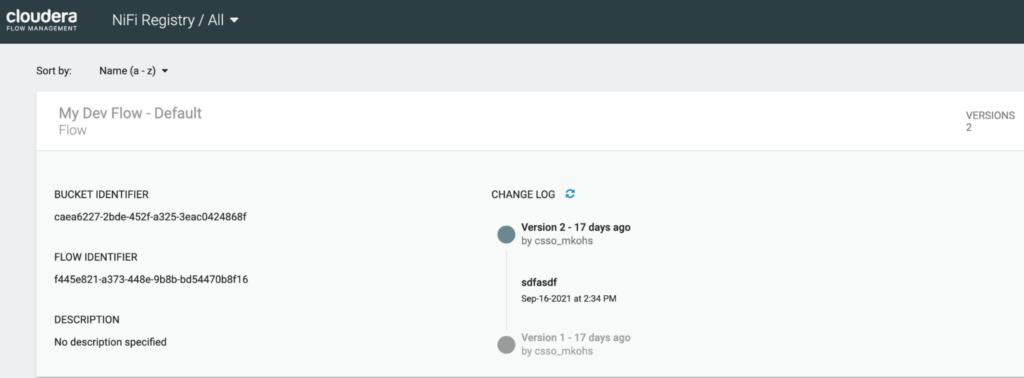
Figure 9: Obtaining the bucketID and flowId from NiFi Registry
Since the NiFi Registry API is exposed through a Knox proxy, you need to authenticate your Rest API call using a CDP workload user and password. You can use your personal CDP workload user or a machine user for this purpose as long as the EnvironmentUser role has been assigned to the CDP workload user for the CDP environment which is hosting your Flow Management cluster.
To add the EnvironmentUser role, navigate to your CDP environment, select “Manage Access” from the Actions menu and assign the EnvironmentUser role to the CDP workload user you want to use.
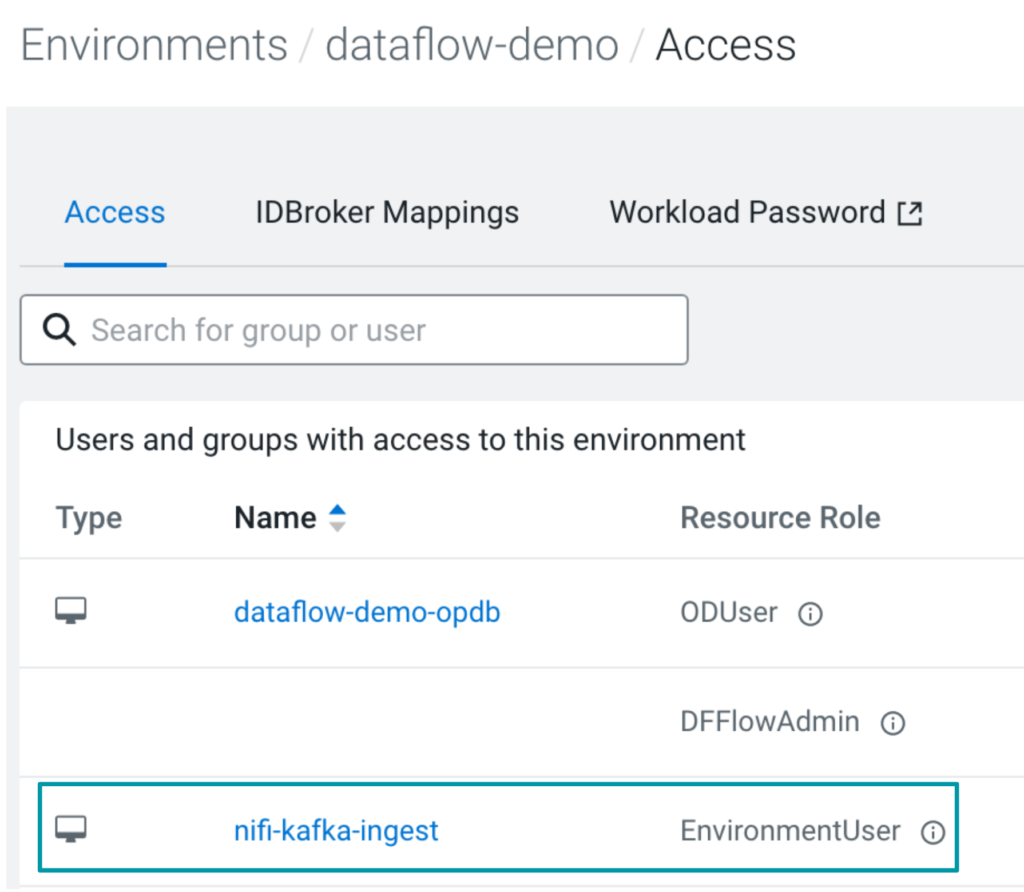
Figure 10: Assigning the EnvironmentUser role to a CDP workload user
In CDP Public Cloud, access to versioned NiFi data flows in the NiFi Registry is controlled by Apache Ranger. The CDP workload user that you are planning to use to call the NiFi Registry Rest API needs to be allowed access to the flow definition that you want to export. To allow the nifi-kafka-ingest user access to the bucket caea6227-2bde-452f-a325-3eac0424868f you need to create a corresponding policy in Ranger:
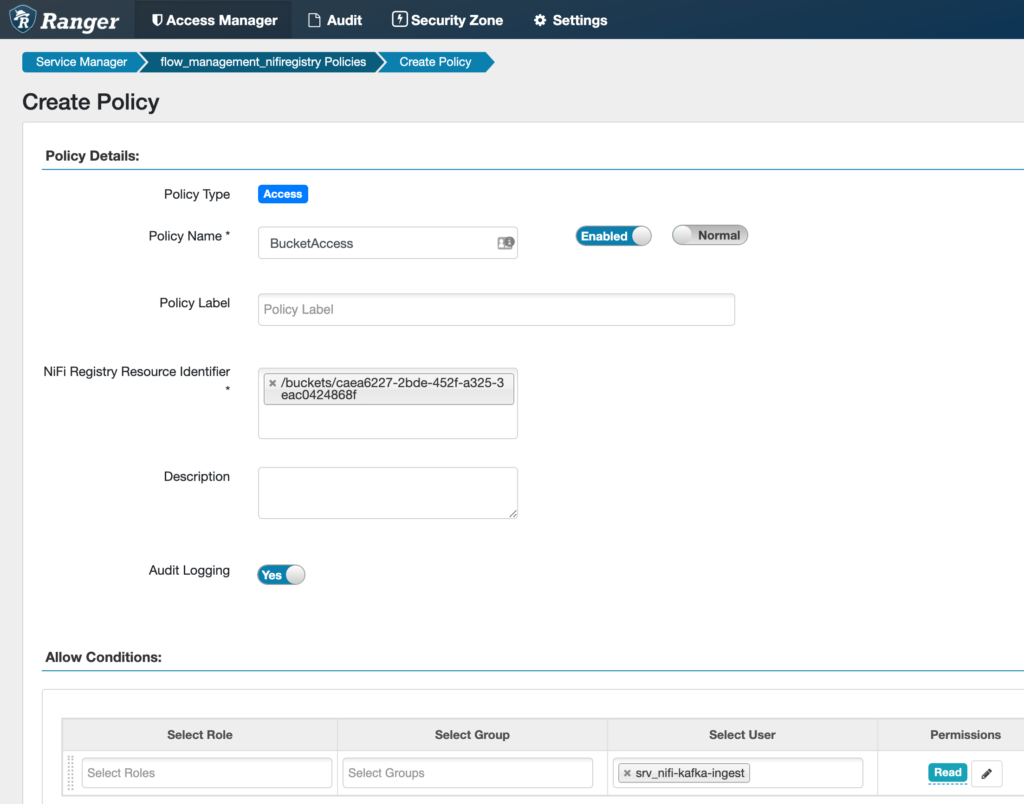
Figure 11: This Ranger policy allows your previously created machine user to access the NiFi Registry bucket which stores the flow definition you want to export.
Now that you have set up your CDP workload user, ensured that it can access the flow definition in the Registry, and obtained all the necessary IDs, you can go ahead and export your flow definition from the NiFi Registry.
Let’s combine the endpoint URL information you collected earlier with the bucket and flow identifiers and CDP workload user details to construct your final Rest API call. The response will be the flow definition in JSON format and you can choose to save it to a file using the redirect operator >.
curl -u CDP_WORKLOAD_USER:CDP_WORKLOAD_USER_PASSWORD https://flow-management-gateway.dataflow.xcu2-8y8x.dev.cldr.work/flow-management/cdp-proxy-api/nifi-registry-app/nifi-registry-api/buckets/caea6227-2bde-452f-a325-3eac0424868f/flows/f445e821-a373-448e-9b8b-bd54470b8f16/versions/latest > /home/youruser/myflowdefinition.json
Note: If you are running the command on one of the NiFi instances, replace “gateway” by “management0” to ensure the Registry endpoint can be reached.
Note: In this example we are using curl to invoke the Registry Rest endpoint. If you are using Python, check out nipyapi, which already provides Python wrappers for the NiFi and NiFi Registry API endpoints.
Note: To automate exporting data flows even further you can use NiFi Registry Hooks that allow you to execute a script when a certain action in the Registry is triggered. You could set up a Registry hook that automatically exports the flow definition and uploads it to the CDF-PC Flow Catalog every time a new version is created.
Exporting data flows using the NiFi CLI
You can also use the NiFi CLI to export flow definitions from the registry. The NiFi CLI is part of the NiFi toolkit which is installed on any NiFi node in your Flow Management cluster.
To use the NiFi CLI, establish an SSH connection with any NiFi node and login with your CDP workload user name. Start the NiFi CLI by executing the following command:
/opt/cloudera/parcels/CFM/TOOLKIT/bin/cli.sh
In addition to the flow identifier, NiFi Registry Rest endpoint and CDP workload user credentials, this approach also requires you to explicitly specify a truststore configuration to establish a secure connection. While the truststore location (/hadoopfs/fs4/working-dir/cm-auto-global_truststore.jks
) and the truststore type (JKS) are the same on every Flow Management cluster, the truststore password is unique for each cluster and needs to be obtained from /etc/hadoop/conf/ssl-client.xml
With the Registry Rest endpoint, CDP workload user credentials, flow identifier and truststore information you can now construct the full registry export-flow-version command:
registry export-flow-version --baseUrl https://flow-management-gateway.pm-sandb.a465-9q4k.cloudera.site/flow-management/cdp-proxy-api/nifi-registry-app/nifi-registry-api --flowIdentifier 45f308ce-9dc2-4ac7-9ff2-153d714b52dd --basicAuthUsername CDP_WORKLOAD_USER --basicAuthPassword CDP_WORKLOAD_USER_PASSWORD --truststore /hadoopfs/fs4/working-dir/cm-auto-global_truststore.jks --truststorePasswd TRUSTSTORE_PASSWORD --truststoreType jks --outputType json --outputFile /home/youruser/myflowdefinition.json
The command will return the flow definition in json format and write it to the location specified using –outputFile.
Note: If you are running the nifi toolkit on one of the NiFi instances, replace “gateway” by “management0” to ensure the Registry endpoint can be reached.
Importing data flows into CDF for the Public Cloud
Now that you have exported the flow definition from the Flow Management development environment, you need to import it into CDF-PC’s central Flow Catalog before you can create deployments.
Most of the actions that you can perform in CDF-PC’s UI can also be automated using the CDP CLI. Before you can start using the CDP CLI to upload your flow definition to the Flow Catalog you need to download and configure it correctly.
Note: CDF-PC CLI commands are currently only available in the CDP Beta CLI. Use these instructions to install and configure the Beta CLI.
Once you have set up the CDP CLI you can explore all available CDF-PC commands simply by running cdp df.
The command for importing flow definitions into the catalog is df import-flow-definition and requires you to specify the path to the flow definition you want to upload and provide a name for it in the catalog.
cdp df import-flow-definition --file myflowdefinition.json --name MyFlowDefinition --description “This is my first uploaded Flow Definition” --comments “Version 1”
You have now successfully imported your flow definition and can explore it in the Flow Catalog.
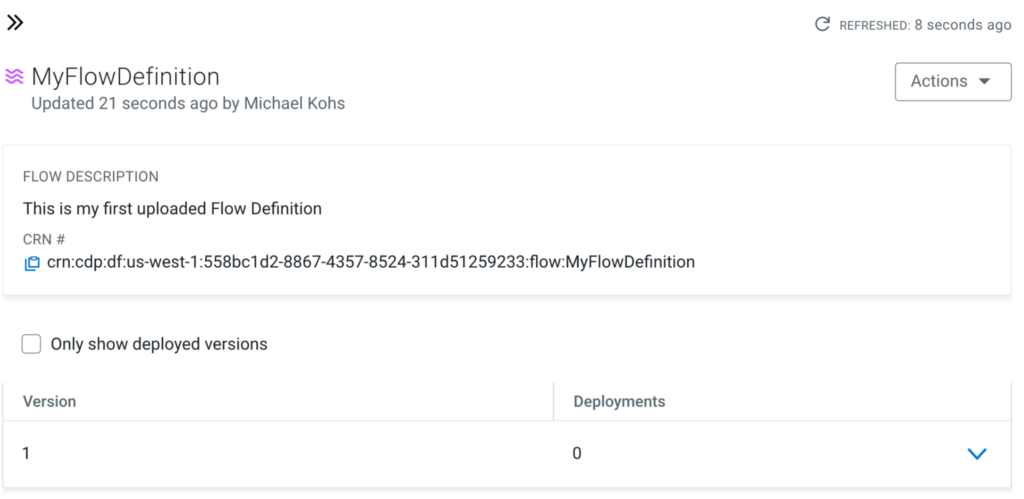
Figure 12: The flow definition has been imported successfully to the catalog
If you want to upload new versions of this flow definition, use the import-flow-definition-version command. It requires you to specify the CRN of the existing flow definition in the catalog as well as the new flow definition JSON file that you want to upload as a new version.
To get the flow definition CRN, navigate to the catalog, select your flow definition and copy the CRN. Use the CRN to construct the final import-flow-definition-version command:
cdp df import-flow-definition-version --file myflowdefinition_v2.json --flow-crn crn:cdp:df:us-west-1:558bc1d2-8867-4357-8524-311d51259233:flow:MyFlowDefinition --comments “Version 2 with fixes for processing data”
After successful execution, you will now see a second version for the flow definition in the catalog.
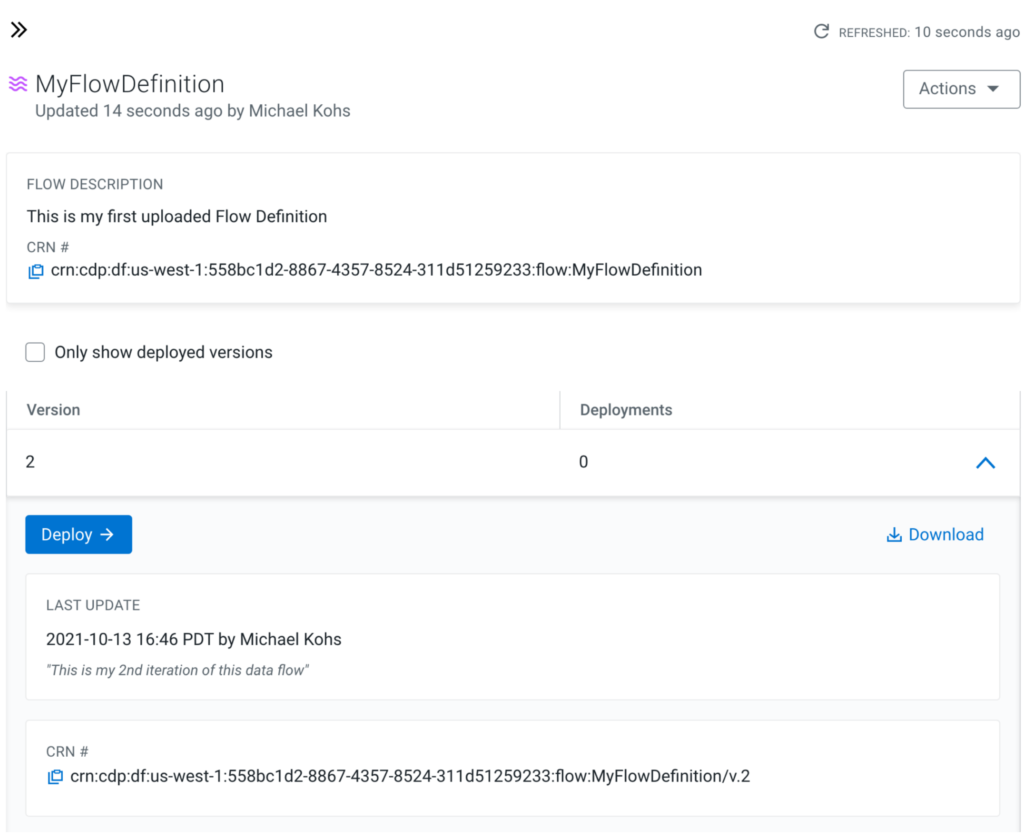
Figure 13: A new version has been created for the imported flow definition
Deploying data flows with CDF for Public Cloud
After importing your flow definition into the catalog you can use the create-deployment command to automate flow deployments.
To create a flow deployment in CDF-PC, you have to provide the flow definition CRN from the Flow Catalog, any parameter values the flow might require, any KPIs you want to set up as well as deployment configurations like the NiFi node size or whether the deployment should automatically scale up and down.
The easiest way to construct the full create-deployment command is to walk through the Deployment Wizard once and use the View CLI Command feature in the Review step to generate the corresponding CLI command and the required parameter and KPI files.
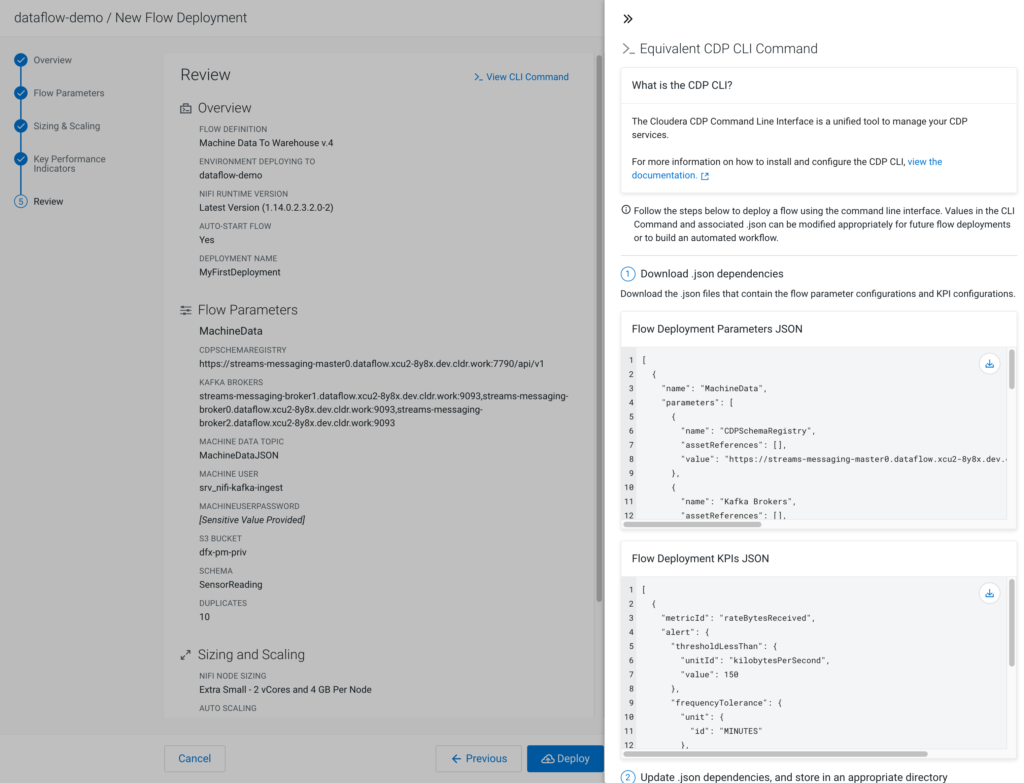
Figure 14: The Review step in the Deployment Wizard creates parameter and KPI property files and constructs the final create-deployment command
If your flow deployment contains flow parameters and KPIs, download the Flow Deployment Parameters JSON and Flow Deployment KPIs JSON files. These files define all parameters and their values as well as KPIs that you defined in the wizard.
Note: Values for Parameters marked as sensitive will not be included in the generated parameters file. Update the parameter value after downloading the file.
With these two files downloaded, all you have left to do is copy the CLI command from the wizard, adjust the parameter-groups file and kpis file paths before you can hit enter and programmatically create your first flow deployment.
  cdp df create-deployment \

  --service-crn crn:cdp:df:us-west-1:9d74eee4-1cad-45d7-b645-7ccf9edbb73d:service:e7aef078-aa34-44eb-8bb7-79e89a734911 \

  --flow-version-crn crn:cdp:df:us-west-1:558bc1d2-8867-4357-8524-311d51259233:flow:MyFlowDefinition/v.2 \

  --deployment-name "MyFirstDeployment" \

  --cfm-nifi-version 1.14.0.2.3.2.0-2 \

  --auto-start-flow \

  --cluster-size-name EXTRA_SMALL \

  --auto-scaling-enabled \

  --auto-scale-min-nodes 1 \

  --auto-scale-max-nodes 3 \

  --parameter-groups file://PATH_TO_UPDATE/flow-parameter-groups.json \

  --kpis file://PATH_TO_UPDATE/flow-kpis.json
After issuing the create-deployment command, you can navigate to the Dashboard in CDF-PC and watch the deployment process. Once the deployment has been created successfully you can manage it by using both the UI and the CLI.
Summary
Automating flow deployments with a single command is a key feature of CDF-PC and helps you focus on data flow development, deployment and monitoring instead of worrying about creating infrastructure and setting up complex CI/CD pipelines. Going forward we will continue to improve the CDF-PC CLI capabilities to further optimize the flow development lifecycle. Take the CDF-PC Product Tour and learn more about CDF-PC in the documentation.
Resources
- NiFi Registry REST API documentation
- Installing the Beta CDP CLI
- Available df commands in Beta CDP CLI
- Enabling DataFlow for a CDP Environment
- Importing a Flow Definition to the Flow Catalog
- Deploying Flow Definitions with the CLI
- NiFi Demo Jam showcasing NiFi Registry Hooks
Editor's Choice

