Governance and the sustainable handling of data is a critical success factor in virtually all organizations. While Cloudera Data Platform (CDP) already supports the entire data lifecycle from ‘Edge to AI’, we at Cloudera are fully aware that enterprises have more systems outside of CDP. It is crucial to avoid that CDP becomes the next silo in your IT landscape. To ensure just that, it can be fully integrated into the existing enterprise IT environment however diverse and even helps to track and categorize a wide variety of existing assets to provide a complete end-2-end view. In this blog, we’ll highlight the key CDP aspects that provide data governance and lineage and show how they can be extended to incorporate metadata for non-CDP systems from across the enterprise.
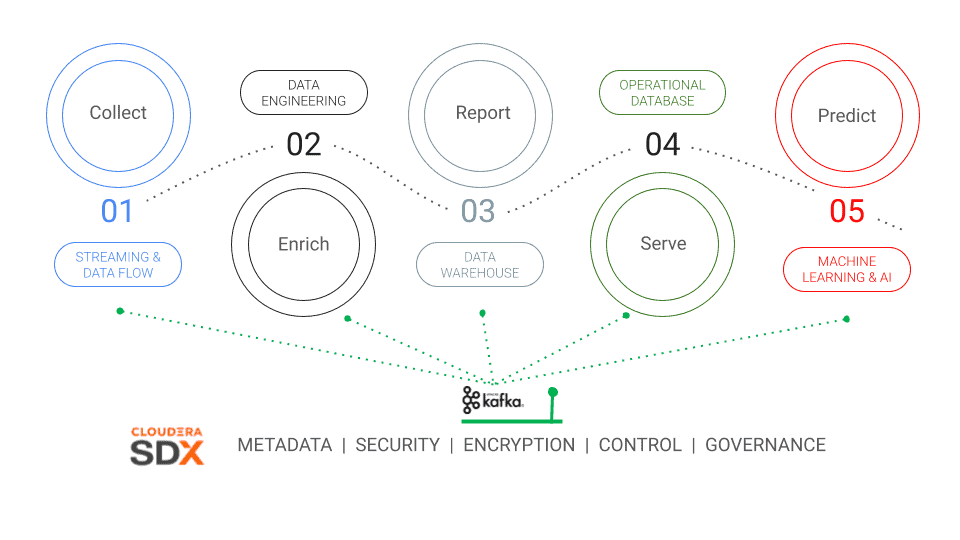
Apache Atlas as a fundamental part of SDX
CDP delivers consistent data security and governance across its complete range of analytics deployed to hybrid cloud courtesy of the Shared Data Experience (SDX). Just like CDP itself, SDX is built on community open source projects with Apache Ranger and Apache Atlas taking pride of place. Atlas provides open metadata management and governance capabilities to build a catalog of all assets, and also classify and govern these assets. The SDX layer of CDP leverages the full spectrum of Atlas to automatically track and control all data assets.
Leveraging Atlas capabilities for assets outside of CDP
Atlas provides a basic set of pre-defined type definitions (called typedefs) for various Hadoop and non-Hadoop metadata to cover all the needs of CDP. But Atlas is an incredibly flexible and customisable metadata framework which allows you to add 3rd party assets, even those that live outside CDP.
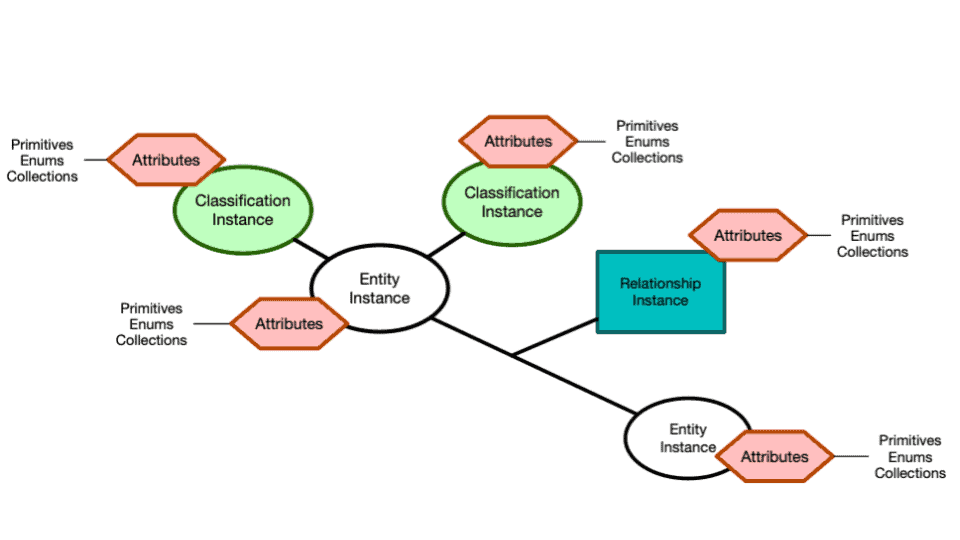
Everything is built around the core metadata model structure of type definitions and entities (see Atlas documentation for more detail):
- Each type definition (typedef)
- can be derived from a supertype definition
- can be part of a superior class, allowing the creation of a tree-like, structured storage for assets
- can have an unlimited number of characteristics (Attributes) to save all useful properties
- can define a valid set of classification definitions which can later be added to each instance of this typedef. In the following example we use a specific server to be of type ‘database_server’. Classifications can also be used to indicate whether a table contains Personal Identifiable Information (PII)
- Entities are instances of a certain typedef and:
- can have relations between each other
- can be linked to any number of classifications. E.g. each application or use case can be assigned a unique classification; the example below uses “xyz” as an application-id. Once added, related entities can be directly mapped to the classification, providing a clear overview of artefacts and how they relate to one another.
Finally, Atlas provides a rich set of REST APIs which can used to
- manage basic typedefs & classifications
- manage entities (instances of typedefs)
- manage relations between entities
Extending Atlas’ metadata model
The following steps describe how SDX’s Atlas can be extended to include third-party assets. Throughout the various steps, ready-made scripts from this Github repository are used.
1.Sketch of the end-to-end data pipeline
The following is a very simple but common data pipeline scenario:
A source system (e.g. transacional core banking application) sends a CSV data file to a (non HDFS) landing zone. An ETL process then reads the file, runs some quality checks on it and loads the valid records into an RDBMS as well as Hive table. Invalid records are stored in a separate error file.
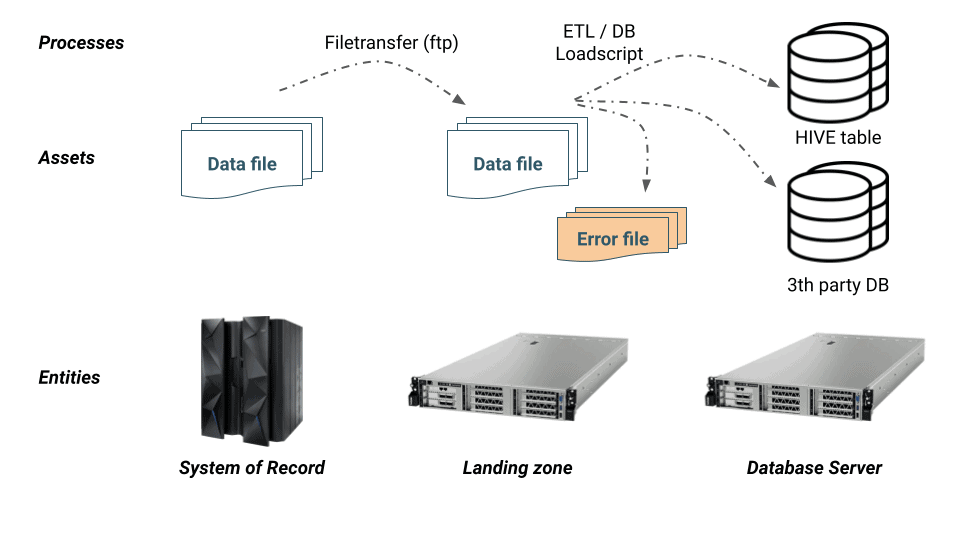
To capture this end-to-end data pipeline in Atlas,we need the following typedefs:
- Entities:
- Server
- Assets:
- Files
- RDBMS Database Table
- HIVE Table
- note that this asset is already available in CDP’s Atlas as an integral part of the CDP platform. No typedef needs to be created but we’ll show how third-party assets can connect to CDP assets to build complete lineage
- Processes:
- File transfer process
- ETL/DB Load process
2. Define required type definitions (typedef’s)
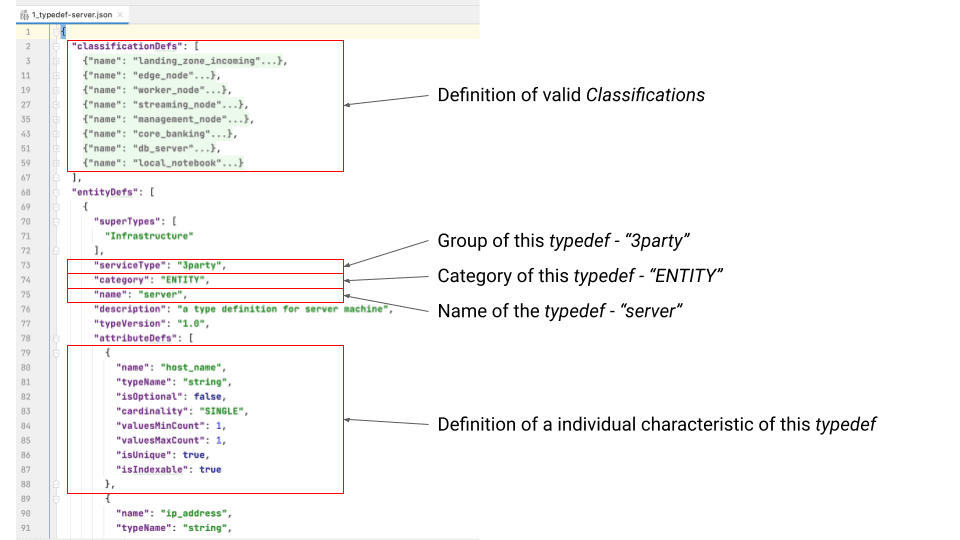
From a design viewpoint, a typedef is analogous to a class definition. There are predefined type definitions (typedefs) for all assets that occur in connection with CDP, e.g. Hive tables. Definitions that do not exist OOTB can be defined using the following syntax in a simple JSON file. The example 1_typedef-server.json describes the server typedef used in this blog.
Type : server
Derived form: ENTITY
Special Characteristics for this typedef:
- host_name
- ip_address
- zone
- platform
- rack_id
3. Add typedefs via the REST API’s to Atlas
To increase the reliability of CDP, all Atlas hooks are using Apache Kafka as an asynchronous transport layer. However, Atlas also provides its own rich set of RESTful API’s. In this step we use exactly those REST API v2 endpoints — the documentation for the full REST API endpoint can be found here and curl will be used to invoke the REST API’s
Remark: If you like you can use a local docker based installation for first steps:
docker pull sburn/apache-atlas:latest
docker run -d -p 21000:21000 --name atlas
sburn/apache-atlas
/opt/apache-atlas-2.1.0/bin/atlas_start.py
The request typedef JSON is stored in the file 1_typedef-server.json, and we invoke the REST endpoint with the following command:
curl -u admin:admin -X POST -H
Content-Type:application/json -H Accept:application/json -H C
ache-Control:no-cache
http://localhost:21000/api/atlas/v2/types/typedefs -d
@./1_typedef-server.json
To create all required typedef for the entire data pipeline you can also use the following bash script (create_typedef.sh):
ATLAS_USER="admin"
ATLAS_PWD="admin"
ATLAS_ENDPOINT="http://localhost:21000/api/atlas/v2"
ATLAS="curl -u ${ATLAS_USER}:${ATLAS_PWD}"
ATLAS_HEADER="-X POST -H Content-Type:application/json -H Accept:application/json -H Cache-Control:no-cache"
# typedef
$(${ATLAS} ${ATLAS_HEADER} ${ATLAS_ENDPOINT}/types/typedefs -d '@./1_typedef-server.json')
$(${ATLAS} ${ATLAS_HEADER} ${ATLAS_ENDPOINT}/types/typedefs -d '@./2_typedef-etl_process.json')
$(${ATLAS} ${ATLAS_HEADER} ${ATLAS_ENDPOINT}/types/typedefs -d '@./3_typedef-file.json')
$(${ATLAS} ${ATLAS_HEADER} ${ATLAS_ENDPOINT}/types/typedefs -d '@./4_typedef-transfer_process.json')
$(${ATLAS} ${ATLAS_HEADER} ${ATLAS_ENDPOINT}/types/typedefs -d '@./5_typedef-Db_table.json')
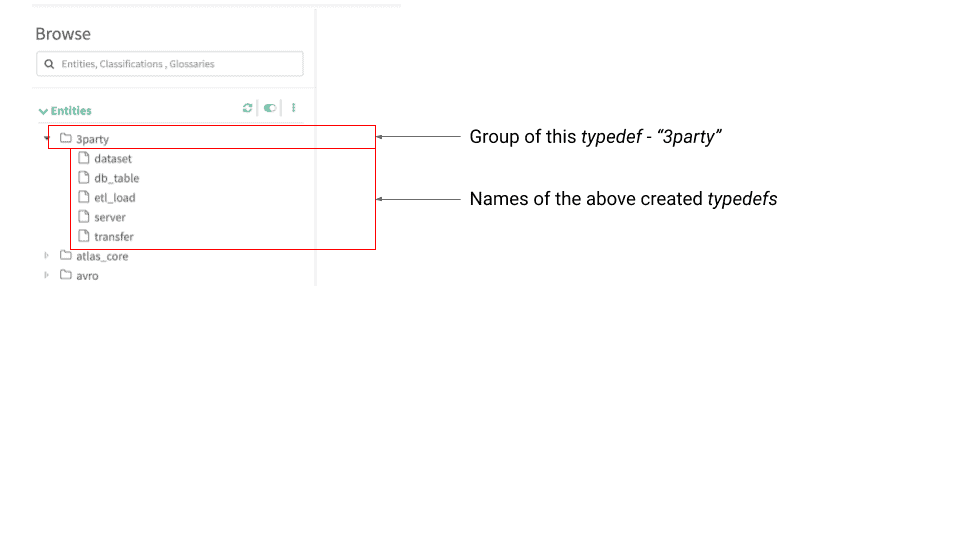
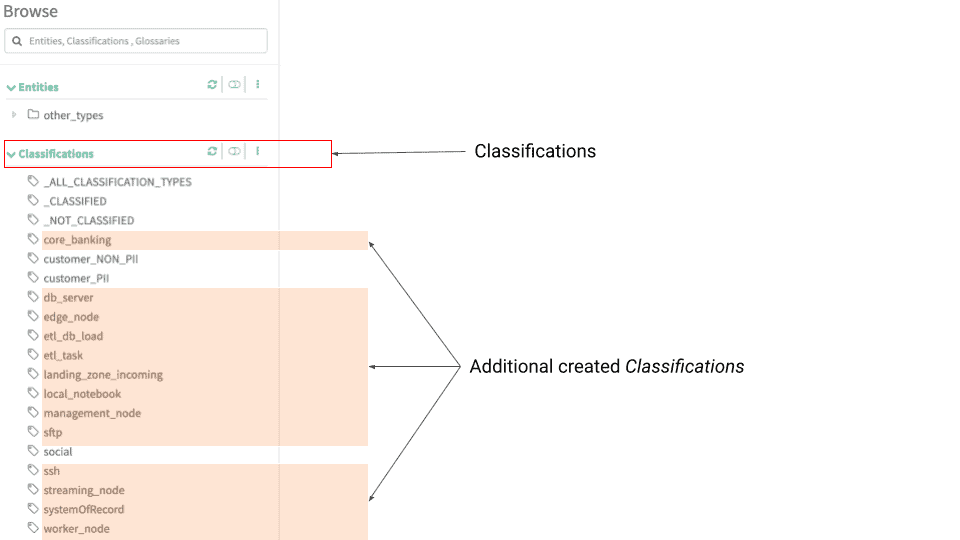
4. Check the Atlas UI after adding the 3rd party typedefs & classification to validate the new entities have been added.
The new typedefs are grouped under the servicetype “3party”
New classifications have also been added:
5. Create an instance of the type “server”
To create an instance of a typedef, use the REST API “/api/atlas/v2/entity/bulk” and refer to the corresponding typedef (e.g. “typeName”: “server”).
Good to know: Create vs Modify. Each typedef defines which fields must be unique. If you submit a request in which those values are not unique, the existing instance (with the equal values) is updated instead of inserted.
The following command shows how to create a server instance:
curl -u admin:admin -H Content-Type:application/json -H Accept:application/json http://localhost:21000/api/atlas/v2/entity/bulk -d '
  {
  "entities": [
    {
      "typeName": "server",
      "attributes": {
        "description": "Server: load-node-0 a landing_zone_incoming in the prod environment",
        "owner": "mdaeppen",
        "qualifiedName": "load-node-0.landing_zone_incoming@prod",
        "name": "load-node-0.landing_zone_incoming",
        "host_name": "load-node-0",
        "ip_address": "10.71.68.009",
        "zone": "prod",
        "platform": "darwin19",
        "rack_id": "swiss 1.0"
      },
      "classifications": [
        {"typeName": "landing_zone_incoming"}
      ]
    }
  ]
  }'
The script create_entities_server.sh from the github repository illustrates the creation of a server instance using a generic script with some parameters. The output is the GUID of the created/modified artefact (e.g. SERVER_GUID_LANDING_ZONE=f9db6e37-d6c5-4ae8-976c-53df4a55415b)
SERVER_GUID_LANDING_ZONE=$(./create_entities_server.sh \
-ip 10.71.68.009 \ <-- ip of the server (unique key)
-h load-node-0 \ <-- host name of the server
-e prod \ <-- environment (prod|pre-prod|test)
-c landing_zone_incoming) <-- classification
6. Create an instance of the type “datafile”
Similar to the creation of a server instance, use again the REST API “/api/atlas/v2/entity/bulk” and refer to the typedef “dataset”
curl -u admin:admin -H Content-Type:application/json -H Accept:application/json http://localhost:21000/api/atlas/v2/entity/bulk -d '
  {
  "entities": [
    {
      "typeName": "dataset",
      "createdBy": "ingestors_xyz_mdaeppen",
      "attributes": {
        "description": "Dataset xyz-credit_landing.rec is stored in /incommingdata/xyz_landing",
        "qualifiedName": "/incommingdata/xyz_landing/xyz-credit_landing.rec",
        "name": "xyz-credit_landing",
        "file_directory": "/incommingdata/xyz_landing",
        "frequency":"daily",
        "owner": "mdaeppen",
        "group":"xyz-credit",
        "format":"rec",
        "server" : {"guid": "00c9c78d-6dc9-4ee0-a94d-769ae1e1e8ab","typeName": "server"},
        "col_schema":[
          { "col" : "id" ,"data_type" : "string" ,"required" : true },
          { "col" : "scrap_time" ,"data_type" : "timestamp" ,"required" : true },
          { "col" : "url" ,"data_type" : "string" ,"required" : true },
          { "col" : "headline" ,"data_type" : "string" ,"required" : true },
          { "col" : "content" ,"data_type" : "string" ,"required" : false }
        ]
      },
      "classifications": [
        { "typeName": "xyz" }
      ]
    }
  ]
  }'
The script create_entities_file.sh from the github repo shows how to create a file instance and return a GUID for each file.
CLASS="systemOfRecord"
APPLICATION_ID="xyz"
APPLICATION="credit"
ASSET="$APPLICATION_ID"-"$APPLICATION"
FILE_GUID_LANDING_ZONE=$(./create_entities_file.sh \
 -a "$APPLICATION_ID" \
 -n "$ASSET"_"landing" \ <-- name of the file
 -d /incommingdata/"$APPLICATION_ID"_landing \ <-- directory
 -f rec \ <-- format of the file
 -fq daily \
 -s "$ASSET" \
 -g "$SERVER_GUID_LANDING_ZONE" \ <-- guid of storage server
 -c "$CLASS")
7. Maintain an overview of application-related classifications
So that we do not lose track of which entity is which, should many exist, we can create an additional classification for each application. The script create_classification.sh helps us to create an additional classification for each application which can be used to link all assets to it.
CLASS="systemOfRecord"
APPLICATION_ID="xyz"
APPLICATION="credit"
ASSET="$APPLICATION_ID"-"$APPLICATION"
$(./create_classification.sh -a "$APPLICATION_ID")
REST point invocation:
curl -u admin:admin -H Content-Type:application/json -H Accept:application/json http://localhost:21000/api/atlas/v2/types/typedefs -d '{
  "classificationDefs": [
    {
      "category": "CLASSIFICATION",
      "name": "xyz",
      "typeVersion": "1.0",
      "attributeDefs": [],
      "superTypes": ["APPLICATION"]
    }
  ]
  }'
8. Build the relations between assets
For the data pipeline assets we have designed and created above, we need two different types for processes that connect them:
- Transfer (see typedef & create_entities_dataflow.sh)
# add file transfer "core banking" to "landing zone"
FILE_MOVE_GUID=$(./create_entities_dataflow.sh \
 -a "$APPLICATION_ID" \
 -t transfer \ <-- type of process
 -ip 192.168.0.102 \ <-- execution server
 -i "$ASSET"_"raw_dataset" \ <-- name of the source file
 -it dataset \ <-- type of the source
 -ig "$FILE_GUID_CORE_BANING" \ <-- guid of the source
 -o "$ASSET"_"landing_dataset"  \ <-- name of the target file
 -ot dataset \ <-- type of the target
 -og "$FILE_GUID_LANDING_ZONE" \ <-- guid of the target
 -c sftp) <-- classification
echo "$FILE_MOVE_GUID"
- ETL / Load (see typedef & create_entities_dataflow.sh)
# add etl "landing zone" to "DB Table"
FILE_LOAD_GUID=$(./create_entities_dataflow.sh \
 -a "$APPLICATION_ID" \
 -t etl_load \ <-- type of process
 -ip 192.168.0.102 \ <-- execution server
 -i "$ASSET"_"landing_dataset" \ <-- name of the source file
 -it dataset \ <-- type of the source
 -ig "$FILE_GUID_LANDING_ZONE" \ <-- guid of the source
 -o "$ASSET"_"database_table"   \ <-- name of the target file
 -ot db_table \ <-- type of the target
 -og "$DB_TABLE_GUID" \ <-- guid of the target
 -c etl_db_load) <-- classification
echo "$FILE_LOAD_GUID"
9. Put everything together
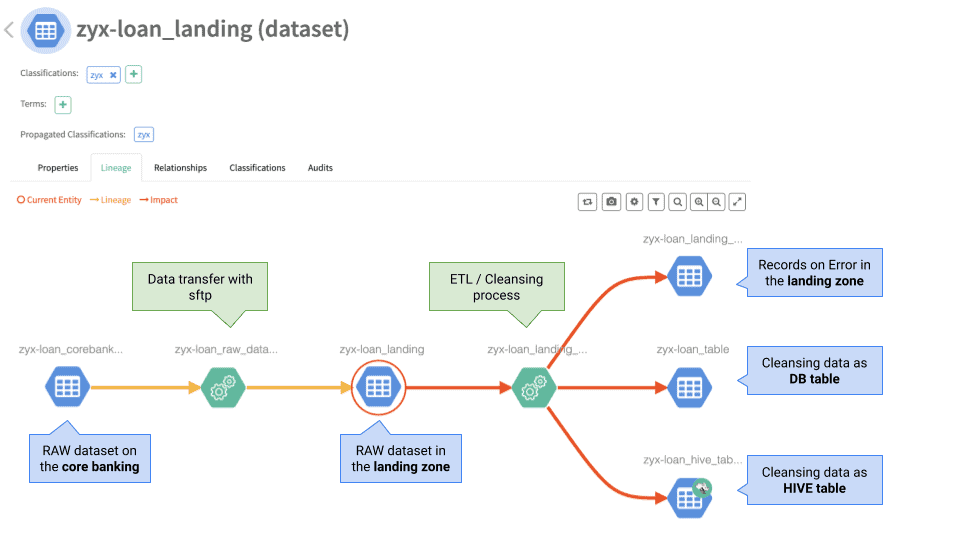
Now we have all the puzzle pieces on the table. The script sample_e2e.sh shows how to put them together to create an end-to-end data lineage. The lineage can also contain assets which have been created in CDP by simply adding a relation (as shown above) to them.
Sequence of steps:
- Create the unique classification for this application
- Create the required server instancesCreate the required file instances on the before created servers (Mainframe, Landing zone)
- Create the required DB table instances on the before created DB server
- Create a process with type ‘transfer’ between Mainframe > Landing dataset
- Create a process with type ‘etl_load’ between Landing zone > DB table
- Create a process with type ‘etl_load’ between Landing zone > HIVE table
- Create a process with type ‘etl_load’ between Landing zone > Error dataset
SDX: governance beyond CDP
The scenario described above is one that’s found time and again in virtually all companies in this or in a similar form. Atlas is a very flexible metadata catalog which can be adapted for all kinds of assets. With the integration of 3rd party assets it provides true added value through a more complete illustration of the existing data flows. The relations between all the assets is crucial to evaluate the effects of a change or to simply understand what’s going on.
I recommend to follow a ‘start small’ approach and record the original source of each dataset as it is on-boarded to CDP or touched during the maintenance. Leverage the power of what’s already there and complete the picture over time.
For more information check out the Apache Atlas, Cloudera community or my github repo.


