

Learn how to use OCR tools, Apache Spark, and other Apache Hadoop components to process PDF images at scale.
Optical character recognition (OCR) technologies have advanced significantly over the last 20 years. However, during that time, there has been little or no effort to marry OCR with distributed architectures such as Apache Hadoop to process large numbers of images in near-real time.
In this post, you will learn how to use standard open source tools along with Hadoop components such as Apache Spark, Apache Solr, and Apache HBase to do just that for a medical device information use case. Specifically, you will use a public dataset to convert narrative text into searchable fields.
Although this example concentrates on medical device information, it can be applied in many other scenarios where processing and persisting images is required. Insurance companies, for example, can make all their scanned documents in claims files searchable for better claim resolution. Similarly, the supply-chain department in a manufacturing facility could scan all the technical data sheets from parts suppliers and make them searchable by analysts.
Use Case: Medical Device Registration
Recent years have seen a flurry of changes in the field of electronic drug product registration. The IDMP (Identification of medical products) ISO standard is one such message format for registering products and the substances contained within them, with the Medicinal Product ID, Packaging ID and Batch ID being used to track the products in the cases of adverse experiences, illegal import, counterfeiting, and other issues of pharmacovigilance. The standard asks that not only do new products need to be registered, but that the older/archived filing of every product to which the public could be exposed must also be provided in electronic form.
To comply with IDMP standards in different companies, companies must be able to pull and process data from multiple data sources, such as RDBMS as well as, in some cases, legacy product data sheets. While it is well known how to ingest data from RDBMS via technologies like Apache Sqoop, legacy document processing requires a little more work. For the most part, the documents need to be ingested, and relevant text needs to be programmatically extracted at scale using existing OCR technologies.
Dataset
We will use a data set from the FDA that contains all of the 510(k) filings ever submitted by medical device manufacturers since 1976. Section 510(k) of the Food, Drug and Cosmetic Act requires device manufacturers who must register, to notify FDA of their intent to market a medical device at least 90 days in advance.
This dataset is useful for several reasons in this case:
- The data is free and in the public domain.
- The data fits right in with the European regulation, which activates in July 2016 (where manufacturers must comply with new data standards). FDA fillings have important information relevant to deriving a complete view of IDMP.
- The format of the documents (PDF) allows us to demonstrate simple yet effective OCR techniques when dealing with documents of multiple formats.
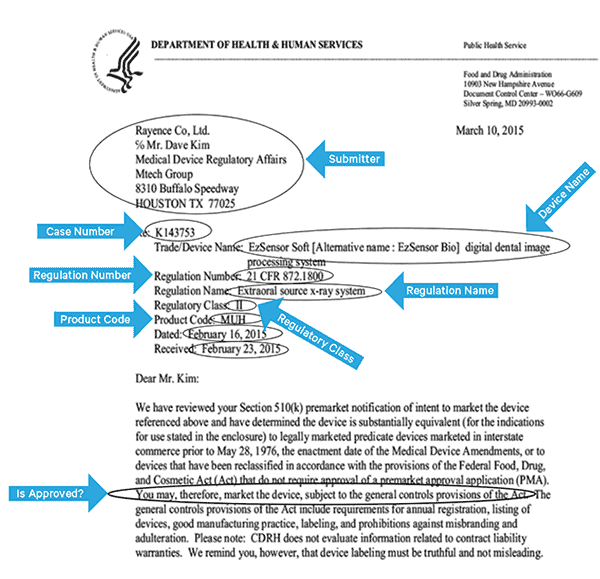
To effectively index this data, we’ll need to extract some fields from the images. Below is a sample document, with the potential fields that can be extracted.
High-Level Architecture
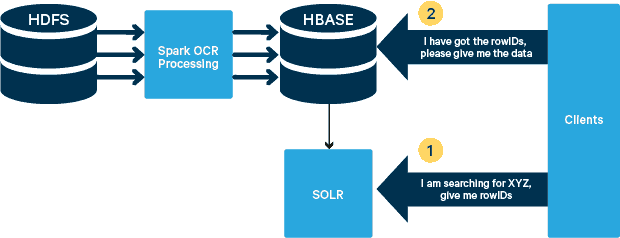
For this use case, the PDFs are stored in HDFS and processed using Spark and OCR libraries. (The ingestion step is outside the scope of this post, but it could be as simple as running hdfs -dfs -put or using a webhdfs interface.) Spark allows the use of nearly identical code in a Spark Streaming application for near-real time streaming, and HBase is a perfect storage medium for low-latency random access—and is well suited for storing images, with the new MOB functionality, to boot. Cloudera Search (which is built on top of Apache Solr) is the only search solution that integrates natively with HBase, thereby allowing you to build secondary indexes.
Setting Up the Medical Device Table in HBase
We will keep the schema for our use case straightforward. The rowID will be the filename, and there will be two column families: “info” and “obj”. The “info” column family will contain all the fields we extracted from the images. The “obj” column family will hold the bytes of the actual binary object, in this case PDF. The name of the table in our case will be “mdds.”
We will take advantage of HBase MOB (medium object) functionality introduced in HBASE-11339. To set up HBase to handle MOB, a few extra steps are required, but, conveniently, instructions can be found on this link.
There are many ways to create the table in HBase programmatically (Java API, REST API, or a similar method). Here we will use the HBase shell to create the “mdds” table (intentionally using a descriptive column family name to make things easier to follow). We want to have the “info” column family replicated to Solr, but not the MOB data.
The command below will create the table and enable replication on a column family called “info.” It’s crucial to specify the option REPLICATION_SCOPE => '1', else the HBase Lily Indexer will not get any updates from HBase. We want to use the MOB path in HBase for objects larger that 10MB. To accomplish that we also create another column family, called “obj,” using the following parameters for MOBs:
IS_MOB => true, MOB_THRESHOLD => 10240000
The IS_MOB parameter specifies whether this column family can store MOBs, while MOB_THRESHOLD specifies after how large the object has to be for it to be considered a MOB. So, let’s create the table:
create 'mdds', {NAME => 'info', DATA_BLOCK_ENCODING => 'FAST_DIFF',REPLICATION_SCOPE => '1'},{NAME => 'obj', IS_MOB => true, MOB_THRESHOLD => 10240000}
To confirm the table was created properly, run the following command in HBase shell:
hbase(main):001:0> describe 'mdds'
Table mdds is ENABLED
mdds
COLUMN FAMILIES DESCRIPTION
{NAME => 'info', DATA_BLOCK_ENCODING => 'FAST_DIFF', BLOOMFILTER => 'ROW', REPLICATION_SCOPE => '1', VERSIONS => '1', COMPRESSION => 'NONE', MIN_VERSIONS => '0', TTL => 'FOREVER', KEEP_DELETED_CELLS => 'FALSE', BLOCKSIZE => '65536', IN_MEMORY => 'false', BLOCKCACHE => 'true'}
{NAME => 'obj', DATA_BLOCK_ENCODING => 'NONE', BLOOMFILTER => 'ROW', REPLICATION_SCOPE => '0', COMPRESSION => 'NONE', VERSIONS => '1', MIN_VERSIONS => '0', TTL => 'FOREVER', MOB_THRESHOLD => '10240000', IS_MOB => 'true', KEEP_DELETED_CELLS => 'FALSE', BLOCKSIZE => '65536', IN_MEMORY => 'false', BLOCKCACHE => 'true'}
2 row(s) in 0.3440 seconds
Processing Scanned Images with Tesseract
OCR has come a long way in terms of dealing with font variations, image noise, and alignments issues. Here we’ll use the open source OCR engine Tesseract, which was originally developed as proprietary software at HP labs. Tesseract development has since been released as an open source software and been sponsored by Google since 2006.
Tesseract is a highly portable software library. It uses the Leptonica image-processing library to generate a binary image by doing adaptive thresholding on a gray or colored image.
Processing follows a traditional step-by-step pipeline. Following is the rough flow of steps:

Processing starts with a connected component analysis, which results in storing the components found. This step helps in inspection of the nesting of outlines, and the number of child and grandchild outlines.
At this stage, outlines are gathered together, purely by nesting, into Binary Large Objects (BLOBs). BLOBs are organized into text lines, and the lines and regions are analyzed for fixed pitch or proportional text. Text lines are broken into words differently according to the kind of character spacing. Fixed pitch text is chopped immediately by character cells. Proportional text is broken into words using definite spaces and fuzzy spaces.
Recognition then proceeds as a two-pass process. In the first pass, an attempt is made to recognize each word in turn. Each word that is satisfactory is passed to an adaptive classifier as training data. The adaptive classifier then gets a chance to more accurately recognize text lower down the page. Since the adaptive classifier may have learned something useful too late to make a contribution near the top of the page, a second pass is run over the page, in which words that were not recognized well enough are recognized again. A final phase resolves fuzzy spaces, and checks alternative hypotheses for the x-height to locate small-cap text.
Tesseract in its current form is fully unicode capable and trained for several languages. Based on our research, it is one of the most accurate open source libraries available for OCR. As mentioned earlier, Tesseract uses Leptonica. We also make use of Ghostscript to split the PDF files into images. (You can split into image compression format of your choice; we picked PNG.) These three libraries are written in C++, and to invoke them from Java/Scala programs, we need to use implementations of corresponding Java Native Interfaces. In our work, we use the JNI bindings from JavaPresets. (The build instructions can be found below.) We used Scala to write the Spark driver.
val renderer :SimpleRenderer = new SimpleRenderer( )
renderer.setResolution( 300 )
val images:List[Image] = renderer.render( document )
Leptonica reads in the split images from the previous step.
ImageIO.write(
        x.asInstanceOf[RenderedImage],
        "png",
        imageByteStream
)
val pix: PIX = pixReadMem (
       ByteBuffer.wrap( imageByteStream.toByteArray( ) ).array( ),
       ByteBuffer.wrap( imageByteStream.toByteArray( ) ).capacity( )
)
We then use Tesseract API calls to extract the text. We assume the documents are in English here, hence the second parameter to Init method is “eng.”
val api: TessBaseAPI = new TessBaseAPI( )
api.Init( null, "eng" )
api.SetImage(pix)
api.GetUTF8Text().getString()
After the images are processed, we extract some fields from the text and send them to HBase.
def populateHbase (
                   fileName:String,
                   lines: String,
                   pdf:org.apache.spark.input.PortableDataStream) : Unit =
{
 /** Configure and open a HBase connection */
 val mddsTbl = _conn.getTable( TableName.valueOf( "mdds" ));
 val cf = "info"
 val put = new Put( Bytes.toBytes( fileName ))

 /**
  * Extract Fields here using Regexes
  * Create Put objects and send to HBase
  */
 val aAndCP = """(?s)(?m).*\d\d\d\d\d-\d\d\d\d(.*)\nRe: (\w\d\d\d\d\d\d).*""".r
 ……..

 lines match {
   case
     aAndCP( addr, casenum ) => put.add( Bytes.toBytes( cf ),
Bytes.toBytes( "submitter_info" ),
Bytes.toBytes( addr ) ).add( Bytes.toBytes( cf ),
Bytes.toBytes( "case_num" ), Bytes.toBytes( casenum ))
   case _ => println( "did not match a regex" )
 }

  …….

 lines.split("\n").foreach {

   val regNumRegex = """Regulation Number:\s+(.+)""".r
   val regNameRegex = """Regulation Name:\s+(.+)""".r
   ……..
   …….

   _ match {
     case regNumRegex( regNum ) => put.add( Bytes.toBytes( cf ),
Bytes.toBytes( "reg_num" ),
     …….
        …..
     case _ => print( "" )
   }
 }
 put.add( Bytes.toBytes( cf ), Bytes.toBytes( "text" ), Bytes.toBytes( lines ))
 val pdfBytes = pdf.toArray.clone
 put.add(Bytes.toBytes( "obj" ), Bytes.toBytes( "pdf" ), pdfBytes )

 mddsTbl.put( put )
 …….
}
If you look closely into the code above, right before we send the Put object to HBase, we insert the raw PDF bytes into the “obj” column family of the table. We use HBase as a storage layer for the extracted fields as well as the raw image. This makes it fast and convenient for application to extract the original image, if need be. The full code can be found here. (It is worth noting that while we used standard HBase APIs to create Put objects for HBase, in a real production system, it would be wise to consider using SparkOnHBase APIs, which allow for batch updates to HBase from Spark RDDs.)
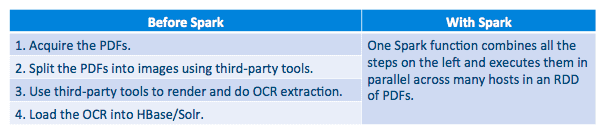
Execution Pipeline
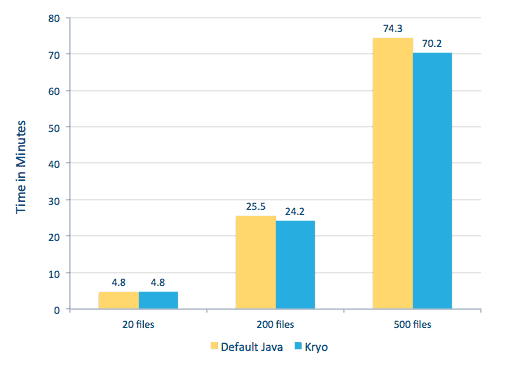
We were able to process each PDF in a serial framework. To scale the processing, we chose to process these PDFs in a distributed fashion using Spark. The following chart demonstrates how we combine different stages of this processing to turn the workflow into a simple macro call from Spark and get the data loaded into HBase.
We also tried to do a comparison between serialization methods, but, with our dataset, we did not see a significant difference in performance.
Environment Setup
Hardware used: Five-node cluster with 15GB memory, 4 vCPUs, and 2x40GB SSD
Since we were using C++ libraries for processing, we used the JNI bindings which can be found here.
Build the JNI bindings for Tesseract and Leptonica from javaCPP presets:
-
- On all nodes:
yum -y install automake autoconf libtool zlib-devel libjpeg-devel giflib libtiff-devel libwebp libwebp-devel libicu-devel openjpeg-devel cairo-devel git clone https://github.com/bytedeco/javacpp-presets.gitcd javacpp-presets- Build Leptonica.
cd leptonica
./cppbuild.sh install leptonica
cd cppbuild/linux-x86_64/leptonica-1.72/
LDFLAGS="-Wl,-rpath -Wl,/usr/local/lib" ./configure
make && sudo make install
cd ../../../
mvn clean install
cd ..
- Build Tesseract.
- On all nodes:
cd tesseract
./cppbuild.sh install tesseract
cd tesseract/cppbuild/linux-x86_64/tesseract-3.03
LDFLAGS="-Wl,-rpath -Wl,/usr/local/lib" ./configure
make && make install
cd ../../../
mvn clean install
cd ..
- Build javaCPP presets.
mvn clean install --projects leptonica,tesseract
We use Ghostscript to extract the images from the PDFs. Instructions to build Ghostscript, corresponding to the versions of Tesseract and Leptonica used here, are as follows. (Make sure Ghostscript is not installed in the system via the package manager.)
wget http://downloads.ghostscript.com/public/ghostscript-9.16.tar.gz
tar zxvf ghostscript-9.16.tar.gz
cd ghostscript-9.16
./autogen.sh && ./configure --prefix=/usr --disable-compile-inits  --enable-dynamic
sudo make && make soinstall && install -v -m644 base/*.h /usr/include/ghostscript && ln -v -s ghostscript /usr/include/ps
(Depending on your ldpath setting, you may have to do) :  sudo ln -sf /usr/lib/libgs.so /usr/local/lib/libgs.so
Make sure all the needed libraries are in the classpath. We put all the relevant jars in a directory called lib. Comma is important below:
$ for i in `ls lib/*`; do export MY_JARS=./$i,$MY_JARS; done
tesseract.jar, tesseract-linux-x86_64.jar, javacpp.jar, ghost4j-1.0.0.jar, leptonica.jar, leptonica-1.72-1.0.jar, leptonica-linux-x86_64.jar
We invoke the Spark program as follows. We need to specify the extraLibraryPath for native Ghostscript libraries; the other conf is needed for Tesseract.
spark-submit --jars $MY_JARS --num-executors 12 --executor-memory 4G --executor-
cores 1 --conf spark.executor.extraLibraryPath=/usr/local/lib --conf
spark.executorEnv.TESSDATA_PREFIX=/home/vsingh/javacpp-
presets/tesseract/cppbuild/1-x86_64/share/tessdata/ --conf
spark.executor.extraClassPath=/etc/hbase/conf:/opt/cloudera/parcels/CDH/lib/hbase/
lib/htrace-core-3.1.0-incubating.jar --driver-class-path
/etc/hbase/conf:/opt/cloudera/parcels/CDH/lib/hbase/lib/htrace-core-3.1.0-
incubating.jar --conf  spark.serializer=org.apache.spark.serializer.KryoSerializer
--conf spark.kryoserializer.buffer.mb=24 --class com.cloudera.sa.OCR.IdmpExtraction
Creating a Solr Collection
Solr integrates quite seamlessly with HBase via Lily HBase Indexer. To understand how the integration of Lily Indexer integration with HBase is done, you can brush up via our previous post in the “Understanding HBase Replication and Lily HBase Indexer” section.
Below we outline the steps that need to be performed to create the indexes:
- Generate a sample schema.xml configuration file:
solrctl --zk localhost:2181 instancedir --generate $HOME/solrcfg - Edit the schema.xml file in
$HOME/solrcfg, specifying the fields we need for our collection. The full file can be found here. - Upload the Solr configurations to ZooKeeper:
solrctl --zk localhost:2181/solr instancedir --create mdds_collection $HOME/solrcfg - Generate the Solr collection with 2 shards (-s 2) and 2 replicas (-r 2):
solrctl --zk localhost:2181/solr --solr localhost:8983/solr collection --create mdds_collection -s 2 -r 2
In the command above we created a Solr collection with two shards (-s 2) and two replicas (-r 2) parameters. The parameters were sufficient for our corpus, but in an actual deployment one would have to set the number based on other considerations outside our scope of discussion here.
Registering the Indexer
This step is needed to add and configure the indexer and HBase replication. The command below will update ZooKeeper and add mdds_indexer as a replication peer for HBase. It will also insert configurations into ZooKeeper, which Lily HBase Indexer will use to point to the right collection in Solr. |
hbase-indexer add-indexer -n mdds_indexer -c indexer-config.xml -cp solr.zk=localhost:2181/solr -cp solr.collection=mdds_collection.
Arguments:
-n mdds_indexer– specifies the name of the indexer that will be registered in ZooKeeper-c indexer-config.xml– configuration file that will specify indexer behavior-cp solr.zk=localhost:2181/solr– specifies the location of ZooKeeper and Solr config. This should be updated with the environment specific location of ZooKeeper.-cp solr.collection=mdds_collection– specifies which collection to update. Recall the Solr Configuration step where we created collection1.
The index-config.xml file is relatively straightforward in this case; all it does is specify to the indexer which table to look at, the class that will be used as a mapper (com.ngdata.hbaseindexer.morphline.MorphlineResultToSolrMapper), and the location of the Morphline configuration file. By default, mapping-type is set to row, in which case the Solr document becomes the full row. Param name="morphlineFile" specifies the location of the Morphlines configuration file. The location could be an absolute path of your Morphlines file, but since you are using Cloudera Manager, specify the relative path as morphlines.conf.
The contents of the hbase-indexer configuration file can be found here.
Configuring and Starting Lily HBase Indexer
When you enable Lily HBase Indexer, you need to specify the Morphlines transformation logic that will allow this indexer to parse updates to the Medical Device table and extract all the relevant fields. Go to Services and choose Lily HBase Indexer that you added previously. Select Configurations->View and Edit->Service-Wide->Morphlines. Copy and paste the Morphlines file.
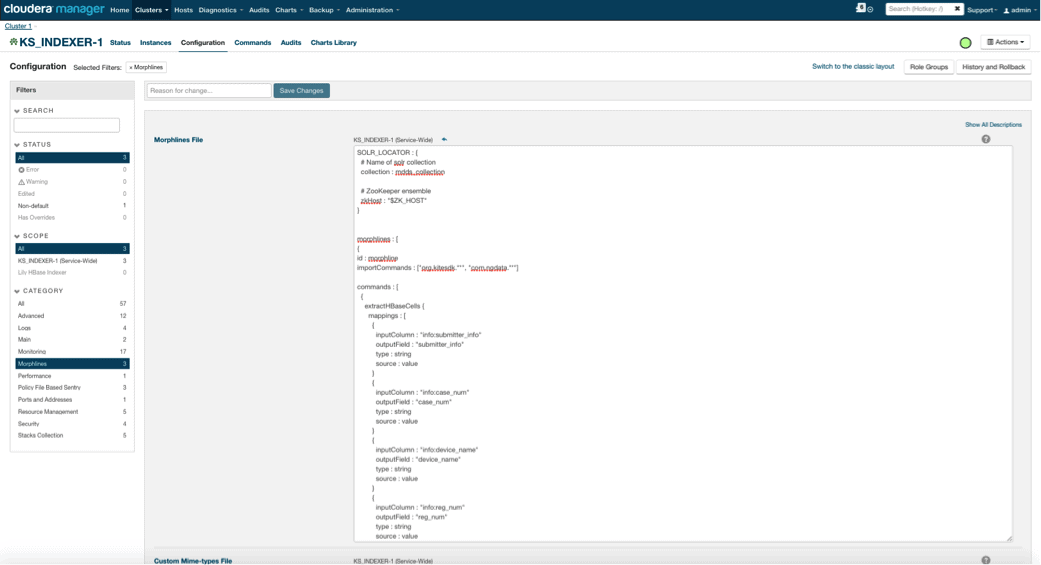
The medical devices morphlines library will perform the following actions:
- Read the HBase email events with the
extractHBaseCellscommand - Convert the date/timestamps into a field that Solr will understand, with the
convertTimestampcommands - Drop all of the extra fields that we did not specify in schema.xml, with the
sanitizeUknownSolrFieldscommand
Download a copy of this Morphlines file from here.
One important note is that the id field will be automatically generated by Lily HBase Indexer. That setting is configurable in the index-config.xml file above by specifying the unique-key-field attribute. It is a best practice to leave the default name of id—as it was not specified in the xml file above, the default id field was generated and will be a combination of RowID.
Accessing the Data
You have the choice of many visual tools to access the indexed images. HUE and Solr GUI are both very good options. HBase also enables a number of access techniques, not only from a GUI but also via the HBase shell, API, and even simple scripting techniques.
Integration with Solr gives you great flexibility and can also provide very simple as well as advanced searching options for your data. For example, configuring the Solr schema.xml file such that all fields within the email object are stored in Solr allows users to access full message bodies via a simple search, with the trade-off of storage space and compute complexity. Alternatively, you can configure Solr to store only a limited number of fields, such as the id. With these elements, users can quickly search Solr and retrieve the rowID which in turn can be used to retrieve individual fields or the whole image from HBase itself.
The example above stores only the rowID in Solr but indexes on all fields extracted from the image. Searching Solr in this scenario retrieves HBase row IDs, which you can then use to query HBase. This type of setup is ideal for Solr as it keeps storage costs low and takes full advantage of Solr’s indexing capabilities.
Sample Queries
Below are some example queries that can be done from the application into Solr. The idea is that client will initially query Solr indexes, returning the rowID from HBase. Then query HBase for the rest of the fields and/or the original raw image.
- Give me all documents that were filed between the following dates:
http://hbase-solr2-1.vpc.cloudera.com:8983/solr/mdds_collection/select?q=received:[2010-01-06T23:59:59.999Z TO 2010-02-06T23:59:59.999Z]
- Give me documents whose were filed under Mobile x-ray systems regulatory name:
http://hbase-solr2-1.vpc.cloudera.com:8983/solr/mdds_collection/select?q=reg_name:Mobile x-ray system
- Give me all documents that were filed from Chinese manufacturers:
http://hbase-solr2-1.vpc.cloudera.com:8983/solr/mdds_collection/select?q=submitter_info:*China*
The ids from Solr documents are the row IDs in HBase; the second part of the query will be to HBase to extract the data (including the raw PDF if required).
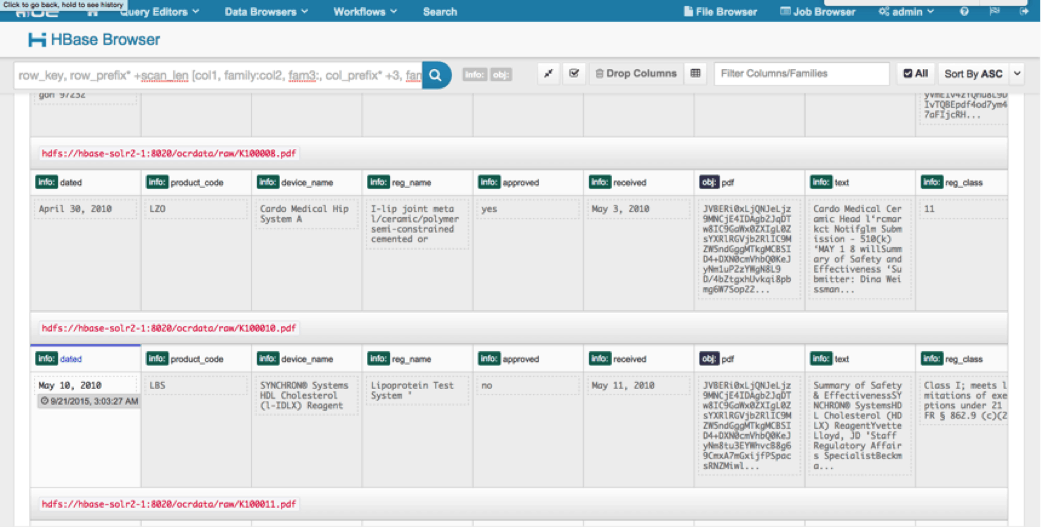
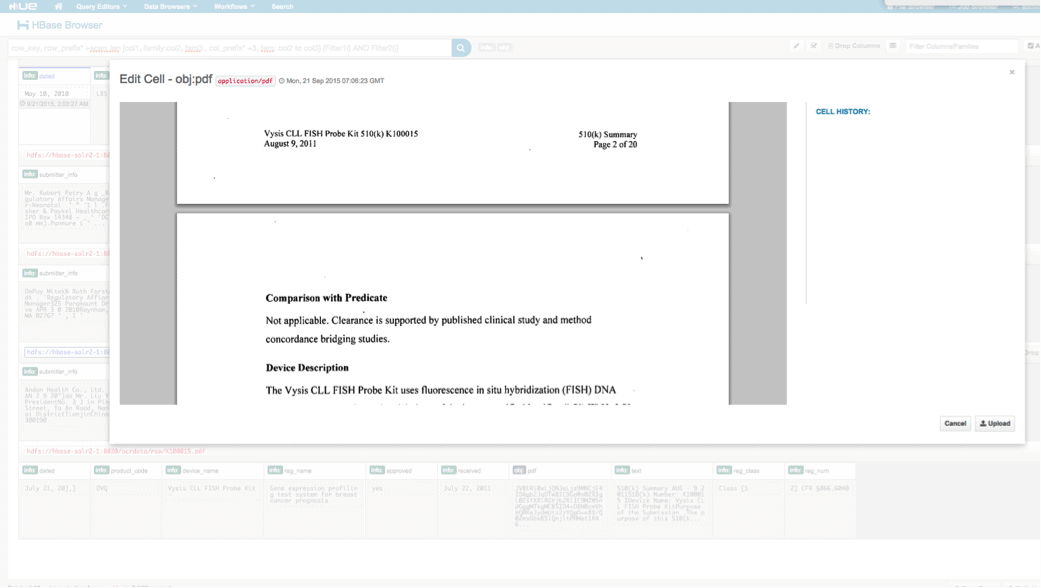
Access via HUE
We can view the uploaded data via the HBase Browser in HUE. One great thing about HUE is it can detect the binaries for PDF and render them when clicked on.
Below is a snapshot of the view of the parsed fields in HBase rows and also a rendered view of one of the PDF objects stored as a MOB in the obj column family.
Conclusion
In this post, we have demonstrated how to use standard open source technologies to perform OCR on scanned documents using a scalable Spark program, storing into HBase for fast retrieval, and indexing the extracted information in Solr. It should be apparent that:
- Given the message specification format, we can extract fields and value pairs and make them searchable via Solr.
- These fields from data can fulfill the IDMP requirements of making the legacy data electronic, which goes into effect sometime next year.
- The fields as well as raw images can be persisted in HBase and accessed via standard APIs.
If you find yourself in need of processing scanned documents and combining the data with various other sources in your enterprise, consider using a combination of Spark, HBase, Solr, along with Tesseract and Leptonica. It may save you a considerable amount of time and money!
Jeff Shmain is a Senior Solution Architect at Cloudera. He has 16+ years of financial industry experience with strong understanding of security trading, risk, and regulations. Over the last few years, he has worked on various use case implementations at 8 out of 10 world’s largest investment banks.
Vartika Singh is a Senior Solution Consultant at Cloudera. She has over 12 years of experience in applied machine learning and software development.
Editor's Choice