

Since childhood, we’ve been taught about the power of coalitions: working together to achieve a shared objective. In nature, we see this repeated frequently – swarms of bees, ant colonies, prides of lions – well, you get the idea.
It is no different when it comes to Machine Learning models. Research and practical experience show that groups or ensembles of models do much better than a singular, silver bullet model. Intuitively, this makes sense. Trying to model real-life complexity in a single relationship (i.e,. a single function) seems inaccurate. Typically there are many subdivisions (i.e., localized phenomena) that are present, which need to be learned effectively.
Why use Xgboost?
Recently, an algorithm called “Extreme Gradient Boosting” or Xgboost has received a lot of attention. It is often credited with wins in ML competitions such as Kaggle. It is a decision-tree-based model that creates hundreds of “weak learners,” e.g., trees that do not overfit the data. The final predictions or estimations are made using this group of trees, thereby reducing overfit and increasing generalization on unseen data. For an introductory understanding of Xgboost, please watch these videos from Josh Starmer of UNC-Chapel Hill.
Xgboost is a subject of numerous interesting research papers, including “XGBoost: A Scalable Tree Boosting System,” by the University of Washington researchers. In comparison, XGBoost is found to provide lower prediction error, higher prediction accuracy, and better speed than alternatives such as Support Vector Machines (SVMs), as shown in this research paper.
Since ML modeling is a highly iterative process, and real-world datasets keep growing in size, a distributed version of Xgboost is necessary. Research has shown Xgboost to have a great ability to linearly scale with the number of parallel instances. In this article, we will explore how to implement a parallel Xgboost on Cloudera’s Machine Learning platform (CML).
Our choice of the parallel framework: DASK
DASK is an open-source parallel computing framework – written natively in Python – that integrates well with popular Python packages such as Numpy, Pandas, and Scikit-Learn. Dask was initially released around 2014 and has since built significant following and support.
DASK uses Python natively, distinguishing it from Spark, which is written in Java, and has the overhead of running JVMs and context switching between Python and Java. It is also much harder to debug Spark errors vs. looking at a Python stack trace that comes from DASK.
We will run Xgboost on DASK to train in parallel on CML. The source code for this blog can be found here.
DASK or Spark?
The choice of DASK vs Spark depends on a number of factors that are documented here. To summarize:
- Spark is mature and all-inclusive. If you want a single project that does everything and you’re already on Big Data hardware, then Spark is a safe bet, especially if your use cases are typical ETL + SQL and you’re already using Scala.
- Dask is lighter weight and is easier to integrate into existing code and hardware. If your problems vary beyond typical ETL + SQL and you want to add flexible parallelism to existing solutions, then Dask may be a good fit, especially if you are already using Python and associated libraries like NumPy and Pandas.
DASK is fundamentally based on generic task scheduling. So it is able to implement more sophisticated algorithms and build more complex bespoke systems vs. Spark. DASK is best suited for enterprises where considerable Python code exists which needs to be scaled up beyond a single threaded execution.
We have observed Financial Services Risk Simulations as one use-case where it is particularly successful. From an algorithmic perspective, Xgboost on DASK has seen traction with many of our clients.
Parallel training using containers on CML
Our software architecture to train using parallel Xgboost is shown below. CML allows us to launch a container cluster on-demand – which we can shut down, releasing resources, once the training is finished.
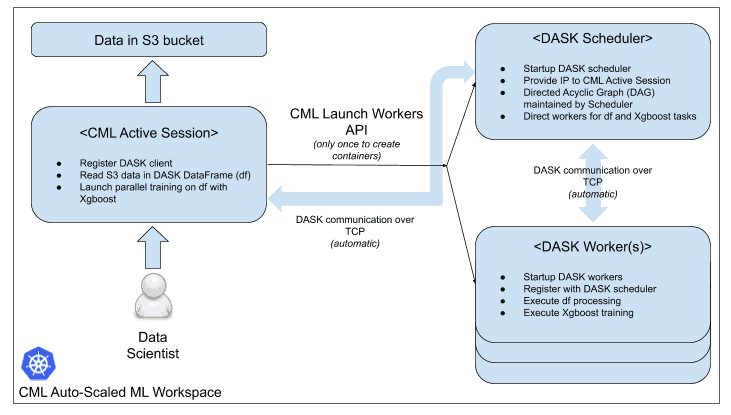
CML is a kubernetes environment where all containers, also known as engines, are run in individual pods. This provides full isolation and encapsulation of code running in each container, allowing data scientists to use different versions of packages and/or different languages across projects. CML allows custom docker images to be used for various engines. We built a custom docker image that uses CML engine image as a base with DASK pre-installed, in the same image. A simple dockerfile to build this is included in the github repo shared earlier.
We then launch a user session in CML and open up the DASK Xgboost notebook provided in the repo. This running user session serves as the DASK client and runs code related to data reading, dataframe manipulation, and Xgboost training. However, the actual work is done in distributed fashion by the launched containers in the DASK cluster.
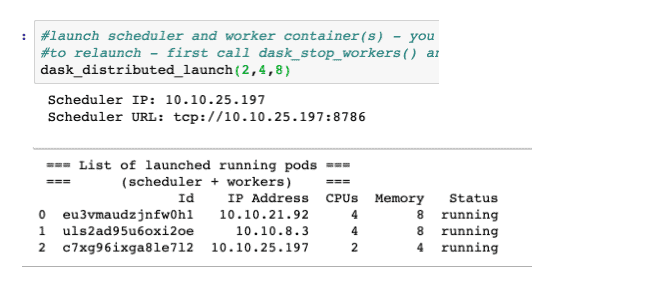
This notebook first launches the DASK cluster on Kubernetes via CML’s Launch_Workers API. A list of running containers is printed within the notebook for reference of the user – as shown below. Also included is the DASK scheduler container URL to register our client.
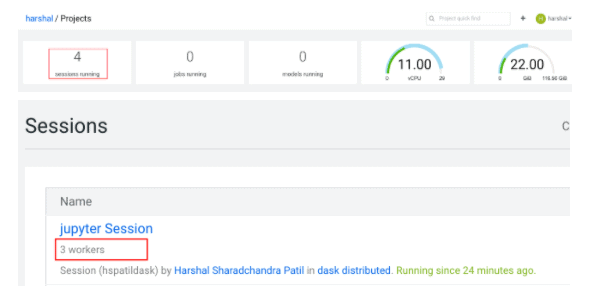
The data scientist will also be able to see a count of 1 active session + 3 active DASK containers on the projects screen. The sessions screen will show the 3 active dask containers as part of the running session. So, our DASK cluster is up and running!
Xgboost classification in parallel
Synthetic data generation
We want to run an Xgboost classifier to classify wines into three types based on their characteristics. The original dataset is from Scikit-learn which has only 178 rows. We generated a synthetic dataset of 8 million records based on this dataset to be used in our training.
The dataset generation is done by adding a small amount of random noise to observations to generate new observations.
First, we select an observation from the source dataset using a uniform distribution. This means that each observation always has an equal probability of being picked as the next record. It is the same as sampling with replacement.
The random noise is normal distribution with mean equal to 0 and standard deviation set to 1/100th of each feature’s own standard deviation. That way, we ensure that the original distribution remains unchanged while we get new observations with slightly different values. We keep the target variable as is and generate a new record.
This process is repeated 8 million times to get the necessary dataset. This dataset is then copied to an S3 bucket to be hosted for use in model training.
Distributed dataframe and model training
The data file is read from the S3 bucket into a DASK dataframe, which is a distributed dataframe. Due to the lazy computation model, the dataframe manipulations are built into a Directed Acyclic Graph (DAG) and executed only when an explicit compute() method is used.
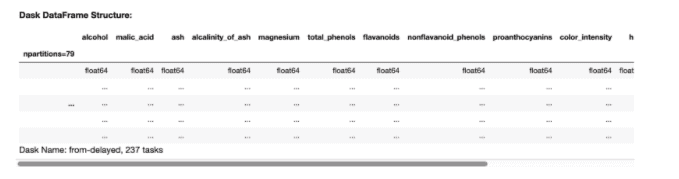
The dataframe has partitions which are processed in parallel. Each partition is in-fact a Pandas dataframe. So, DASK is effectively dividing the dataset into 79 smaller Pandas dataframes and processing them in parallel across multiple threads in the workers (2 in our case).
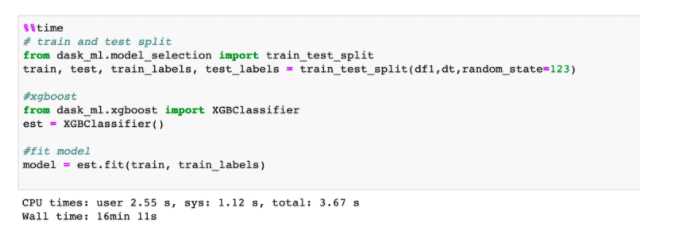
Xgboost training code follows similar syntax to Scikit-learn. The training job took us approximately 15 minutes to train in parallel, with 2 workers.
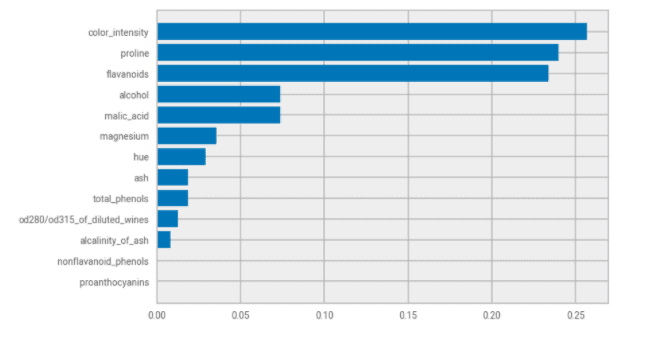
Once the model is trained, we are able to get model metadata and are able to apply this model using the predict method. One of the most insightful elements returned by the Xgboost classifier is the feature importance ranking in making a prediction. We are able to retrieve it and understand the most important features driving the classification, as shown in the chart below.
DASK dashboard
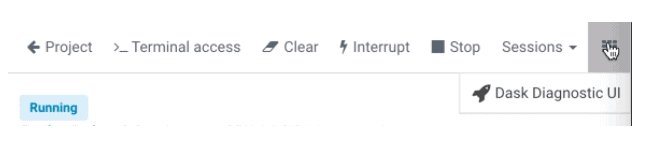
We are able to view the DASK dashboard run by the scheduler and peek into the execution of our training job. To achieve this, we need to change our architecture a bit. We need to launch the scheduler in a CML session using one of the Application ports. In the same session, we also use CML’s Launch_workers API to launch the DASK workers, as done previously. The DASK client is run in an entirely different session and is able to connect to the scheduler via IP address of the session. The Dask UI link is accessible, as shown below.
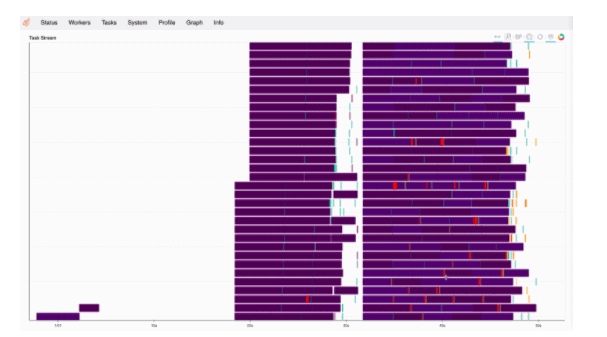
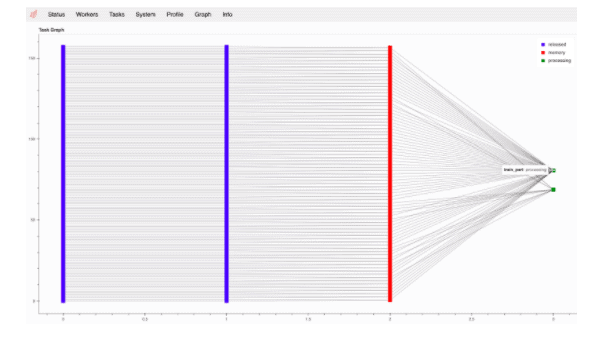
We are then able to look at the DAG execution for the Xgboost training. We are also able to look at all the distributed tasks running in parallel across time. Both are shown below.
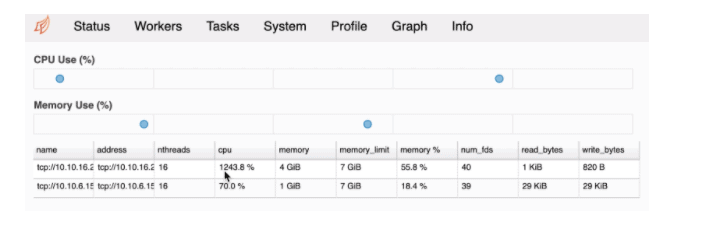
We can monitor the load on distributed worker containers and the usage of multiple threads as well as memory usage in each of the workers. Utilization of >100% for CPU indicates the multi-threaded nature of the execution. In the image below, you see an instance of 12 threads running in parallel on worker 1.
Conclusion
By now you should be eager to try this yourself. Find the code and demo videos in the Cloudera Community here, fire up your own instance of CML, and build some epic models using distributed training with DASK.For more details on how Cloudera can help with your machine learning journey, visit our website, and contact us anytime.
Editor's Choice


Hey Harshal,
Thanks a lot for this amazing tutorial. This makes it quite simple to try out dask.
I’ming cloudera data science work bench image base v3 in my organization and I understand that the notebook option is available for v8 and above.
So I’m trying to run the notebook code from a session instead .
When I run dask_distributed_launch I’m running into following error
schedulerip=x[“ip_address”]
Keyerror:’ipaddress’
Could you please guide me on this?
I really want to showcase how powerful cdsw+dask can turn out when playing with huge data sets
Thanks again for your explanation 🙂
So I did some further digging and this is what I found.
The json file returned from Cdsw.requests.get called under list_workers() doesn’t contain a key called ipaddress and hence the issue. Could you please suggest what can be done about it?
We ship the cdsw python package with the engines and currently, it’s not easy to get that specific piece upgraded. You should try to update your project to use a recent engine (in the Project Settings > Engines tab) or if that’s not possible because you are on an old product version then you should try to get your CDSW upgraded to 1.6+.
Engine v3 is very old, we shipped that with CDSW 1.2, it doesn’t support this.