

Background
We summarized the technical details about the Systems Security Services Daemon’s configuration and installation in the previous blog post: Best Practices Guide for Systems Security Services Daemon Configuration and Installation (Part 1).
Manual installation, configuration, and troubleshooting can be exceptionally time consuming and run the risk of inconsistencies because work needs be replicated individually on each host. This leaves us with one final question: How can these tasks be automated on all hosts?
One possible solution is Ansible [1]. It is a widely-used and accepted automation tool, which is part of the Red Hat distribution, and it provides integration with several Red Hat tools. It uses OpenSSH for transport. Ansible needs an inventory file that contains all managed hosts. This file can be either static or dynamically generated. We recommend applying an Ansible playbook for SSSD installation and configuration, and using Ansible ad-hoc commands for troubleshooting any possible issues.
Dynamic Inventory Script for Cloudera Manager
To make integration easier, Gabor Roczei created a dynamic inventory script that allows Ansible to gather data from Cloudera Manager. Its main advantages are:
- Cache management of inventory for better performance
- Cloudera Manager’s HTTP cookie handling
- Support for multiple Cloudera Manager instances
- SSL-friendly, as the root CA check of the Cloudera Manager server can be disabled or enabled
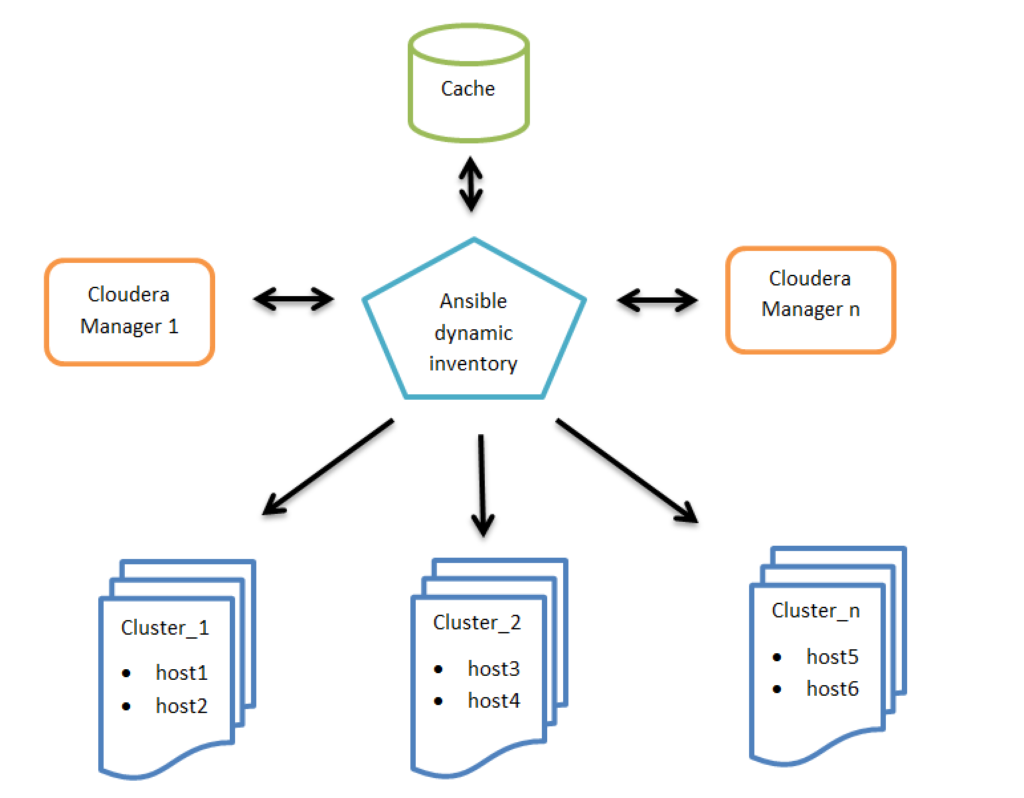
Figure 1: High level architecture of Ansible dynamic inventory vs. Cloudera Managers
Configuration
Step 1: Configuration of the related Cloudera Manager(s):
$ export CM_URL=https://cm1.example.com:7183,https://cm2.example.com:7183
$ export CM_USERNAME=username
Other optional configuration parameters:
$ export CM_CACHE_TIME_SEC=36000
$ export CM_DISABLE_CA_CHECK=True
$ export CM_TIMEOUT_SEC=60
$ export CM_DEBUG=False
Note: We recommend adding these environment variables to the startup file of your shell. For example: $HOME/.bashrc
Step 2: Installation of the git package:
# yum install git
Step 3: Installation of the Ansible package:
# yum install ansible
Step 4: Clone the cloudera-playbook git repository [2]:
$ git clone https://github.com/cloudera/cloudera-playbook
Note: The cloudera-playbook git repository is not officially supported by Cloudera, but the authors recommend using it.
Step 5: Set up the default Ansible inventory and other useful Ansible parameters [3]:
$ vi $HOME/.ansible.cfg
[defaults]
# Python 2 version:
inventory = $HOME/cloudera-playbook/dynamic_inventory_cm_py2
# Python 3 version:
# inventory = $HOME/cloudera-playbook/dynamic_inventory_cm_py3
# Do not gather the host information (facts) by default. This can give significant speedups for large clusters.
# gathering = explicit
# Disable key check if host is not initially in 'known_hosts'
host_key_checking = False
[ssh_connection]
# If it is True, make ansible use scp if the connection type is ssh (default is sftp)
scp_if_ssh = True
Note: Update the inventory path of the dynamic_inventory_cm_py2 if necessary
Step 6: Change the working directory to cloudera-playbook:
$ cd cloudera-playbook
Step 7: The available Cloudera Manager clusters (Ansible groups, such as Cluster_1, Balaton) can be listed with the following command:
$ ./dynamic_inventory_cm_py2 --list
Note: The cache of the Cloudera Manager inventory can be refreshed with the following command:
$ ./dynamic_inventory_cm_py2 --refresh-cache
Step 8: Setup the SSH public key authentication for remote hosts [4]:
The big advantage of this is that with ad-hoc commands, you do not need to enter your password each time you run the command, only the first time you enter the private key password.
If the ~/.ssh/id_rsa.pub and ~/.ssh/id_rsa files do not exist, they need to be generated with the ssh-keygen command prior to connecting to the managed hosts.
Launch a subshell with the following command:
$ ssh-agent bash
You will execute the rest of the commands in this How-To article in the subshell.
Add the SSH private key into the SSH authentication agent:
$ ssh-add ~/.ssh/id_rsa
Validate:
$ ssh-add -L
Upload the SSH public key (id_rsa.pub) to the managed hosts:
$ ansible all -m authorized_key -a key="{{ lookup('file', '~/.ssh/id_rsa.pub') }} user=$USER" --ask-pass -u $USER --become-user $USER
For example, you can use the root user:
$ ansible all -m authorized_key -a key="{{ lookup('file', '~/.ssh/id_rsa.pub') }} user=root" --ask-pass -u root
Note: If you do not want to use SSH public key authentication, add the ––ask-pass parameter each time you run the Ansible command.
Step 9: Test remote host connectivity (optional):
$ ansible all -m ping -u $USER --become-user $USER
For example, you can execute the command with the root user:
$ ansible all -m ping -u root
Step 10: The ad-hoc command feature enables running single and arbitrary Linux commands on all hosts. You can use this to troubleshoot slow group resolution issues.
The following commands are example ad-hoc commands where Balaton is a group of hosts that is a cluster in Cloudera Manager:
$ ansible all -u $USER --become-user $USER -o -m command -a "date"
$ ansible Balaton -u $USER --become-user $USER -o -m command -a "time id -Gn $USER"
The following example uses the root user:
$ ansible all -u root -o -m command -a "date"
$ ansible Balaton -u root -o -m command -a "time id -Gn testuser"
Further information about dynamic inventory and ad-hoc commands can be found in the Ansible documentation:
SSSD Setup with Ansible (Applicable for RHEL 7 / CentOS 7)
Step 1: Edit the default variables in group_vars/all:
krb5_kdc_type: Active Directory
krb5_kdc_host: w2k8-1.ad.sec.example.com
krb5_realm: AD.SEC.EXAMPLE.COM
ad_domain: "{{ krb5_realm.lower() }}"
computer_ou: OU=computer_hosts,OU=hadoop_prd,DC=ad,DC=sec,DC=example,DC=com
ldap_group_search_base: OU=groups,OU=hadoop_prd,DC=ad,DC=sec,DC=example,DC=com
ldap_user_search_base: DC=ad,DC=sec,DC=example,DC=com?subtree?(memberOf=CN=hadoop_users,OU=groups,OU=hadoop_prd,DC=ad,DC=sec,DC=example,DC=com)
override_gid: 999999
ad_site: Default-First-Site-Name
Step 2: Enable Kerberos on the hosts:
If necessary, update this template file (See the Ansible Templating (Jinja2) [7] documentation for more information):
templates/krb5.conf.j2
Run this command to apply it on the managed hosts:
$ ansible-playbook --tags krb5_client -u root site.yml
Step 3: Join the host(s) to realm:
If necessary, update these template files (See the Ansible Templating (Jinja2) [7] documentation for more information):
roles/realm/join/templates/sssd.conf.j2
roles/realm/join/templates/realmd.conf.j2
roles/realm/join/templates/nscd.conf.j2
Note: All of the main parameters in these templates have been explained in the previous SSSD blog article.
Run this command to apply it on all managed hosts:
$ ansible-playbook -u root realm_join.yaml
bind user: administrator
bind password:
Run this command to apply it on a cluster (for example: Balaton) (See the Ansible Best Practices [8] documentation for more information):
$ ansible-playbook --limit Balaton -u root realm_join.yaml
bind user: administrator
bind password:
Remove all hosts from the realm with this command:
$ ansible-playbook -u root realm_leave.yaml
Remove the Balaton hosts from the realm with this command (See the Ansible Best Practices [8] documentation for more information):
$ ansible-playbook --limit Balaton -u root realm_leave.yaml
Conclusions
The article demonstrated the power of Ansible, which streamlines the management of a large number of hosts. The SSSD installation and configuration provides an example of how multiple hosts can be managed in conjunction. It also enables faster troubleshooting of issues because no direct login is required for individual hosts.
Acknowledgments
This blog post was done in collaboration with many Clouderans. We would like to thank all the people who were involved, including Gabor Roczei, Matyas Orhidi, Gergely Tomka, Laszlo Stuber, Mubashir Kazia, Manish Maheshwari, Todd Grayson, Gabor Gyulai, Janos Kovacs, Tristan Stevens, Niel Dunnage, Manoj Shanmugasundaram, Georg Zigldrum, Alexandru Anghel, Gergely Nagy, Tom Wheeler, Coral Waters and Shelby Khan.
References
- https://docs.ansible.com/ansible/latest/user_guide/intro_getting_started.html
- https://github.com/cloudera/cloudera-playbook
- https://raw.githubusercontent.com/ansible/ansible/devel/examples/ansible.cfg
- https://docs.ansible.com/ansible/latest/modules/authorized_key_module.html
- https://docs.ansible.com/ansible/latest/dev_guide/developing_inventory.html
- http://docs.ansible.com/ansible/latest/intro_adhoc.html
- https://docs.ansible.com/ansible/latest/user_guide/playbooks_templating.html
- https://docs.ansible.com/ansible/latest/user_guide/playbooks_best_practices.html
Editor's Choice


An very usable note, here. Applicable for my next setup with multiple CDH/CM instances and a single security cache.