

As customers use Apache Hadoop clusters in ways other than through HUE and Hadoop Command Line Interface (CLI) and integrate it closely with the applications they develop, we often get asked how to access their secure Hadoop cluster from within the custom applications. Many customers use a service account in their application and access the cluster with a fixed service account. However, other customers would like to access as the end users who have authenticated to the application. In this blog we’ll talk about what options are available and show in detail how to access some Cloudera Hadoop cluster services from within a web application as the end user using Kerberos delegation with Microsoft Active Directory.
The primary form of strong authentication used on a secure cluster is Kerberos. Kerberos supports credentials delegation where a server process to which a user has authenticated, can perform actions on behalf of the user. This involves the server process accessing databases or other web services as the authenticated user. Historically the form of delegation that was supported by Kerberos is now called “full delegation”. In this type of delegation, the Ticket Granting Ticket (TGT) of the user is made available to the server process and server can then authenticate to any service where the user has been granted authorization. Until recently most Kerberos Key Distribution Center(KDC)s other than Active Directory supported only this form of delegation. Also Java until Java 7 supported only this form of delegation. Starting with Java 8, Java now supports Kerberos constrained delegation (S4U2Proxy), where if the KDC supports it, it is possible to specify which particular services the server process can be delegated access to.
Hadoop within its security framework has implemented impersonation or proxy support that is independent of Kerberos delegation. With Hadoop impersonation support you can assign certain accounts proxy privileges where the proxy accounts can access Hadoop resources or run jobs on behalf of other users. We can restrict proxy privileges granted to a proxy account to act on behalf of only certain users who are members of certain groups and/or only for connections originating from certain hosts. However we can’t restrict the proxy privileges to only certain services within the cluster.
What we are discussing in this article is how to setup Kerberos constrained delegation and access a secure cluster. The example here involves Apache Tomcat, however you can easily extend this to other Java Application Servers.
To illustrate an example of how Kerberos constrained delegation works, take an example of a web server that authenticates the user and then run some Impala queries on behalf of the user. The flow is presented in the diagram below.
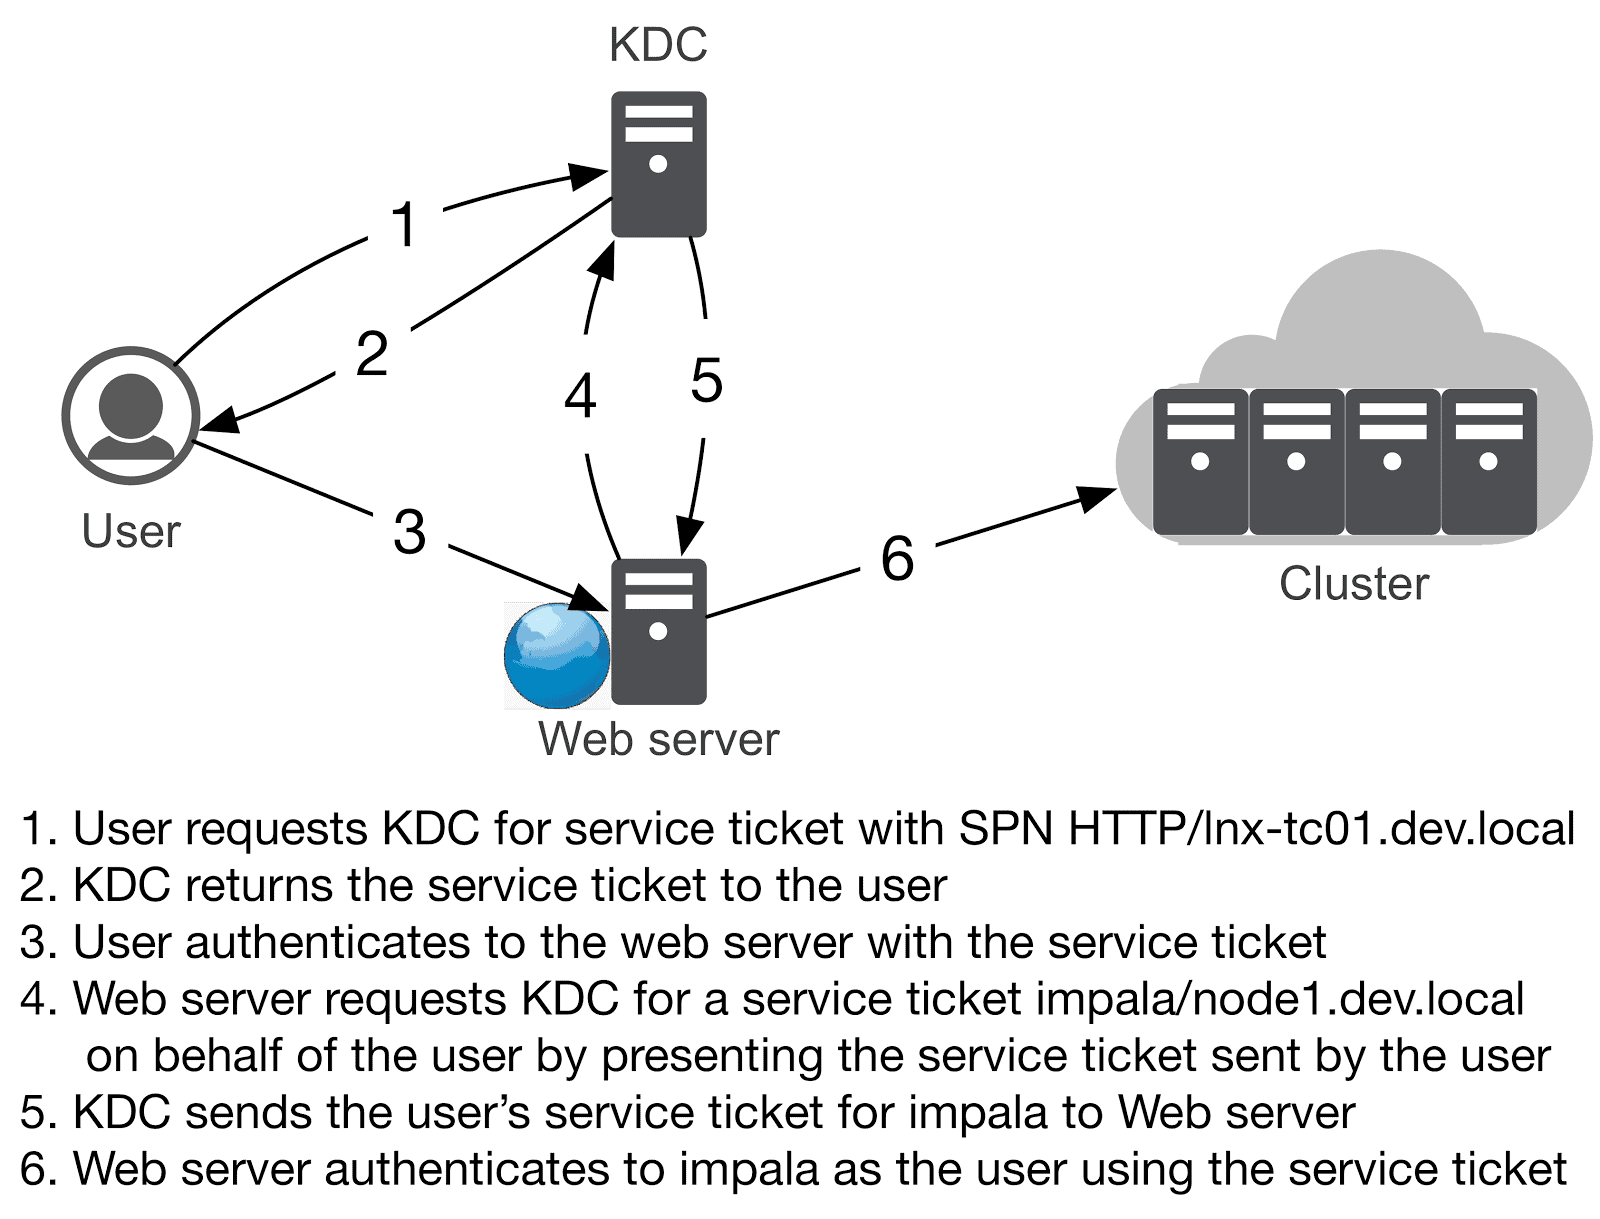 Since Kerberos constrained delegation is supported in Java 8 and above, the primary requirement is to use Tomcat 7 or above that can run on Java 8. In a web application the common Kerberos Authentication mechanism is SPNEGO. The user credential with which the user authenticated to the web application will them be used to access cluster services. We’ll first configure the web application to authenticate with SPNEGO. In Tomcat, SPNEGO Authentication can be implemented by a SPNEGO JASPIC module or by using the built-in SPNEGO Valve. For simplicity we’ll use the SPNEGO Valve in this example.
Configuring the Account
To begin we first have to create an account/principal in AD, associate a ServicePrincipalName (SPN) with it and create a keytab file for the same. If you are running this on a node in a Hadoop cluster, a principal for the HTTP service may have already been created. If an HTTP principal exists for the server where you are running Tomcat, skip the steps for creating the account, setting a principal and creating the keytab file. You can start with the step of creating constrained delegation. If not, follow the instructions below. Tomcat’s Guide has an example on how to setup and to associate an SPN with an account and create keytab file. After creating the account tc01 in AD, this example shows how to configure the SPN on the account and create the keytab file. The server on which tomcat is running is lnx-tc01.dev.local and the AD KDC realm is DEV.LOCAL. Execute these commands on the AD server:
Set the SPN with the command:
setspn -A HTTP/lnx-tc01.dev.local tc01
Create the keytab with the command:
ktpass /out c:\tomcat.keytab /mapuser tc01@DEV.LOCAL
        /princ HTTP/lnx-tc01.dev.local@DEV.LOCAL
        /pass tc01pass /kvno 0 /crypto ALL
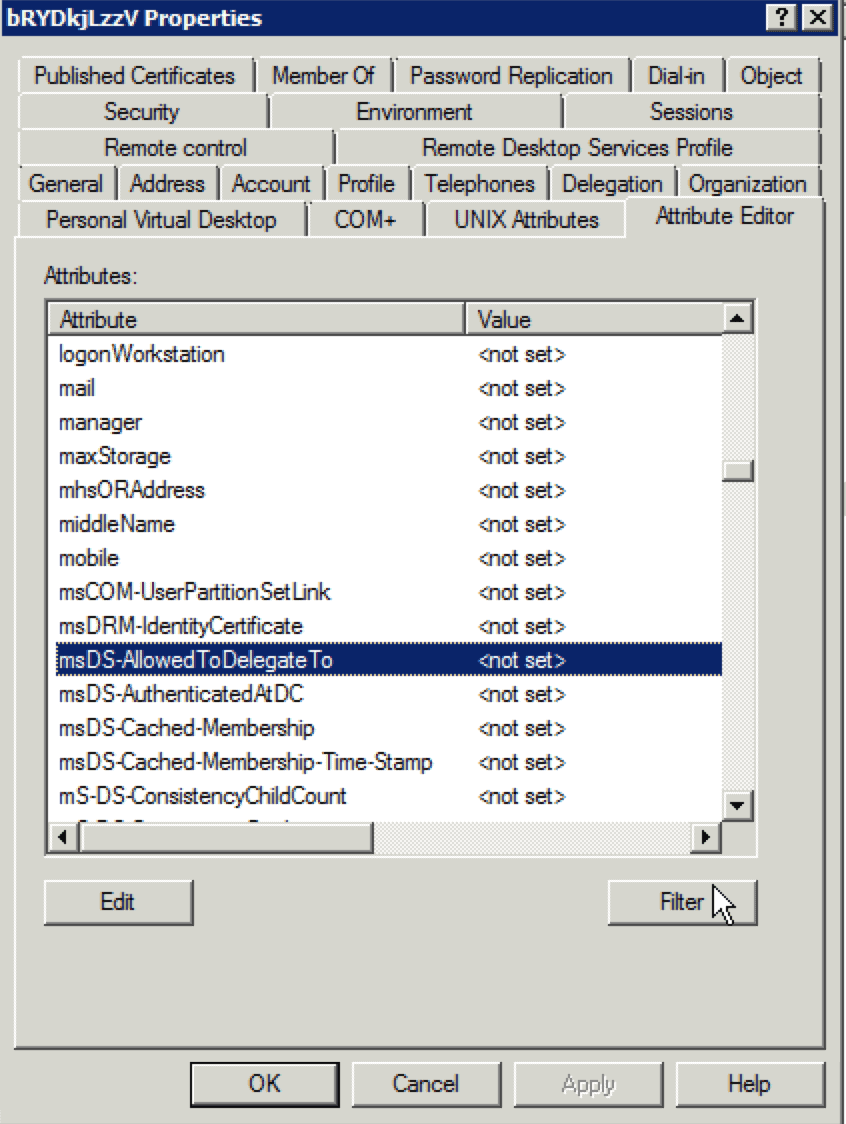
Next configure constrained delegations for the account. This should be configured for services that you want the Tomcat process to authenticate on behalf of the users. For example if you want to connect to an Impala instance running on dn1.dev.local then the constrained delegation would be for SPN impala/dn1.dev.local. (Tip: Configure a haproxy or a Load Balancer for impala so that you don’t have to configure constrained delegation for every impala node in the cluster. The constrained need to be configured for only the SPN of the haproxy or Load Balancer). If you want to connect to an Oozie instance running on edge1.dev.local then the SPN configured for delegation would be HTTP/edge1.dev.local. To configure constrained delegation use “Active Directory Users and Computer”, open up the account properties and use either the Delegation tab or the Attributes Editor tab. If Attributes Editor is used then the property to be modified is ‘msDS-AllowedToDelegateTo’. Here is how to use Attribute Editor:
Locate the account in Active Directory Users and Computer and open up the properties and navigate to Attribute Editor tab as shown. (The screenshots are from Active Directory 2008, if you use another version of Active Directory, the GUI controls may slightly vary)
Next, click on Filter and unselect Show only attributes that have values

Now locate msDS-AllowedToDelegateTo and double click.
 In the multi-valued String editor enter each SPN and click Add, Apply changes when done.
 The account is now configured for Tomcat to use constrained delegation.
Configuring Tomcat
The first step to configuring Tomcat is to copy Unlimited JCE policy files to the $JAVA_HOME/jre/lib/security directory of the JDK/JRE that runs tomcat. Next if TLS is in use on the cluster make sure the CA root certificate is present in $JAVA_HOME/jre/lib/security/jssecacerts. Next create krb5.ini and jaas.conf files. The krb5.ini file is the Kerberos configuration file which is commonly referred to as krb5.conf file on Linux and Unix systems. This file has configuration about the Kerberos realm and the KDCs servers of that realm. This file should be copied to $CATALINA_BASE/conf/krb5.ini. A sample of the file looks like this:
[libdefaults]
  default_realm = DEV.LOCAL
  dns_lookup_kdc = false
  dns_lookup_realm = false
  ticket_lifetime = 36000
  renew_lifetime = 604800
  forwardable = true
  default_tgs_enctypes = aes256-cts aes128-cts rc4-hmac
  default_tkt_enctypes = aes256-cts aes128-cts rc4-hmac
  permitted_enctypes = aes256-cts aes128-cts rc4-hmac
  udp_preference_limit = 1
  kdc_timeout = 3000
[realms]
  DEV.LOCAL = {
	kdc = dc1.dev.local
	kdc = dc2.dev.local
  }
[domain_realm]
  .dev.local = DEV.LOCAL
Next configure the jaas.conf file. The jaas.conf file configures which JAAS Login module to use, which principal/user to use and where the corresponding keytab file is located. This file should be copied to $CATALINA_BASE/conf/jaas.conf. A sample of the file looks like this.
com.sun.security.jgss.krb5.initiate {
   com.sun.security.auth.module.Krb5LoginModule required
   doNotPrompt=true
   principal="HTTP/lnx-tc01.dev.local@DEV.LOCAL"
   useKeyTab=true
   keyTab="/etc/tomcat8/tomcat.keytab"
   storeKey=true;
};

com.sun.security.jgss.krb5.accept {
   com.sun.security.auth.module.Krb5LoginModule required
   doNotPrompt=true
   principal="HTTP/lnx-tc01.dev.local@DEV.LOCAL"
   useKeyTab=true
   keyTab="/etc/tomcat8/tomcat.keytab"
   storeKey=true;
};
(Tip: Protect the keytab file so that the only user that has access to the file is the user running Tomcat.)
To configure Tomcat we have to setup a JNDI realm using AD to enable authorization for users who have authenticated. While this is strictly not necessary and you can manually configure roles and map the users to the roles, using AD for user to role mapping simplifies authorization management. The relevant configuration for using AD for role mapping looks like below. This goes into server.xml:
<Realm className="org.apache.catalina.realm.JNDIRealm"
    connectionURL="ldaps://dc1.dev.local:3269"
    userSubtree="true"
    userBase="dc=dev,dc=local"
    userSearch="(sAMAccountName={0})"
    userRoleName="memberOf"
    roleBase="OU=Groups,dc=dev,dc=local"
    roleName="cn"
    roleSearch="(member={0})"
    roleSubtree="true"
    roleNested="true"/>
</Realm>
By default the Tomcat SPNEGO valve does not do credential delegation. To configure Tomcat to do credential delegation, configure the following in server.xml
<Context docBase="spnego-test.war" path="/spnego-test">
<Valve className= "org.apache.catalina.authenticator.SpnegoAuthenticator" storeDelegatedCredential="true" />
</Context>
Configuring the Web App
The sample web app we’ll use is based on JSP. It’ll perform two functions. It connects to Impala and run queries and connects to Oozie and runs an Oozie job. We’ll use Cloudera JDBC Connectors for Impala to connect to Impala. The version of Cloudera Connector for Impala JDBC driver we need is 2.5.36 or greater. Download the Connector and unzip the jar files for JDBC 4.1. For connecting to Oozie we’ll use Apache HttpComponents. We’ll need HttpComponents version 4.4 or greater.
Create the following directory:
spnego-test/WEB-INF/lib
Copy the Connector jar files to spnego-test/WEB-INF/lib. You’ll see that Impala Connector is distributed with HttpComponents version 4.1 jar files. We’ll need to replace three jar files from the HttpComponents package: httpcore, httpclient and commons-codec. Copy these three files to the spnego-test/WEB-INF/lib directory.
Next configure the web.xml to use SPNEGO Authentication and configure the roles that’ll have access to this web app. This file is copied to spnego-test/WEB-INF. The relevant configuration section is shown below:
<login-config>
	<auth-method>SPNEGO</auth-method>
</login-config>
<security-role>
	<description>Users</description>
	<role-name>usersgrp</role-name>
</security-role>
<security-role>
	<description>Admins</description>
	<role-name>adminsgrp</role-name>
</security-role>
<security-constraint>
	<web-resource-collection>
    		<web-resource-name>Common Area</web-resource-name>
    		<url-pattern>/*</url-pattern>
    		<http-method>GET</http-method>
    		<http-method>POST</http-method>
    		<http-method>PUT</http-method>
    		<http-method>HEAD</http-method>
    		<http-method>TRACE</http-method>
    		<http-method>DELETE</http-method>
 	   	<http-method>OPTIONS</http-method>
	</web-resource-collection>
	<auth-constraint>
		<role-name>adminsgrp</role-name>
		<role-name>usersgrp</role-name>
	</auth-constraint>
	<user-data-constraint>
    		<transport-guarantee>NONE</transport-guarantee>
	</user-data-constraint>
<context-param>
      	<param-name>oozieUrl</param-name>
<param-value>https://edge1.dev.local:11443/oozie/v2</param-value>
</context-param>
<context-param>
      	<param-name>jdbcUrl</param-name>
<param-value>jdbc:impala://edge1.dev.local:21050;AuthMech=1;KrbRealm=DEV.LOCAL;KrbHostFQDN=edge1.dev.local;KrbServiceName=impala;SSL=1</param-value>
</context-param>
</security-constraint>
Next create the JSP files:
hello_spnego.jsp
This JSP is a basic test to see if the SPNEGO authentication works. If you access this JSP from your browser you should see the username you have logged into your computer.
<html>
<head>
   <title>Hello SPNEGO Example</title>
</head>
<body>
Hello <%= request.getRemoteUser() %> !
</body>
</html>
spnego_jdbc.jsp
This JSP allows you to specify conditions to query the table sample_08 in database “default.” The relevant code of this JSP is shown below
GSSCredential creds = (GSSCredential)request.getAttribute("org.apache.catalina.realm.GSS_CREDENTIAL");
Subject clientSubject = GSSUtil.createSubject(creds.getName(), creds);
This code gets the delegated credential and creates a Subject. The connection to the JDBC will be run within the security context of this subject and the credentials will be passed to the JDBC connection as shown below:
final Properties properties = new Properties();
properties.put("userGSSCredential", userCredential);
conn = Subject.doAs(subject, new PrivilegedExceptionAction<Connection>() {
   public Connection run() throws SQLException {
       return DriverManager.getConnection(jdbcUrl, properties);
   }
});
spnego_oozie.jsp
This JSP checks if it can successfully authenticate to Oozie and it allows you to submit a job to Oozie. Oozie is accessed with its REST interface using HttpClient. We set up HTTPClient for SPNEGO authentication and wrap the delegated credentials with KerberosClient class and set is as the credential for the HttpClient.
CredentialsProvider credentialsProvider = new
    BasicCredentialsProvider();
credentialsProvider.setCredentials(AuthScope.ANY, new
    KerberosCredentials(creds));
Registry<AuthSchemeProvider> authSchemeRegistry = RegistryBuilder
   .<AuthSchemeProvider> create()
   .register(AuthSchemes.SPNEGO, new
        SPNegoSchemeFactory(true)).build();

CloseableHttpClient httpClient = HttpClients.custom()
   .setDefaultAuthSchemeRegistry(authSchemeRegistry)
   .setDefaultCredentialsProvider(credentialsProvider).build();
Package the JSPs, the jar files in a war file and deploy the war to Tomcat.
Demo Time
If you are using IE or Chrome browser on Windows within the corporate network and the host where you run Tomcat is in the same DNS domain as your AD server then you are ready to test. If you are using Firefox or if the DNS of Tomcat host and AD is different then some additional browser configuration may be required. On a Mac make sure you have a valid Kerberos ticket and use Safari browser.
Navigate to http://lnx-tc01.dev.local:8080/spnego-test/hello_spnego.jsp. If you don’t see Hello followed by your username then check the Troubleshooting section before proceeding further.
The next test is for testing Impala. Navigate to http://lnx-tc01.dev.local:8080/spnego-test/impala_jdbc.jsp. This test queries Impala’s sample table salary_08 from the default database. You can enter a query condition such as “salary > 15000 order by salary desc”. Please be aware that this test does not demonstrate the best practices of writing web applications that query data from databases. As this code does not check for the input it is easily vulnerable to SQL injection attacks. The objective of this test is to merely demonstrate how to authenticate to impala with constrained delegation.
The final test is using constrained delegation to authenticate to a web application using SPNEGO. Navigate to URL http://lnx-tc01.dev.local:8080/spnego-test/oozie_spnego.jsp. In this case we are authenticating to Oozie and submitting an Oozie Job. The test will first check the status of Oozie and if it can successfully authenticate, it’ll give you the ability to submit a job. The code will merely submit the job and return the Oozie job id. It can be further enhanced to monitor the Job status and report if the Job ran successfully or not. This example can also be adapted to authenticate to other HTTP services such as WebHDFS/Httpfs etc.
Troubleshooting
If your hello_spnego.jsp test fails, then either the basic configuration of Tomcat SPNEGO Valve is incorrect or the browser needs additional configuration. To confirm if the Tomcat SPNEGO Valve is configured correctly, login to the host where you are running Tomcat and authenticate to AD using kinit. Then run the command
curl --negotiate -u : http://lnx-tc01.dev.local:8080/spnego-test/hello_spnego.jsp
If you don’t see your username in the output html then you have issue with your config, the Tomcat account or keytab used. To test the account, check if you can get a TGT using the keytab by running the command
kinit -kt tomcat.keytab HTTP/lnx-tc01.dev.local@DEV.LOCAL
Next check if you can get a service ticket for the SPN
kvno HTTP/lnx-tc01.dev.local
If both of these commands executes without any error, check your LDAP configuration by running
ldapsearch ldaps://dc1.dev.local:3269 -b "dc=dev,dc=local" "(sAMAccountName=<username>)"
ldapsearch ldaps://dc1.dev.local:3269 -b "cn=usersgrp,ou=Groups,dc=dev,dc=local" "member=<dn_of_end_user>"
If all of these tests run without issues check the browser settings.
If you are able to successfully run the hello_spnego.jsp test and either/both impala and Oozie test is failing then the issue could be the configuration of constrained delegation.
To enable further debugging enable Tomcat debug logging by editing $CATALINA_BASE/conf/logging.properties and adding the lines
org.apache.catalina.realm.level = ALL
org.apache.catalina.realm.useParentHandlers = true
org.apache.catalina.authenticator.level = ALL
org.apache.catalina.authenticator.useParentHandlers = true
Then restart tomcat. Check the log file catalina.<date>.log. Hopefully this should give you sufficient information on what is going on. Also check the references for further information.
Further Information
This configuration works when we enable our web app for SPNEGO and have constrained delegation configured. If we cannot enable SPNEGO for our web application but use some other form of strong authentication like SAML or a JASPIC module, we still can use constrained delegation. For this we first need to get an S4U2Self ticket. This is again available in Java 8. We first have to configure the Tomcat service account for Protocol transition. Next we use impersonate method of com.sun.security.jgss.ExtendedGSSCredential class. We have to use impersonate method of com.sun.security.jgss.ExtendedGSSCredential. We start by creating a GSSCredential of the service account of Tomcat, then creating a GSSName of the end user we want the S4U2Self ticket for, followed by casting the service credentials to ExtendedGSSCredential and calling the impersonate method by passing it the GSSName object created.
Here is a code snippet of how this is done.
try {
   GSSCredential creds = Subject.doAs(this.serviceSubject, new PrivilegedExceptionAction<GSSCredential>() {
       public GSSCredential run() throws Exception {
           GSSName other = manager.createName(someone, GSSName.NT_USER_NAME);
           return ((ExtendedGSSCredential)serviceCredentials)
                    .impersonate(other);
           }
       });
   return creds;
} catch (PrivilegedActionException pae) {
   throw pae.getException();
}
We can now use creds the same way we used delegated credentials previously.
Conclusion
We hope this gives a good understanding of the choices available to implement delegation to access a secure cluster and guideline to implementing some of these choices.
References
- Sample code
- Tomcat SPNEGO Valve documentation
- Additional information on configuring Tomcat SPNEGO Valve
- Impala JDBC Connector for Cloudera download
Editor's Choice